
Editing a Script
The Script Editor is where you define the Actions that the script performs. In addition, you define how the script will appear in the Script Dashboard and what values can be edited by the script user. To open the Script Editor, select a script in the Script Manager and select Edit. Figure 1.5 identifies the sections of the Script Editor.
Figure 1.5
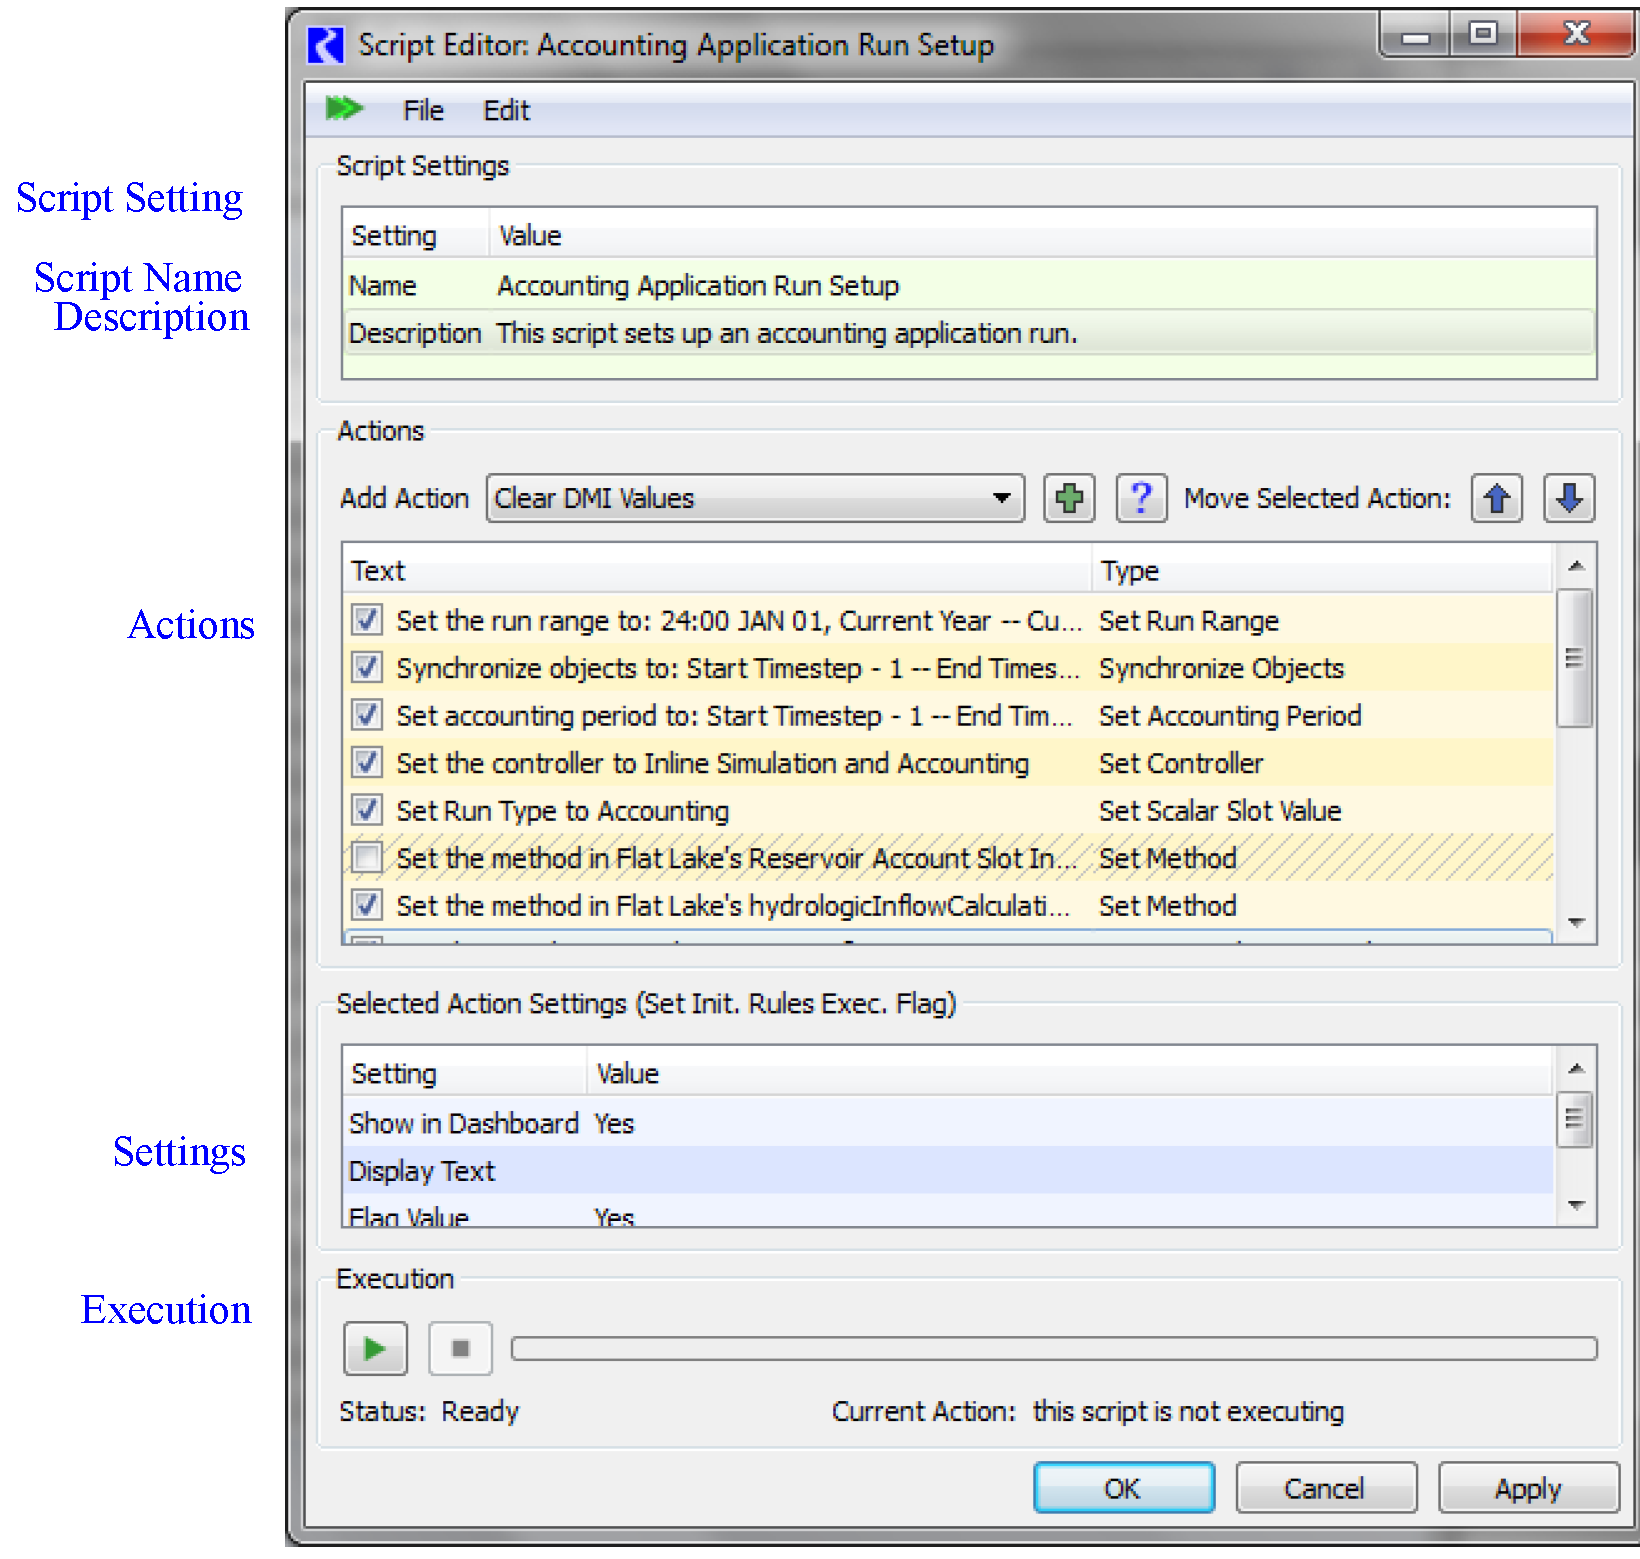
Script Settings
This set of items applies to the entire script and includes the following configuration:
• Script Name. The unique name of the script appears here and in the list of scripts in the Script Manager.
• Description Editor. Enter a description, if desired, that will appear in the Script Manager.
Actions panel
This is an ordered sequence of actions, each of which has one of the defined action types. Each item has either a default or user defined label and its type. E.g., Text: “Set the run range to:” Type: “Set Run Range”. Each action can be disabled (or enabled) using the checkbox.
Selected Action Settings panel
Each action type has two or more associated parameters, each of which has an associated setting. For example, an action of type Set Method has two standard parameters, Show in Manager and Display Text, and three specific parameters, Object Name, Category, and Method.
Execution panel
When creating and debugging your script, it may be more convenient to run the script from here than opening the Script Dashboard. Use the Start button to execute the script. The ability to run the script from the Editor is strictly for convenience while creating and editing the script. The interface and feedback for running a script is much better on the Script Dashboard; see Script Dashboard for details.
Using the Script Editor
This section describes how to use the Script Editor to define the script. This assumes you have created a new Script from the Script Manager. The Script Editor opens automatically for new scripts or select Edit to open an existing script.
1. Enter a meaningful name in the Name field.
2. Enter a description if desired.

3. Add an Action to the script; see About Action Types for a complete list of the available actions. Select Help  for a quick description of each action. Use the Add Action menu and select the desired action. When you select the action it will automatically add it to the script and select it.
for a quick description of each action. Use the Add Action menu and select the desired action. When you select the action it will automatically add it to the script and select it. 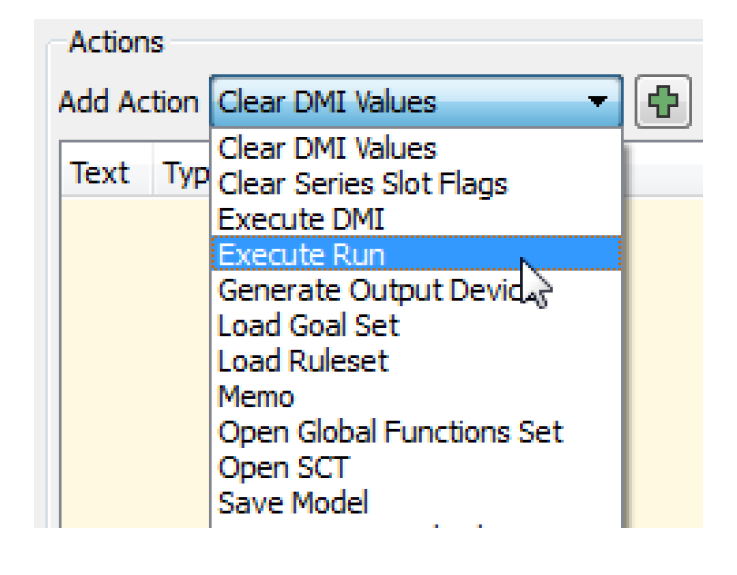
4. Configure that action. With the action selected, the Settings panel shows the available parameters. For example, in Figure 1.6, the Set Controller action is selected, so now the controller can be chosen from the list in the settings panel.
Figure 1.6
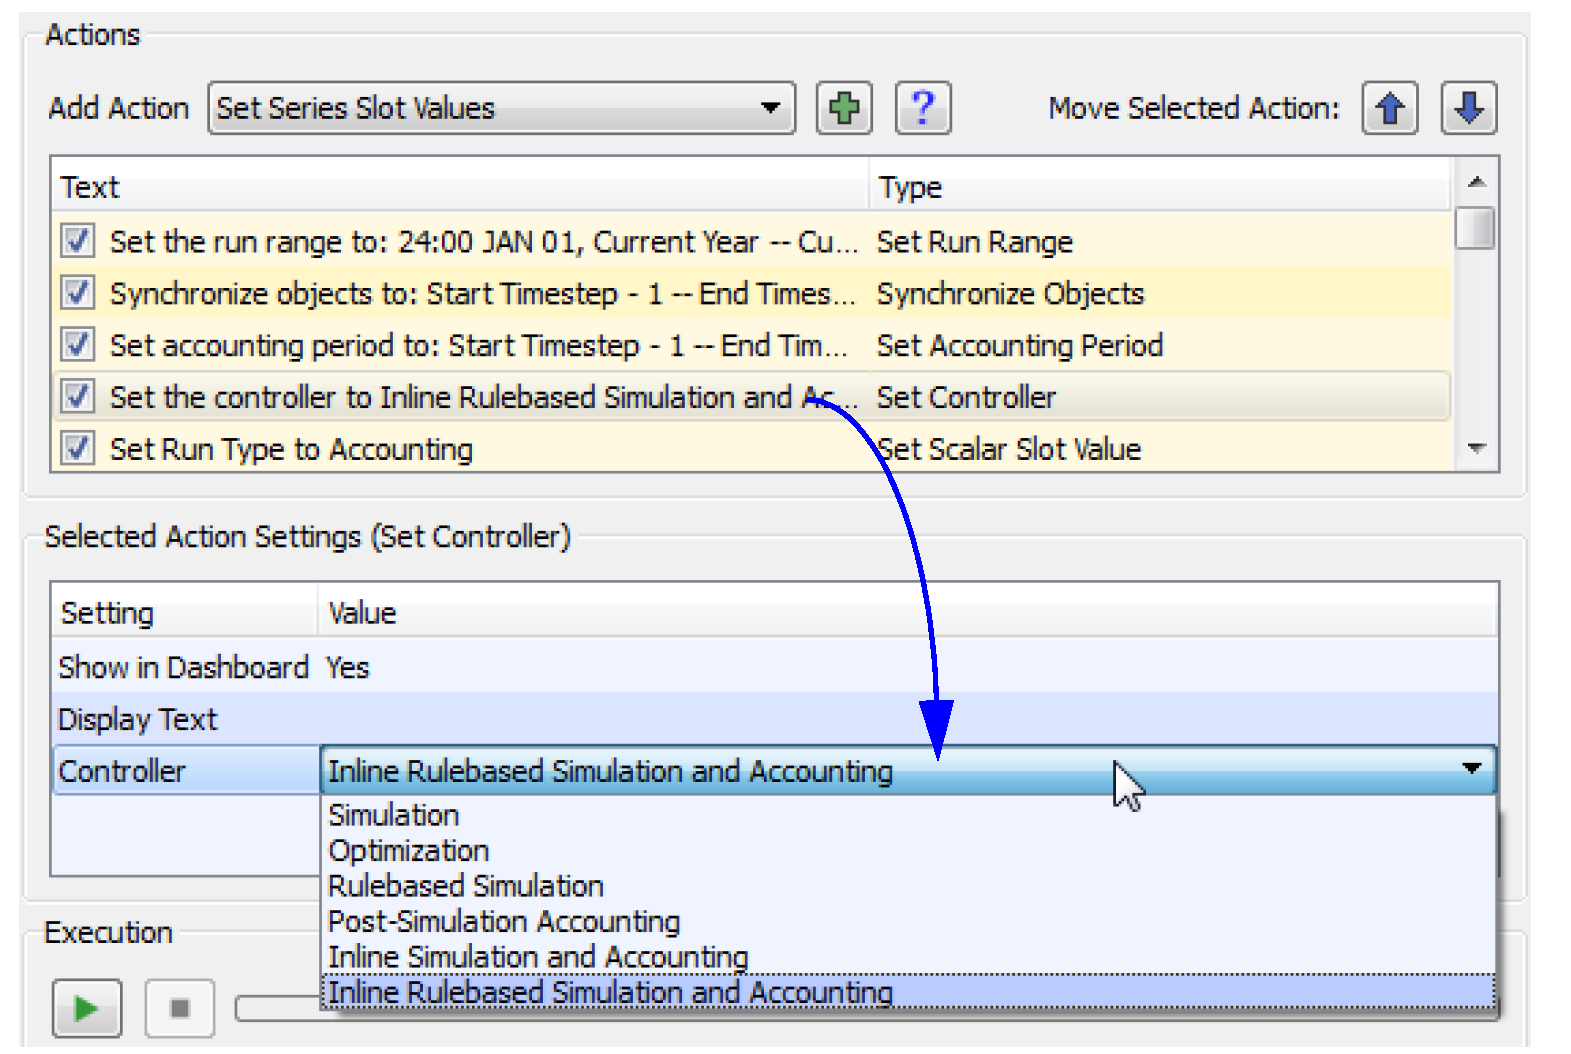
Each action has two or more settings that can be configured. For many of the settings, you provide a numeric value but can also specify that it is editable in the Script Manager. For example, you may use the Set Scalar Slot Value action to set a model trigger. You can specify that the value should default to 0 in the script but allow the user to override the default and use a slider bar in the Script Manager to change the value. See Configuring User Control on the Script Dashboard for details on this type of configuration.
6. Use the arrows  to rearrange the actions as necessary. They will execute in order from top to bottom.
to rearrange the actions as necessary. They will execute in order from top to bottom.7. Once you have the script defined. consider what text to be show on the Script Manager. Use the Show in Manager and Display Text, to modify whether the setting is shown and if so, the text that is displayed, respectively. See Common Settings for Action Types for details. In addition, you can disable actions using the check boxes. This is enabled/disabled setting is shown on the dashboard but can be re-enabled there too. See Common Settings for Action Types for details.
8. Select OK to apply the changes and close the dialog.
About Action Types
Table 1.1 describes the types of actions. Within the Script Editor, select Help for a quick reference of the actions. Each action type also has a link to additional information on its settings. See Action Type Settings Reference for details about the settings.
Action Type | Description | Link |
|---|---|---|
Clear DMI Values | Clear the values set by a DMI (by using the DMI invocation manager functionality) | |
Clear Scalar Slot Values | Clear the values on a set of Scalar Slots (i.e. set them to NaN). | |
Clear Table Slot Values | Clear certain values on a set of Table slots (i.e. set them to Nan). | |
Configure MRM Index Sequential | For the specified MRM configuration, modify the configuration in terms of Index Sequential. | |
Configure MRM Input DMI | For the specified MRM configuration, modify the configuration in terms of Input DMIs, particularly the repeat count. | |
Configure MRM Output | For the specified MRM configuration, modify the configuration in terms of the Output. | |
Create Slot Cache | Create a slot cache of workspace series slot values. | |
Create Snapshot | Create a Snapshot of the specified slots. | |
Divider | Create a different colored row in the Script Editor and Script Dashboard to visually separate actions. | |
Enable Dispatching | Enable or disable dispatching of the specified objects. | |
Enable MRM Distributed Runs | For the specified MRM configuration, specify whether to distribute concurrent runs to multiple processors on the same machine. | |
Enable RPL Item | Enable or disable a RPL item (policy group, rule, method, or goal) | |
Evaluate Expression Slots | Evaluate a set of expression slots. | |
Execute DMI | Invoke a DMI or DMI group. | |
Execute MRM Run | Execute the specified MRM configuration. | |
Execute Run | Run the model. | |
Execute Script | Execute a script from within a script. | |
Generate Output Device | Generate the specified Output Device. This could be a file based device like a Model Report or a graphical device like a Plot Page. | |
Global Time Scroll | Scroll time and series displays to the specified symbolic date/time. | |
Load Goal Set | Open and load a goal set (for Optimization runs). | |
Load Ruleset | Open and load a ruleset (for Rulebased Simulation runs) | |
Memo | Pause script execution and optionally open a confirmation dialog with your user specified message. While script execution is paused, you can interact with RiverWare or other applications in ways not directly supported by scripts. Select the script Start button to resume the script execution. | |
Open File | Open the specified external file, for example an Excel file or Word document. | |
Open Global Functions Set | Open a global function set. | |
Open Object | Open the specified objects. | |
Open SCT | Open an SCT with the specified filename. | |
Open Slots | Open the specified slots. | |
Remove RPL Set | Remove a selected RPL set from the model. An RBS Ruleset or Optimization Goal set is unloaded and closed, a Global Function Set is closed, and the Initialization Rules Set is cleared. | |
Reorder RPL Set | Reorder the items (rules, goals, statements) in a RPL set according to priority or index defined on the specified table slot. | |
Replace Initialization Rules Set from File | Replace the existing Initialization Rules Set from a file. | |
Save Model | Save the model to a file. | |
Set Account Method | Set the selected method in one of an account’s method categories. | |
Set Accounting Period | Set the time range of the accounting system (i.e., the Begin Accounting Period and End Accounting Period dates). | |
Set Controller | Set the current controller. | |
Set Dataset File | Set the DSS file for a DSS dataset, or the Excel workbook for an Excel dataset. | |
Set Excel Dataset Run Name | For the specified Database DMI Excel Dataset, set the run name type and/or specify a new single run name. | |
Set Init. Rules Exec. Flag | Set the “Execute Initialization Rules” run control flag. This flag controls whether or not the initialization rules are executed as part of each run. | |
Set Method | Set the selected method in the specified category for a set of objects. | |
Set MRM Descriptor | For the specified MRM configuration, set the specified keyword, value pair MRM Descriptor. | |
Set MRM Ruleset | In a given MRM configuration, set a new file path to a ruleset. | |
Set MRM Run Range | Set the time range of the run (i.e. the Run Start and End dates) for the specified MRM configuration. | |
Set Run Range | Set the time range of the run (i.e. the Run Start and End dates). | |
Set Run Timestep | Set the timestep size of the run (E.g 1 Hour, 1 Day, 1 Month, 1 Year). Options are included to specify how to synchronize and optionally aggregate data. | |
Set Scalar Slot Value | Set one or more Scalar Slots values. | |
Set Series Slot Flags | Set the specified flag (input or output) on a set of series slots within the specified time range. | |
Set Series Slot Input Mode | Set the Input Mode for one or more Series Slots with Periodic Input | |
Set Series Slot Periodic Values | Set the periodic values of a Series Slot with Periodic Input | |
Set Series Slot Values | Set Series Slot’s values within a time range. | |
Set Table Slot Value | Set a single Table Slot’s value at the specified row and column. | |
Synchronize Objects | Set the time range for the specified objects. | |
Synchronize Slots | Set the time range for the specified slots. |
Common Settings for Action Types
An action is controlled by user settings. Actions of all types have the following settings.
• Show In Dashboard. This is a Yes/No value that controls whether the action is listed in the Script Dashboard.
• Display Text. This brief text identifies the action. This text is, for example, shown in the dashboard. If the field is empty, default text will be automatically generated based on the action type.
• Enabled/Disabled. Each action has a check box next to it which determines whether it is enabled or disabled in the script editor. This setting is also used to indicate whether the action starts as enabled or disabled in the script dashboard, although it can be overridden in the dashboard.
Setting Information
The following sections provide more information on certain settings or on settings that are shared by many actions that have additional controls.
Datetime Information
Datetimes in a script can be specified either as absolute values or a symbolic values. There are two slightly different interfaces, but both have essentially the same functionality. Depending on the action and whether it is the editor or dashboard, one of the following interfaces will be used.
Note: The current menu is being transitioned to the updated menu. Common functionality has been highlighted in Figure 1.7.
Figure 1.7
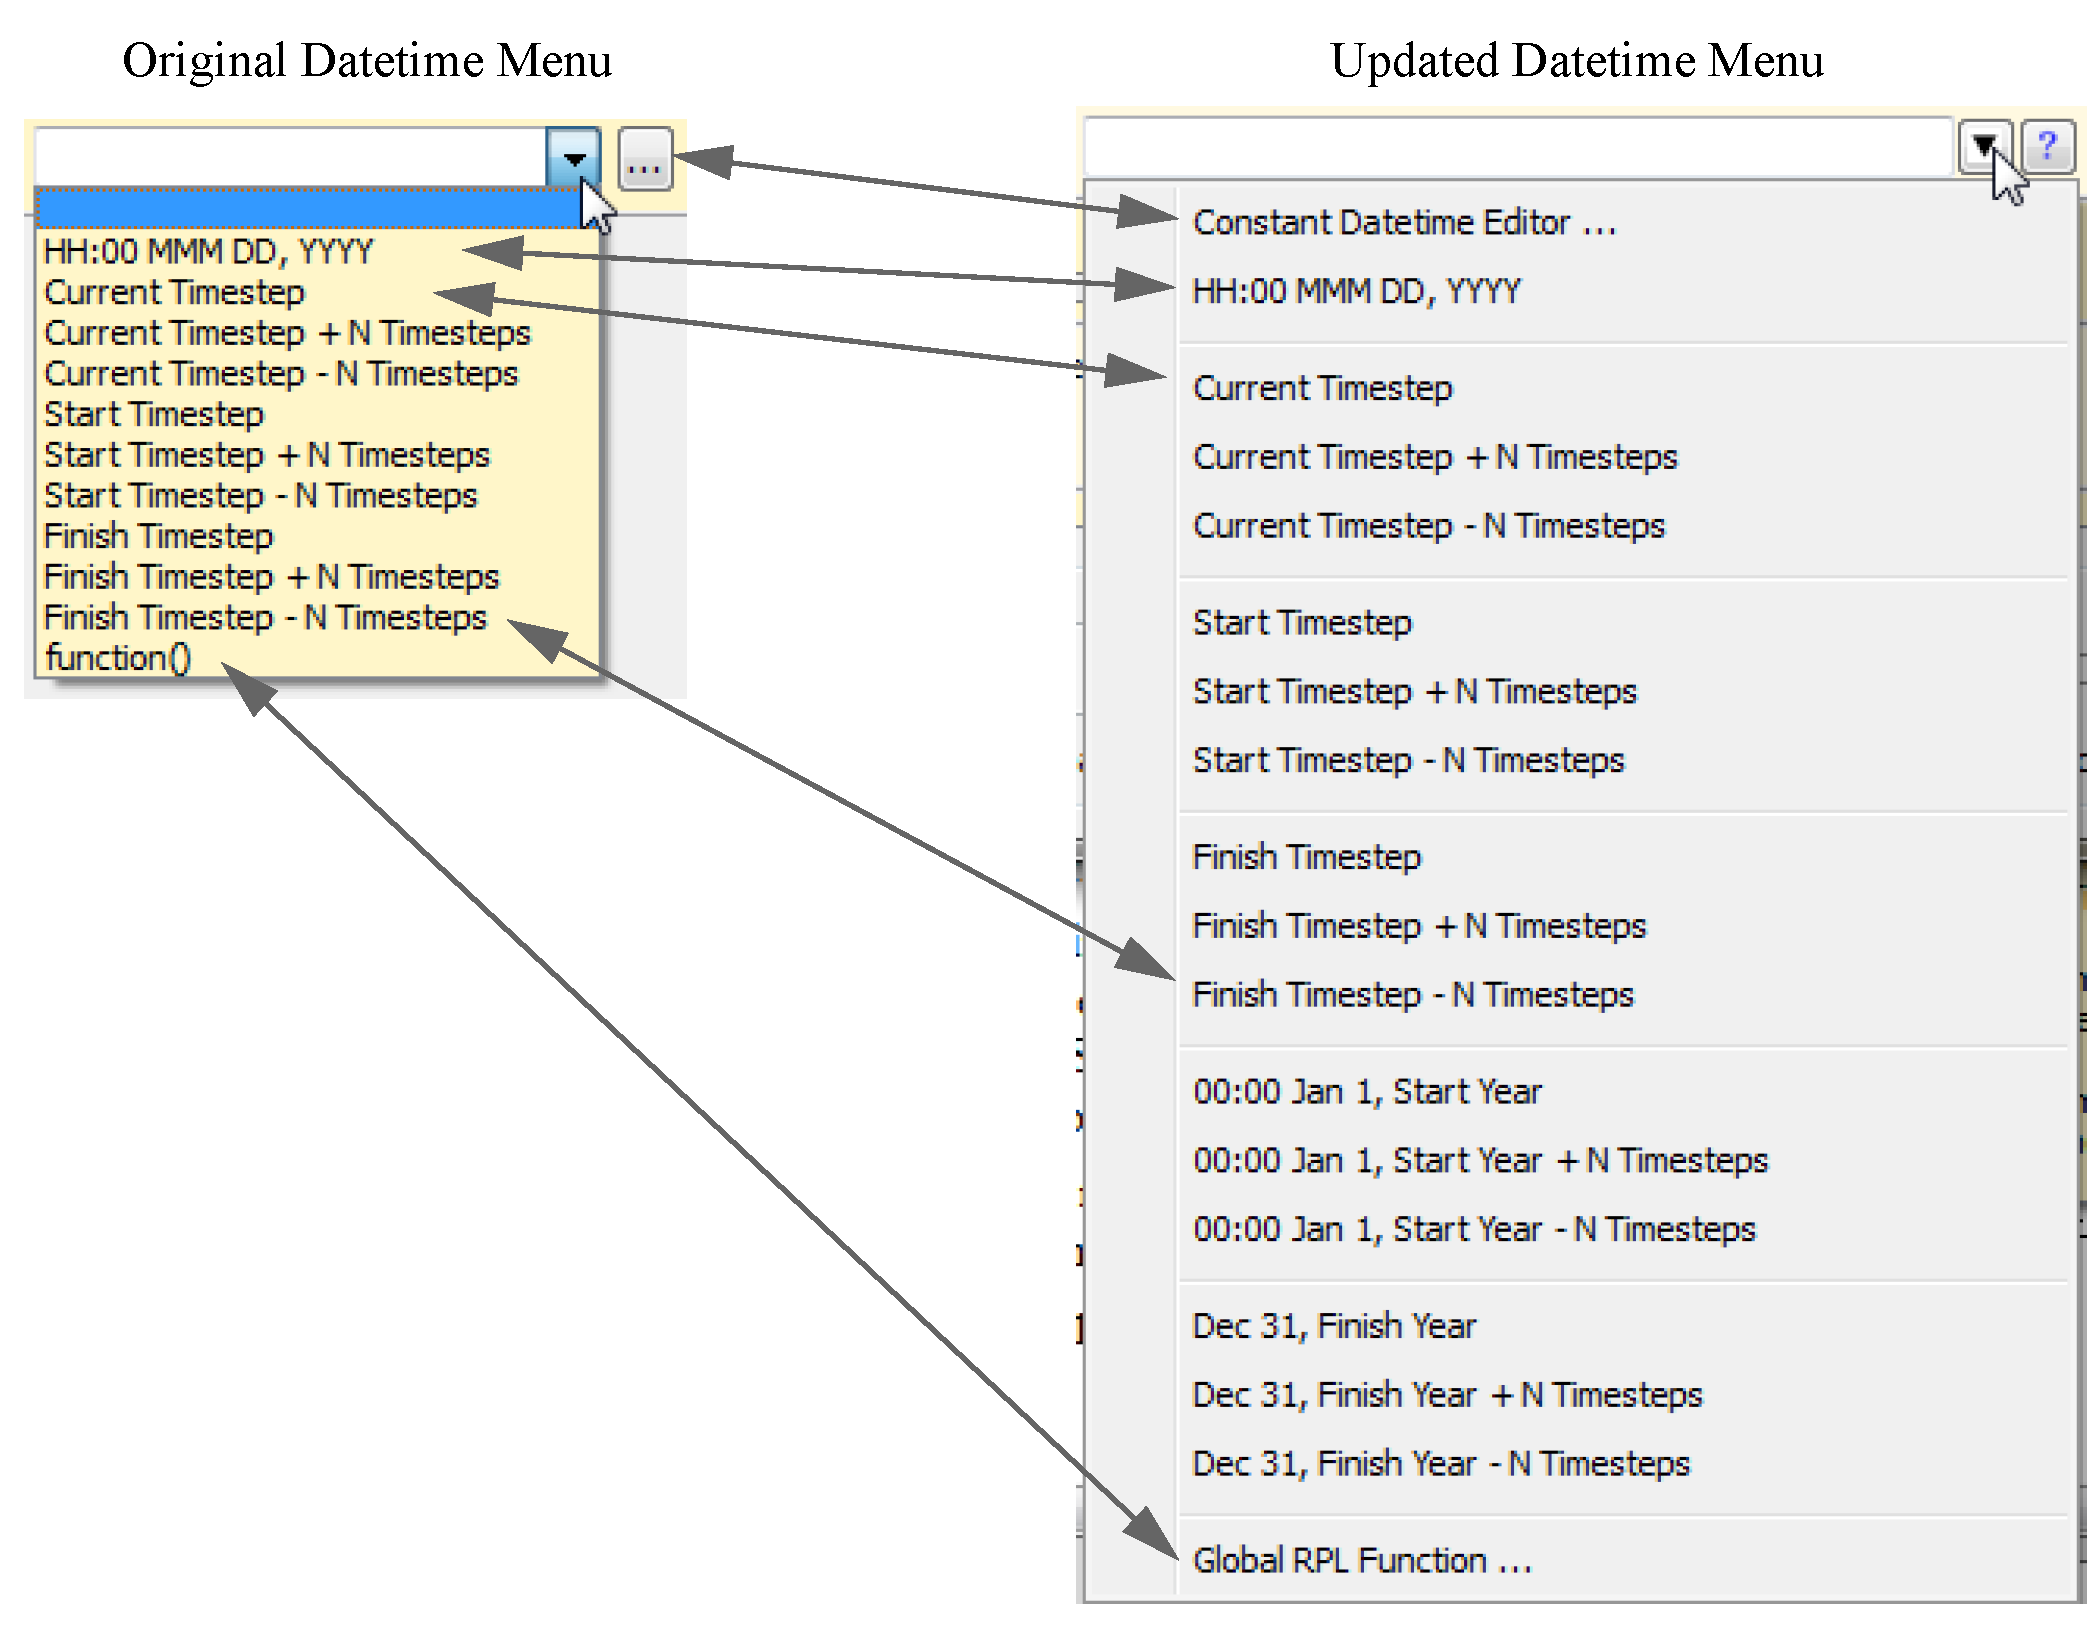
Following is additional information on each of these ways to specify the datetime.
• Choose a Datetime. Use the datetime spinner by selecting the More button or the Constant Datetime Editor option. This opens the Date/Time selector.
Note: This uses the model timestep size.

• Type a Datetime. Enter a date by typing. Use the HH:00 MMM DD, YYYY as a guide: Hour (H), Month (M), Day (D), Year (Y).
• Specify the Datetime Symbolically: Use one of the options shown and specify any of the pieces necessary like integers “N”, Hour (H), Month (M), Day (D), Year (Y). On the updated menu, select Help for details on the symbolical datetimes. Basically, any fully specified datetime can be used. See DATETIME in RiverWare Policy Language (RPL) for details.
Note: No @ or quotes “ ” are necessary when specifying the datetimes. In this context, “Current Timestep” means the machine/operating system time, rounded up to a controller timestep. So if you are running the script at noon on the 4th of July, 2014 in a model with a 1 Day timestep, “Current Timestep” would return 24:00 July 4th, 2014.
• Use a Global Function: To allow additional flexibility specifying datetimes, you can specify a RPL function from an opened Global Function Set; see Global RPL Functions in RiverWare Policy Language (RPL) for details. You can type in the name of the function (original menu) of the form function() (see note below) or choose it using a selector (updated menu). This function must return a fully specified DATETIME variable
Note: Datetimes stored on slots cannot be set to NaN as an override on the dashboard, but can be configured to be set to NaN from the Script Editor.
Note: Originally, you could set a datetime to a RPL function using the function() notation on the Script Editor. Functions specified this way are still supported. But for new scripts or any edits, functions should be specified by changing the “Set by” setting to Function and choosing the function from the selector.
Filename Information
Filenames can be entered manually or chosen using the file chooser. You can specify files using environment variables using the $VARIABLE syntax.
RPL Reorder Set Action
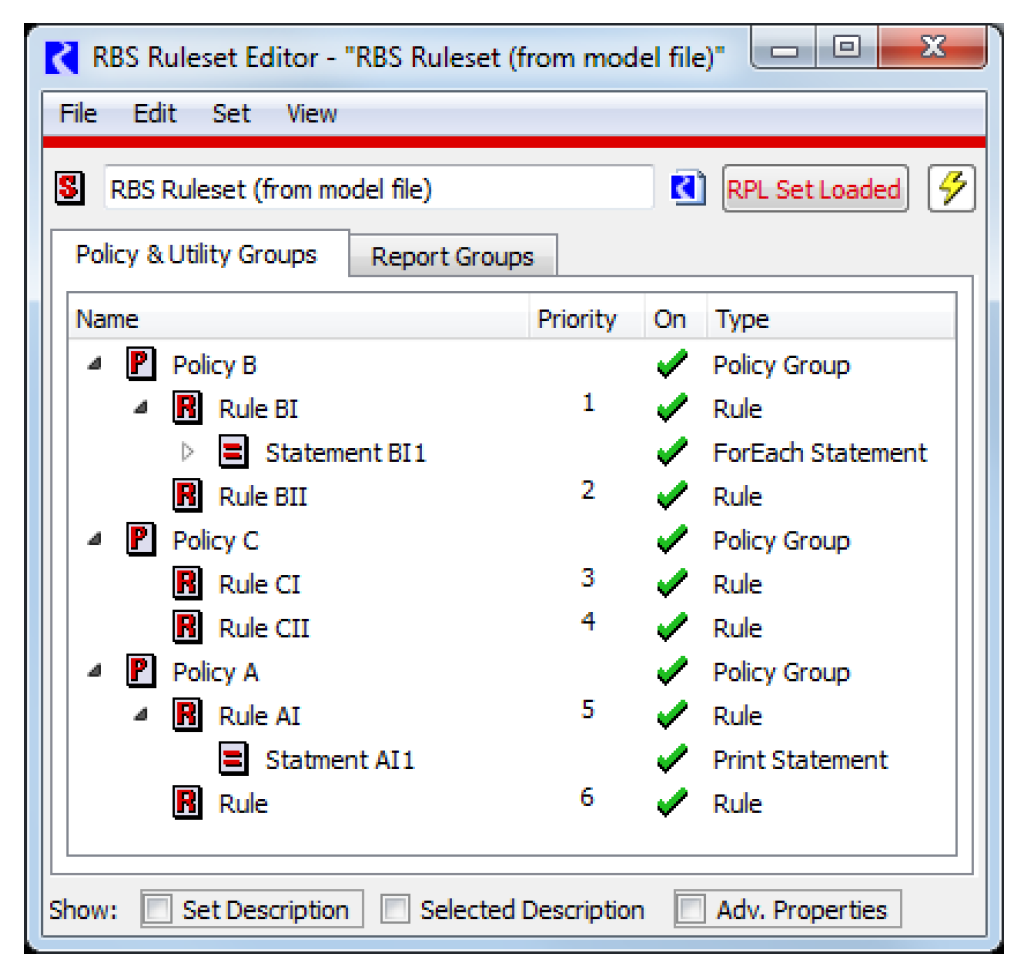
This action allows you to reorder items (rules, goals, groups, or even statements within the specified set. The new order is specified on a table slot. Following is an example that shows the use of this action. Figure 1.8 shows the ruleset before the script is executed.
Note: Statements are shown using the View menu.
Figure 1.8
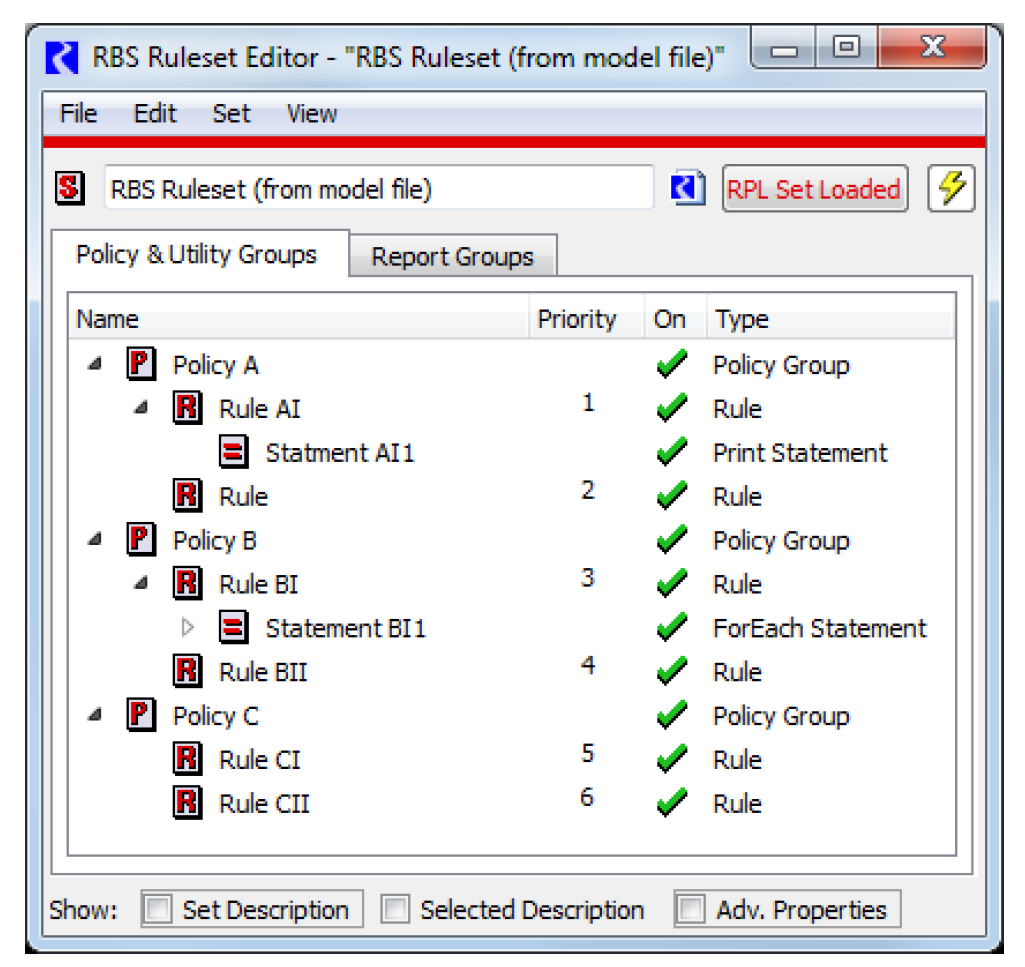
Figure 1.9 shows the specified table that describes the desired ordering. The row labels must match the names of the items in the set.
Figure 1.9
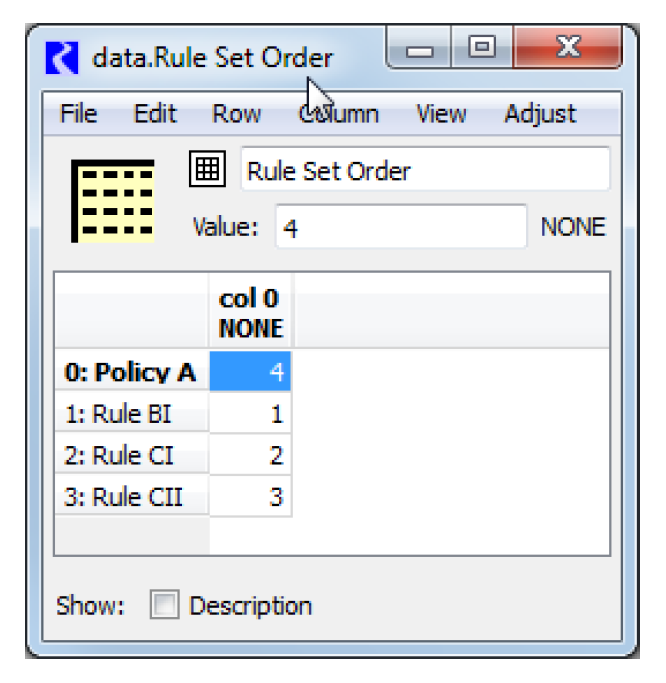
Figure 1.10 shows a text description of this reordering.
Figure 1.10
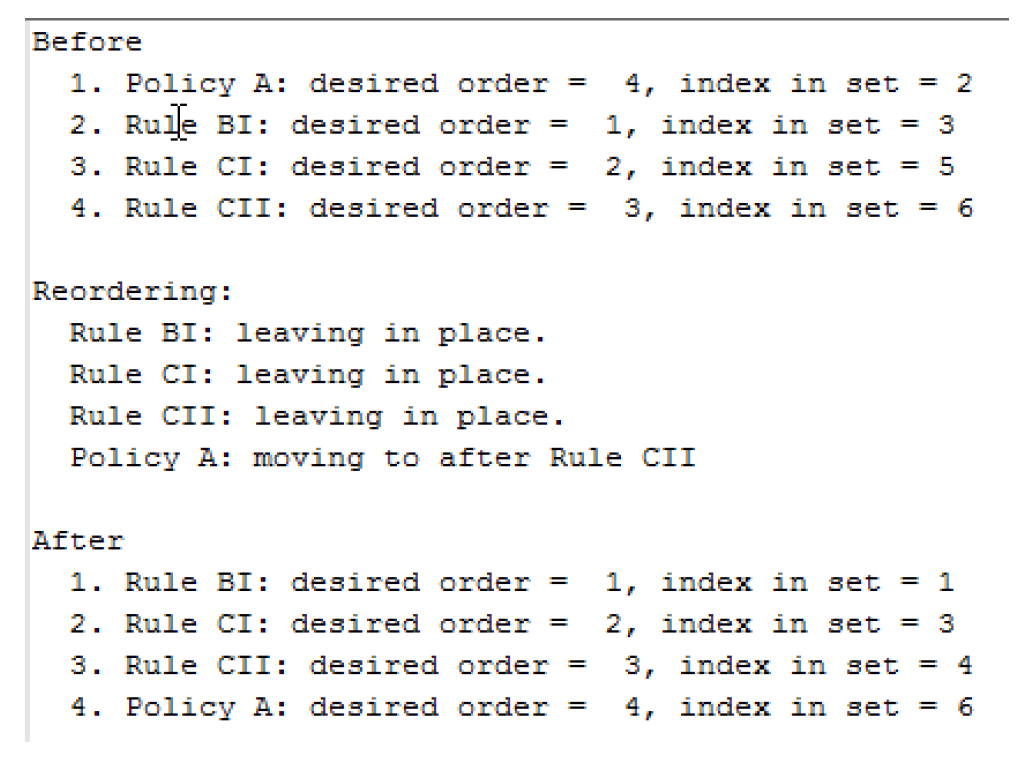
Figure 1.11 shows the ruleset after reordering.
Figure 1.11
Setting Slot Values
This section contains important information on the following actions that set slot values in the model:
Configuring User Control on the Script Dashboarddescribes how to configure user controls on the dashboard. Then, see Setting Slot Values using a Global Function for more information on setting numeric values using a global function.
Configuring User Control on the Script Dashboard
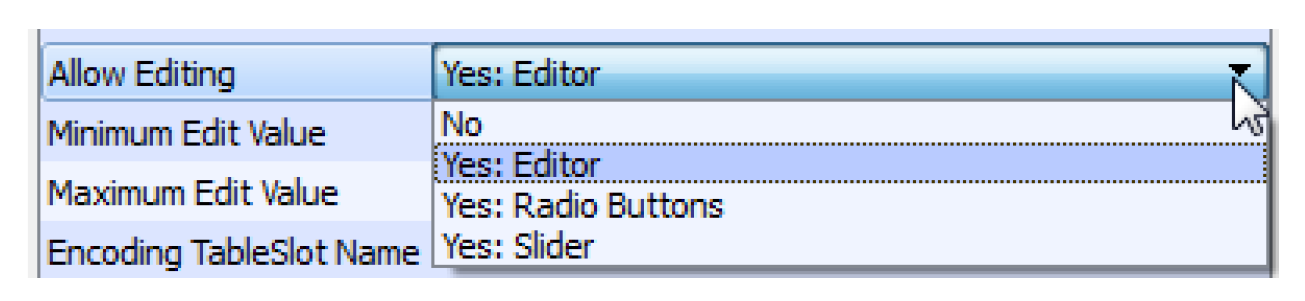
This section applies when the “Set by” setting is using “Values” For actions that set values in the model (Set Scalar Slot Value, Set Series Slot Values, Set Table Slot Value), you can either specify the value to set or give a default, but allow the user of the script to override that value. This section describes configuring the action so that the user can modify the value using either a value editor, radio buttons or a slider. These are controlled by the settings shown in Figure 1.12.
Figure 1.12
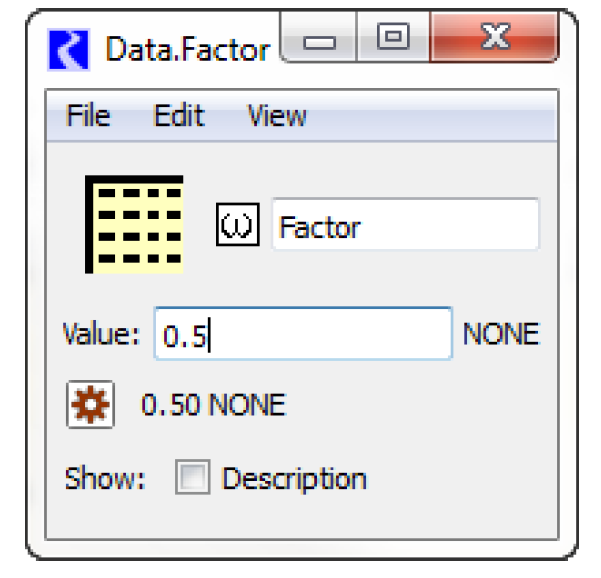
The following sections describe the three “Yes” cases. In each case, an example will be shown where a script is setting a scalar slot called Data.Factor to a value between 0.1 and 1.5. Perhaps this factor is then referenced by a rule to compute demands or inflows. For reference, Figure 1.13 shows this scalar slot.
For all of the Yes selections for Allow Editing, you can also choose to Show Current Value. When Yes, the current value (for a single scalar slot only) is shown on the Dashboard below the editing controls.
Figure 1.13
Editor
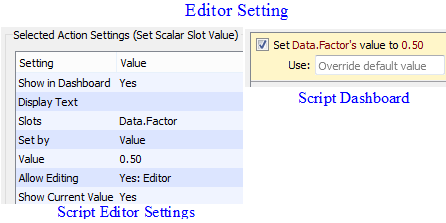
When the Allow Editing setting is Yes: Editor, an editable field is shown on the Script Manager. The default value will be used unless the user enters a different value in the field. Figure 1.14 shows the settings to get this control.
Figure 1.14
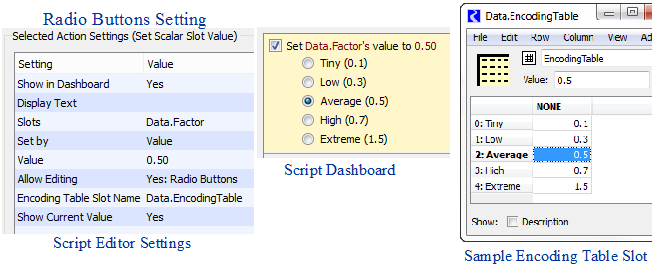
Radio Buttons
When the Allow Editing setting is Yes: Radio Buttons and an Encoding Table Slot is specified, radio buttons are shown on the Script Manager. The default value will be used unless the user selects one of the radio buttons to use that value.
The Encoding Table Slot Name setting specifies a Table Slot whose row labels and values establish a textual encoding of values. Figure 1.15 shows a sample encoding table slot. The row labels are used as the labels on the radio buttons. The values in the table are displayed on the Script Manager and will be used by the action for that button.
Figure 1.15
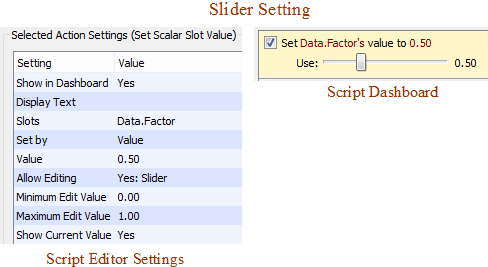
Sliders
When the Allow Editing setting is Yes: Slider and Minimum and Maximum Edit Values are defined, a slider will be shown on the Script Manager. The default value will be used unless the user moves the slider to a different value. Figure 1.16 shows the settings to configure this control. The available slider positions are computed by dividing the interval between the minimum and maximum by 100.
Figure 1.16
Setting Slot Values using a Global Function
The three script actions allow slot values to be set to values as described above. They also allow the slot value to be set to numeric or datetime values using a RPL Global Function.
To use this functionality, in any of these three actions, in the “Set by” setting, choose “Function”. Then choose the desired RPL Global Functions Set and the specific RPL Global Function to use as shown in Figure 1.17.
Figure 1.17 Screenshot of selecting a Global Function
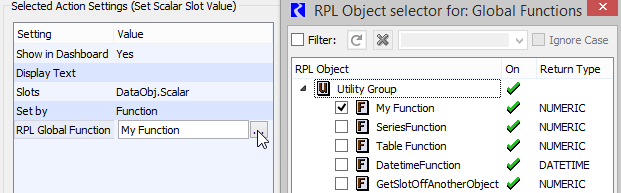
Note: The Global Function must return a NUMERIC or DATETIME value. Setting Text Series Slots is not supported by this mechanism.
The global function can contain various combinations of arguments based on the action. You can use zero, one or more arguments. The arguments passed for each action are:
• Set Scalar Slot Value: SLOT slotToSet. This action loops over each slot and calls the function passing in the slot as the argument.
• Set Series Slot Periodic Values: SLOT slotToSet, DATETIME date: This action loops over each slot and datetime and calls the function passing in the slot and datetime as the arguments.
• Set Series Slot Periodic Values: SLOT slotToSet, NUMERIC row. This action loops over each slot and calls the function passing in the slot and row as the arguments. This action only sets the slot at the specified row. It does not loop over the rows.
• Set Table Slot Value: SLOT slotToSet, NUMERIC row, NUMERIC col. This action loops over each slot and calls the function passing in the slot, row, and column as the arguments.This action only sets the slot at the specified row and column. It does not loop over the rows and columns.
Example 1.1 Using a RPL Global Function to set multiple series slots.
This is best explained with an example. Let’s assume we want to set five series slots to a value on a data object at each timestep in the run.
Set up the script as follows:
1. In the Set Series Slot Values action, “Slots” setting, choose the 5 slots to set.
2. Choose the Global Functions Set and the desired Global Function
3. Specify the Start and End Date
In our example, the settings and RPL function is shown in Figure 1.18.
Figure 1.18 Screenshot of a Set Series Slot Values that calls a numeric RPL function
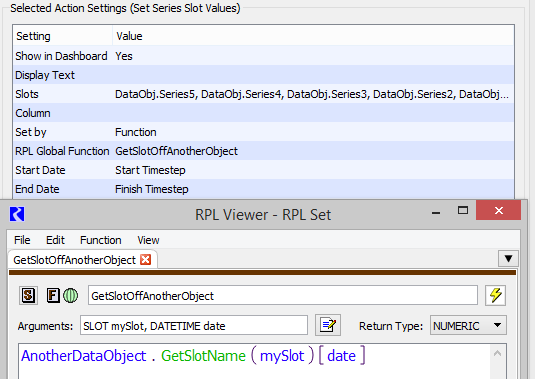
When this action is executed, it will loop over the 5 slots and all timesteps in the run. For each slot/timestep, it will call the GetSlotOffAnotherObject function and pass the slot and datetime into the function. The function computes a numeric, in this case looking up the value on another object. The action then sets that value.
Revised: 08/04/2020