
Editing a RPL Expression
Expressions in the RPL editor are displayed as <expr>, <numeric expr>, <boolean expr>, <list expr>, <string expr>, <object expr>, <slot expr> or <datetime expr>. The type of the expression indicates the valid values that can go in that expression. See Expression Data Types for details on each data type.
There are two ways to enter data into an unspecified expression, typing and using the palette. Any expression can by typed by first double-clicking then typing in the expression. There are many problems with this approach. First, you must know the exact syntax to be typed. Second, you must type all strings perfectly as typos in strings may not be caught on validation. A better approach is to use the palette to build expressions. You only need to type when they are specifying the inner most expression like exact numbers (100 cfs), boolean (true, false), datetimes (@“t”), or strings (“Entering Runoff season”). Following is a description of using the palette.
Using the Palette
See RPL Palette for descriptions of the Palette buttons. Each of the buttons in the RPL Palette represents an expression. These expressions are convenient operations which evaluate to one of the expression data types just mentioned. Buttons on the RPL Palette are enabled and disabled dynamically. When an expression is highlighted in the Editor, the Palette buttons that satisfy the expected data type are enabled. Thus, you create expressions in the following manner: select an unspecified expression, select a palette button or function. Select another unspecified expression and select a palette button or function. Repeat this process until the expression is created. Then, if necessary, double-click any remaining unspecified expressions that cannot be created from the palette (like entering numbers) and type in the value.
When
Entering Values
To replace an unspecified expression with a literal value (like 10 “cfs” or TRUE) double-click the expression and type in the value. For NUMERIC data types, you may also enter a unit. If the unit has a “-” or “/” in it, you must include the quotes when typing the unit, like “acre-feet”. Without these special characters, you can type the units and no quotes. Here are some examples of correctly specified units: 10 cms, 100 “acre-ft”, 50. Illegal entries include 100 acre-ft/day (no quotes) and 100 “cfx” (no unit of that type). See NUMERIC for details on entering units.
Another illegal entry is 1,000 “acre-ft”. This is because the comma (a thousands separator) is not allowed as an input. Instead, RiverWare gives the option of whether or not to display a comma as a thousands separator for all values throughout the model and RPL set. This option is selected or deselected by selecting the main Workspace, then Show Commas in Numbers option; see Show Commas in Numbers in User Interface for details.
Note: After typing a literal value, you do not need to hit Enter to commit the change. Pressing Enter or any selection outside of the editor will signal completion of the editing.
Auto-Correct
When typing values, if the value you provide is not a valid replacement for the expression, RiverWare attempts to coerce the specified string into one that is valid. This auto-correction process is guided by the types which can legally replace the existing expression. RiverWare tries a series of variations on input, where each variation is an attempt to coerce the input into a different value type. Types are considered in the following order: DATETIME, OBJECT, SLOT, SRING, and LIST. If a valid auto-correction is found, it is used to replace the existing expression; if no valid auto-correction is found, an error notification is presented describing the problem with the input.
For example, consider the statement.
WITH (STRING val = <string expr>) DO
PRINT "value: " CONCAT <expr>
END WITH
If the text t + 1 is entered as the variable value in the WITH expression, it is interpreted as a STRING "t + 1" because that is the only legal type for that expression; whereas the same text entered as the right-hand side of the CONCAT expression is interpreted as the DATETIME @"t + 1", because all types are valid in that location and a DATETIME conversion is considered first.
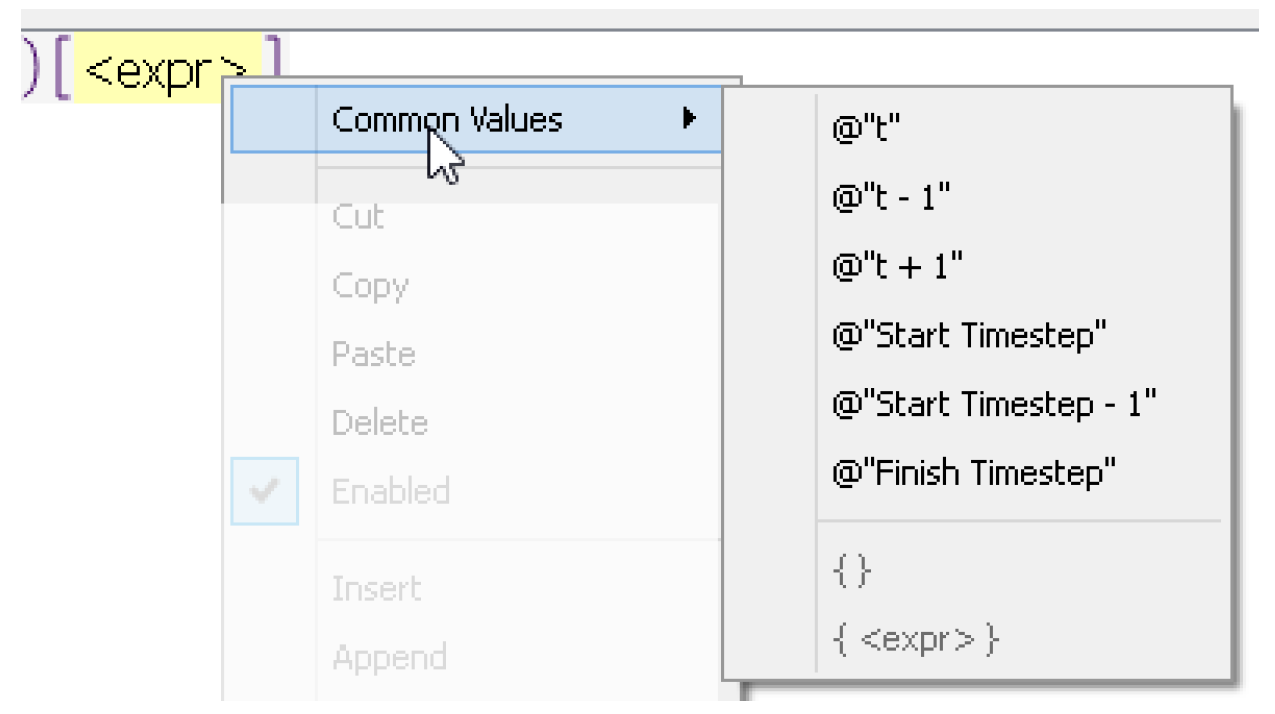
Common Values
Common values are also available by right-clicking the selected expression and choosing the Common Values menu. These include common DATETIME values and list expressions.
• @“t” - Current Timestep
• @“t-1” - Previous Timestep
• @“t+1” - Next Timestep
• @“Start Timestep” - First timestep in the run period
• @“Start Timestep - 1” - Initial timestep
• @“Finish Timestep” - Final Timestep in the run period
• { } - Empty list expression
• { <expr> } - List containing one empty expression.
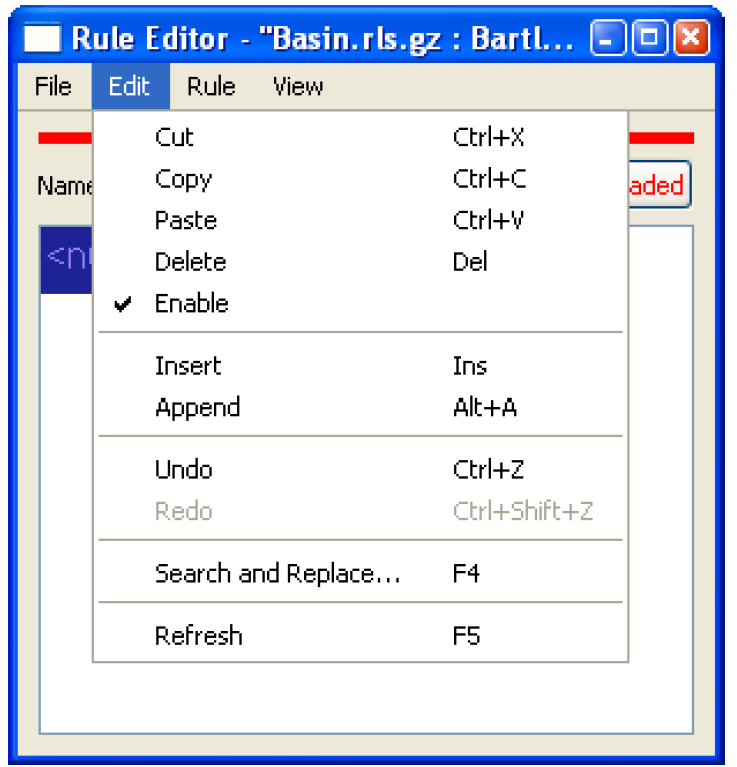
Undo and Redo
When editing RPL expressions, undo and redo are available as follows:
• Edit menu on RPL dialogs
• Right-click context menu
• Keyboard shortcuts
– Undo is ctrl-z
– Redo is ctrl-shift-z
• Expression menu on Expression slots.
Any action that edits a RPL expressions can be undone or redone, including the following:
• Replacing the selected expression with a new expression by selecting a palette button
• Cutting or deleting the selected expression.
• Pasting an expression in the place of the selected expression.
• Adding or removing a statement from a block.
• Adding or removing a constraint from a function.
• Double-clicking an expression and changing it via an inline editor.
Undo and redo are on a per-dialog basis; the dialog must be selected before the undo/redo operation is performed. Also, the history of changes is preserved if a RPL dialog is closed and re-opened, but is not preserved if the set is closed. On expression slots, the history of changes is lost when the slot is closed.
The number of undos/redos is only limited to take you back to the original expression; there is no artificial limit imposed.
Finally, edits on the RPL set level cannot be undone including adding or deleting rules and re-arranging rule priorities.
Using the History
When you double-click an unspecified expression or literal value, a menu appears to the right of the inline editor. This menu tracks the history of past edits that have been used in this dialog you can then use the menu to choose a value from the list. The arrow keys can also be used to scroll through the list.
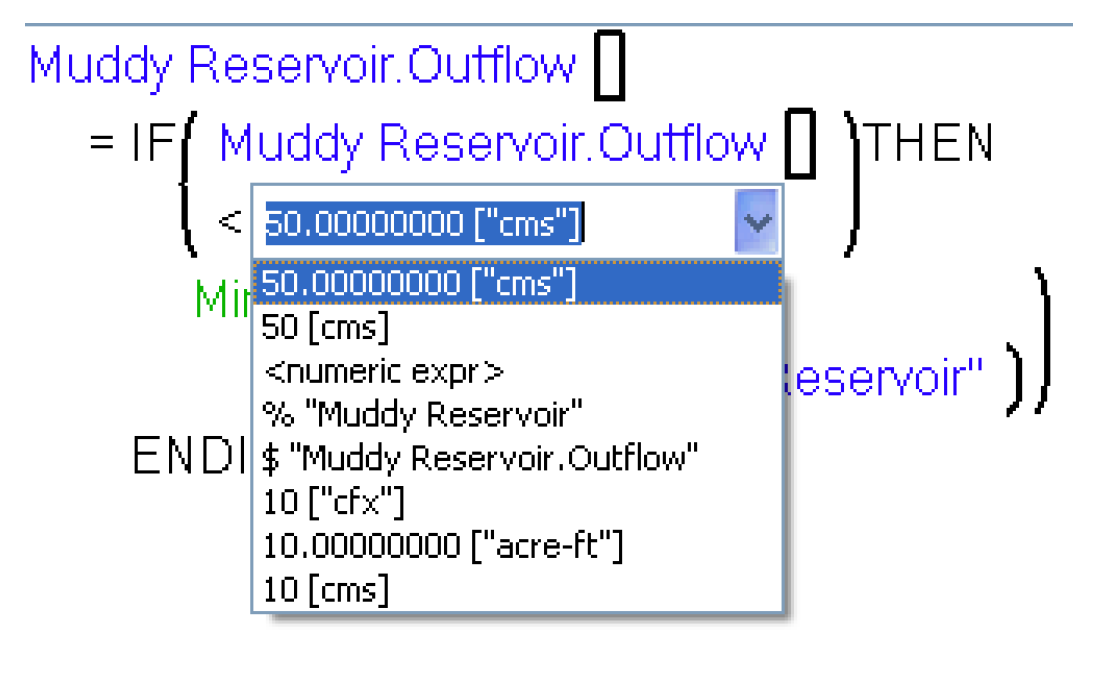
The history can also be used as a starting point if you type in an invalid expression. It provides an opportunity to correct the entry and try again without having to type it from scratch. For example, you wish to enter “Flood Season” into a string, but when you type, you only enter the string “Flood S” and hit Enter before finishing typing Season. RiverWare will not issue an error as “Flood S” is valid. You can then select “Flood S” from the pull-down history, and complete the desired text.
Note: The saved history it is a per-dialog history only but does persist when the dialog is closed and reopened. It does not persist if the RPL set is closed.
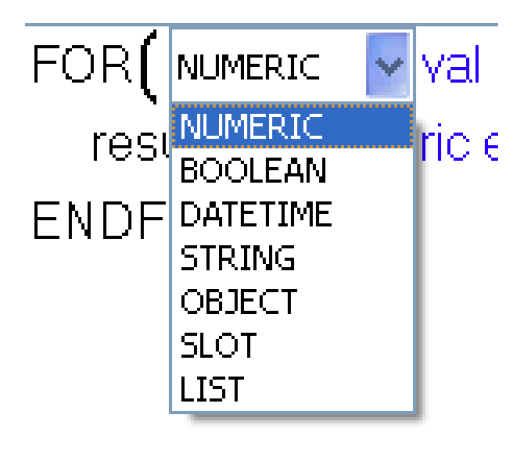
Data Types for Looping Variables
In the looping expressions, FOR, WHILE, WITH, SUM, AVE and in the FOR and WITH statements, you specify the data type of the looping variable. See Expression Data Types for details on data types.
For example, the first line of a default FOR statement looks as follows:
FOR (NUMERIC val IN <list>) WITH NUMERIC result = <numeric> DO
You can change the type of the looping variable NUMERIC and the name of the variable. Menus provide an easy way to do this. You double-click the NUMERIC and are provided with a menu listing the 7 data types in RPL. A second menu is provided for the looping variable; this provides a history of all string values that have been previously entered in the dialog, similar to the history described in the previous section.
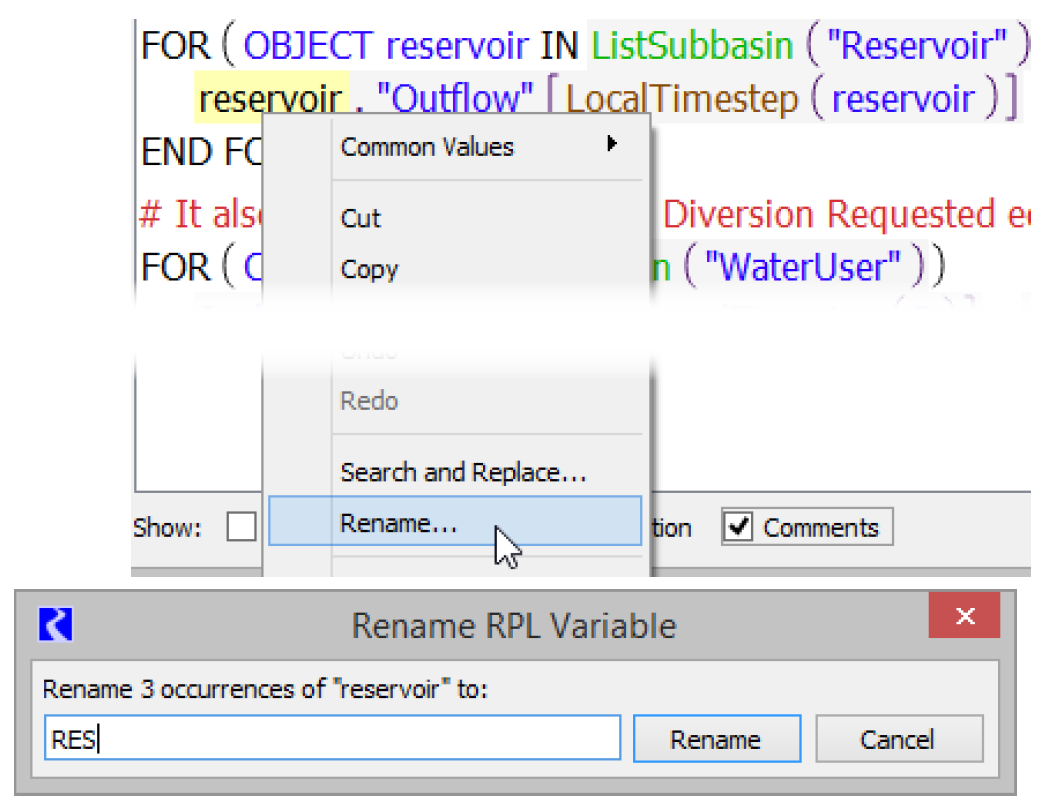
Renaming Looping Variables and Function Arguments
When a looping variable or function argument is selected, you can right-click and choose to Rename all of the occurrences of that variable or argument within the expression and the definition.
Note: Variable names can be associated with statements (FOR and WITH), expressions (FOR, WITH, SUM and AVE), or functions (argument names).
To initiate a rename, use the right-click context menu and choose Rename. A dialog displays the number of occurrences of the name to be replaced, and allows you to type in the new name. Selecting Rename then makes the replacements.
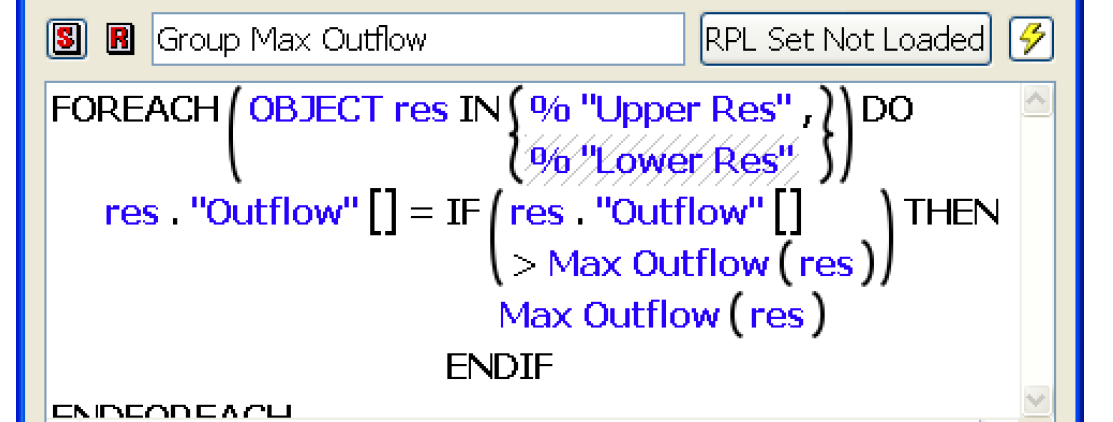
In Figure 2.19, three occurrences of the looping variable reservoir will be renamed RES.
Figure 2.19
RPL Shortcuts
If part of an expression can be used in another assignment, rule, or function, rather than repeating the above process for each new expression, highlight the portion of the expression that can be used elsewhere. From the menu bar, select Edit, then Copy or type <Ctrl C> to copy the highlighted portion. Right-clicking the highlighted portion will bring up a menu with the option to copy. In the location in which the expression is to be pasted, highlight the <expr> and select Edit, then Paste <Ctrl V>, or right-click and select Paste from the menu. This will paste the expression into the new location.
When you copy an expression using <Ctrl C> or the Edit and then Copy menu, the expressions is also placed in the Clipboard tab of the palette. This allows you to use that expression or its subexpressions elsewhere. For more information, see Clipboard Tab.
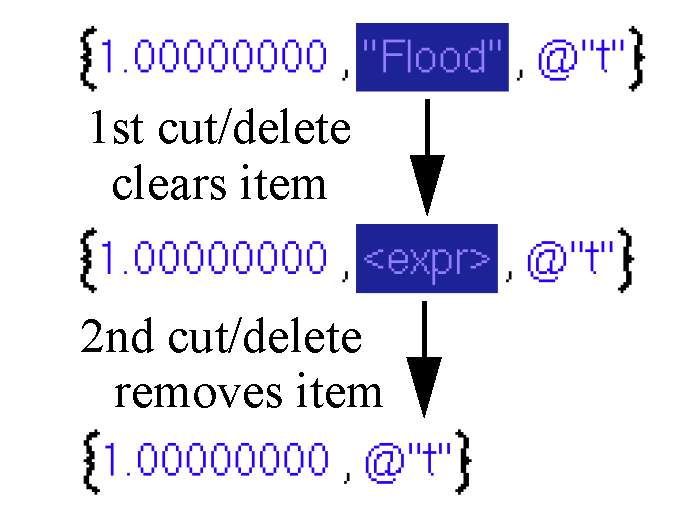
Also, expressions can be deleted using the Cut <Ctrl X> or Delete <delete> operations. The Cut operation, puts the expression in the copy buffer, the Delete operation does not.
Note: There is one exception to the cut/delete behavior. When deleting an item in a list, the first cut or delete operation removes the expression but leaves a blank expression. A second cut/delete removes the item from the list. Figure 2.20 shows an example.
Figure 2.20
Statements may be cut, copied, pasted from the menu bar of the RPL Editor, using <Ctrl C>, or right-clicking and selecting Copy from the menu. Select Paste to paste over an existing statement, Insert to add it above the currently selected statement, or Append to add below the last statement.
Disabling an Item in a List or a Statement
On the RPL set editor, functions and RPL blocks can be disabled by selecting the green check mark turning it into a red X. Within a block, it is also possible to disable an individual item in a list or an entire statement.
• In the RPL editor, highlight the statement or item in the list that you wish to disable.
• Right-click the selected expression. Notice that there is a check mark next to the word Enabled indicating that the item is enabled.
• Select Enabled to toggle off the check mark thereby disabling the item. The disabled variable now shows up with cross hatching. The crosshatch color is defined in the set layout dialog; see Colors for details. When the expression executes, it will skip the disabled item(s).
In general, disabling an assignment or an item in a list should only be used in the debugging and model building process. For example, you might want to have two assignment statements in one block. While debugging the model, it may be necessary to disable one assignment to ensure the other assignment is working correctly.
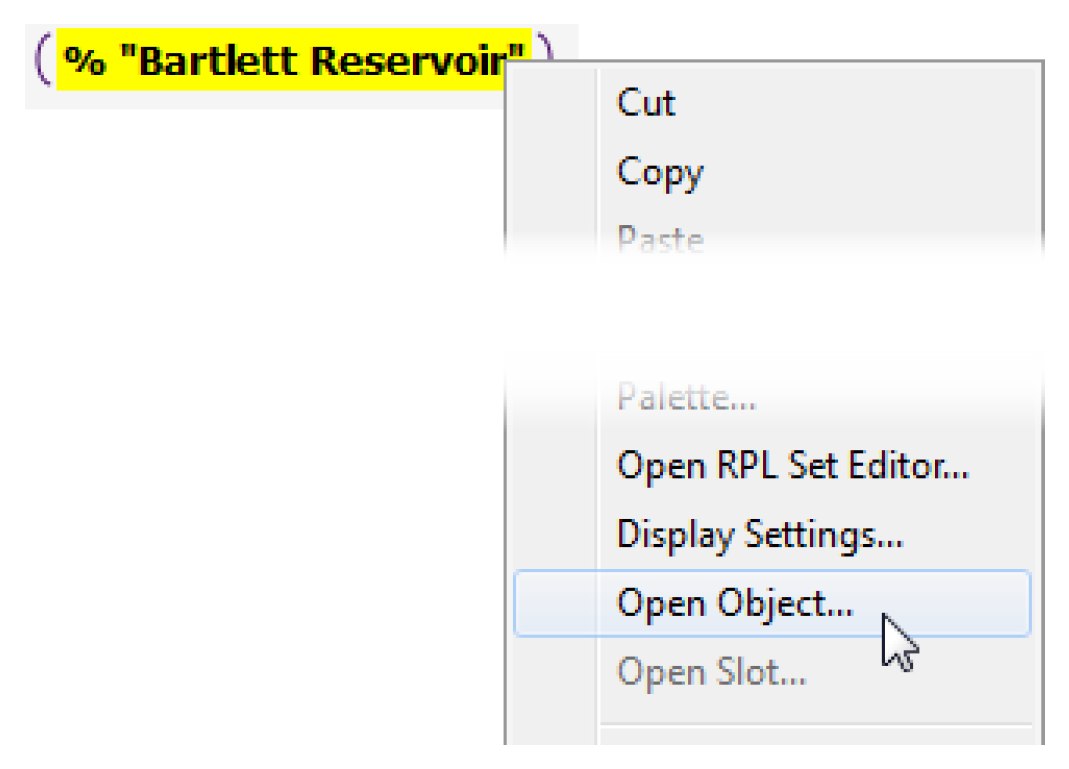
Opening Slots and Objects From RPL Dialogs
When the selected RPL expressions is a valid OBJECT or SLOT, the following right-click context menu selections open that object or slot dialog.
• Open Object
• Open Slot
Note: This only works for expressions for which the workspace object can be determined without evaluation.
Revised: 08/04/2020