
DMI User Interface
This section describes the user interface used to execute and create DMIs. This section applies to all of the DMI approaches. See Database DMI for details on the user interface for the Database DMI.
Accessing DMIs and the DMI Manager
The Workspace provides a DMI menu and a DMI toolbar button.  Selecting either the DMI menu, then DMI Manager or the toolbar button opens the DMI Manager dialog. Once one or more DMIs are defined, the DMI menu also contains these DMIs, which can be invoked directly from the workspace. See Invoking DMIs and DMI Groups for details.
Selecting either the DMI menu, then DMI Manager or the toolbar button opens the DMI Manager dialog. Once one or more DMIs are defined, the DMI menu also contains these DMIs, which can be invoked directly from the workspace. See Invoking DMIs and DMI Groups for details. 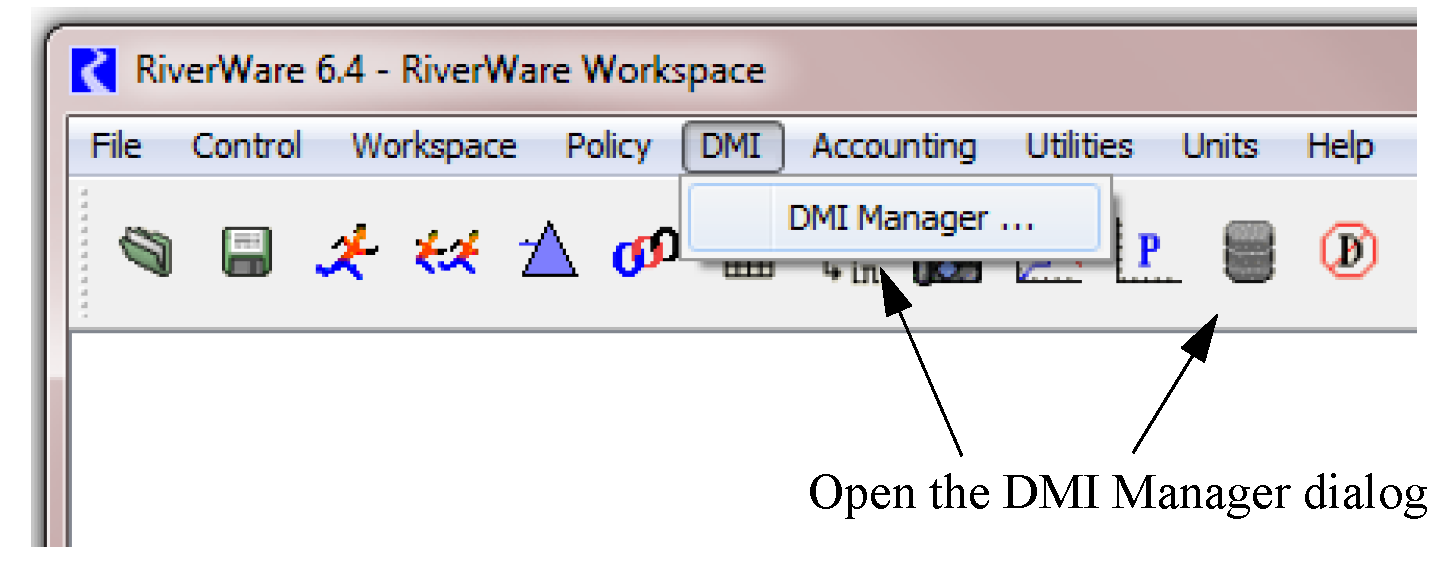
DMI Manager Dialog
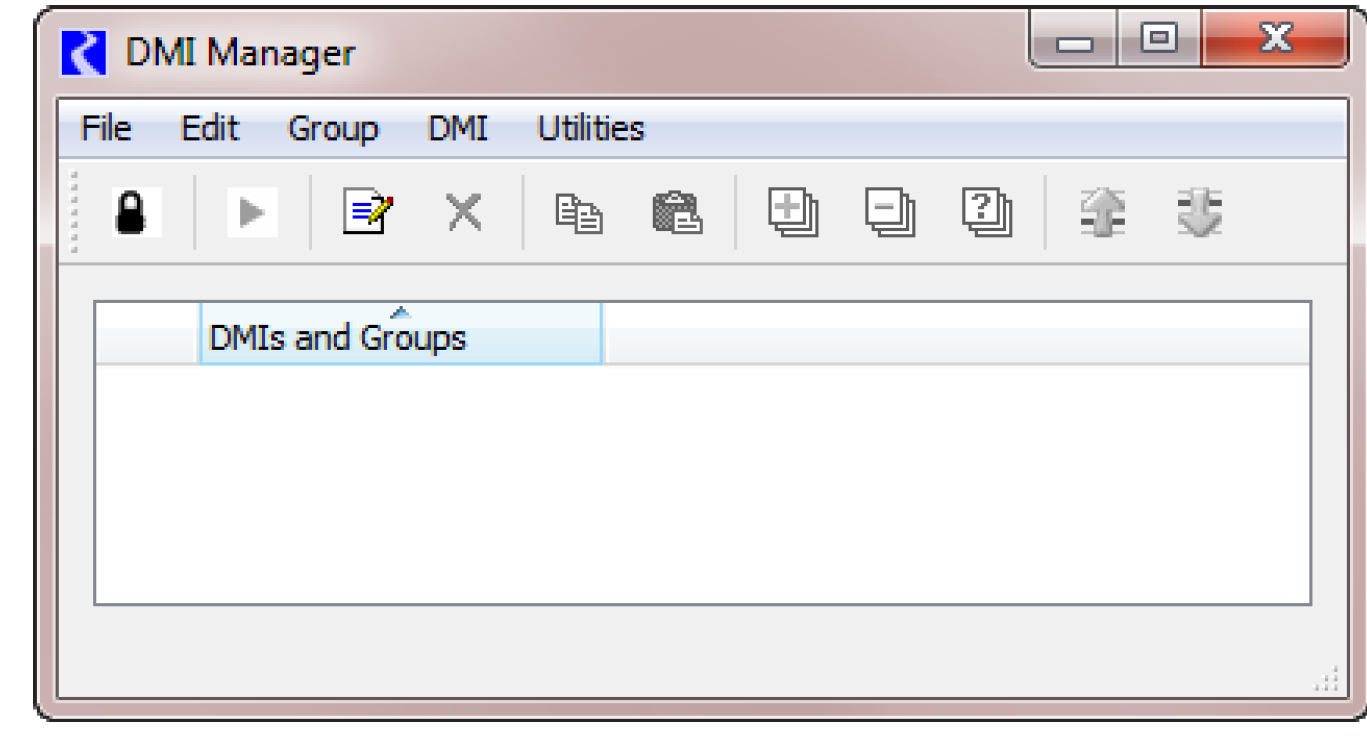
The DMI Manager dialog enables you to do the following:
• Create and delete DMIs
• Open the DMI Editor dialog
• Create and delete DMI groups
• Edit DMI groups
• Sort DMIs and DMI groups
• Invoke DMIs and DMI groups
• Copy and paste DMIs and DMI groups
• Open the DMI Parameter dialog
• Lock the DMI Manager
• View records of DMI invocations
In the DMI Manager and related dialogs, actions can be performed using one or more of the following, each of which acts on the current selection:
• A main menu item
• A toolbar button
• A context (right mouse button) menu item
• A keyboard accelerator
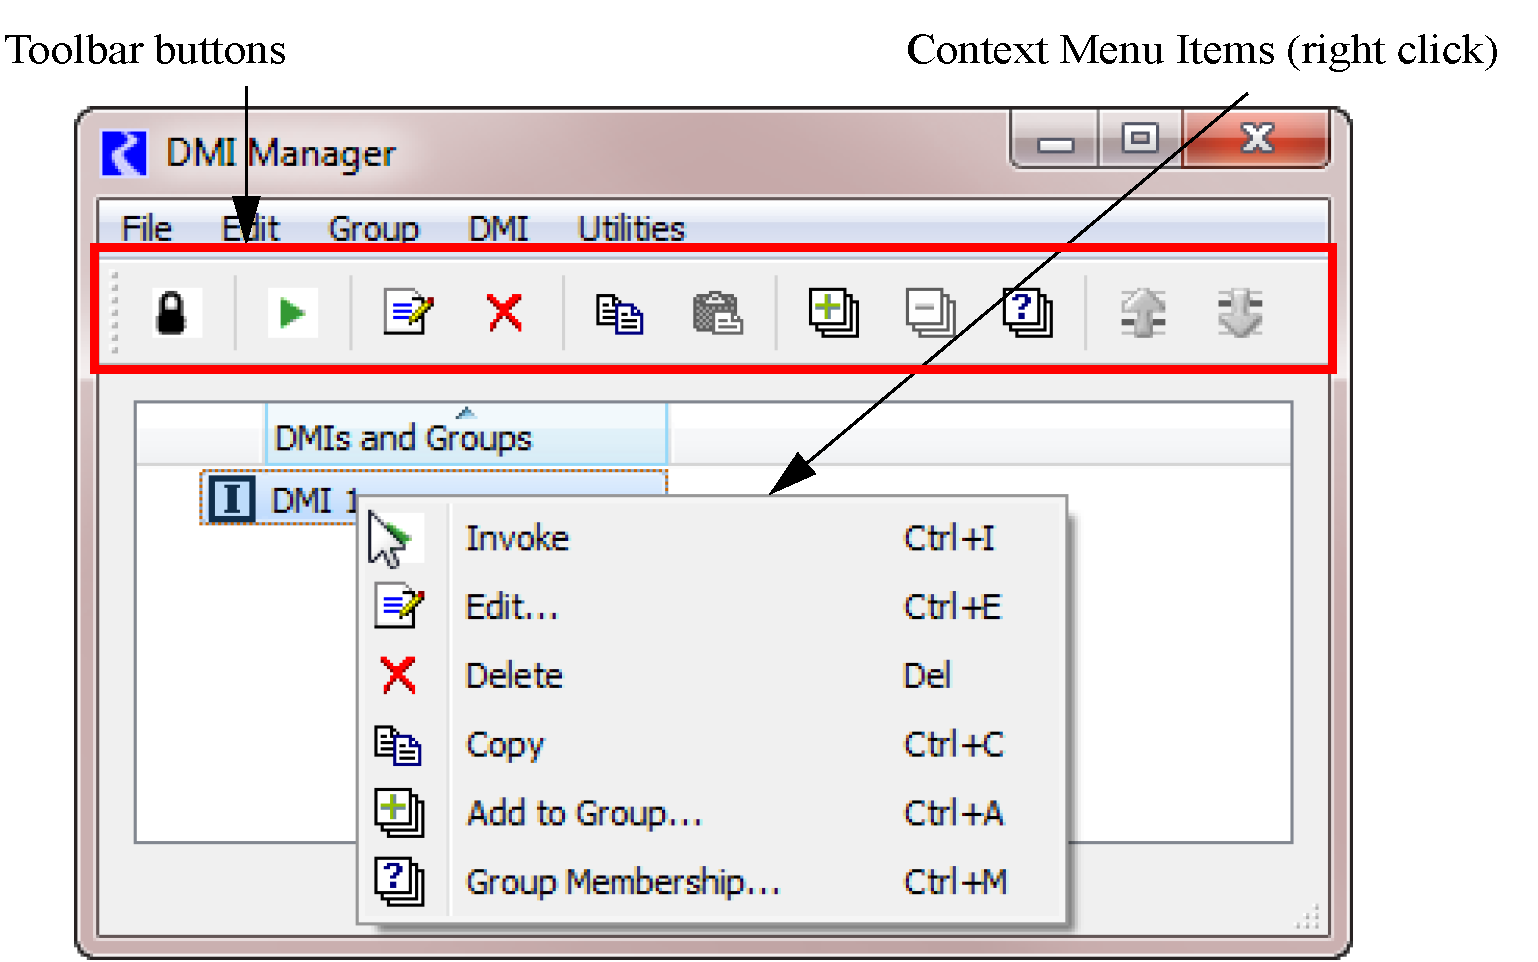
Main menu items, toolbar buttons and context menu items performing the same action share the same icon. For example, Figure 1.1 and Figure 1.2 illustrate that from the DMI Manager dialog a user can invoke the selected DMI identically using the DMI, then Invoke main menu item, the Invoke toolbar button, the DMI Invoke context menu item and the Control-I keyboard accelerator.
Figure 1.1
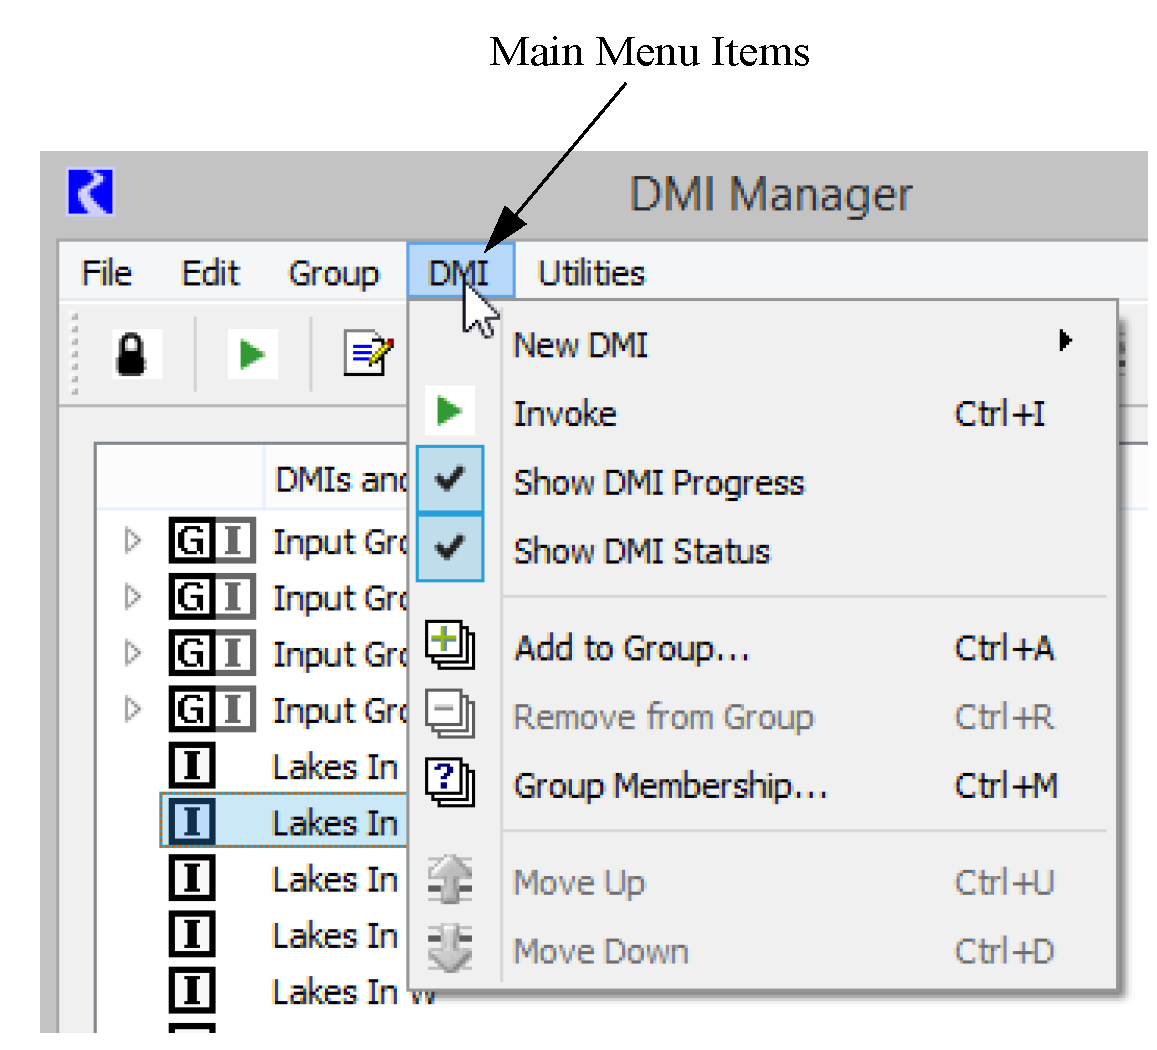
Figure 1.2
Actions which aren’t valid for the current selection are disabled. (That is, their main menu items, toolbar buttons and context menu items are disabled.)
The document refers to main menu items when describing actions; be aware that in most cases toolbar buttons, context menu items and keyboard accelerators are also available for the actions.
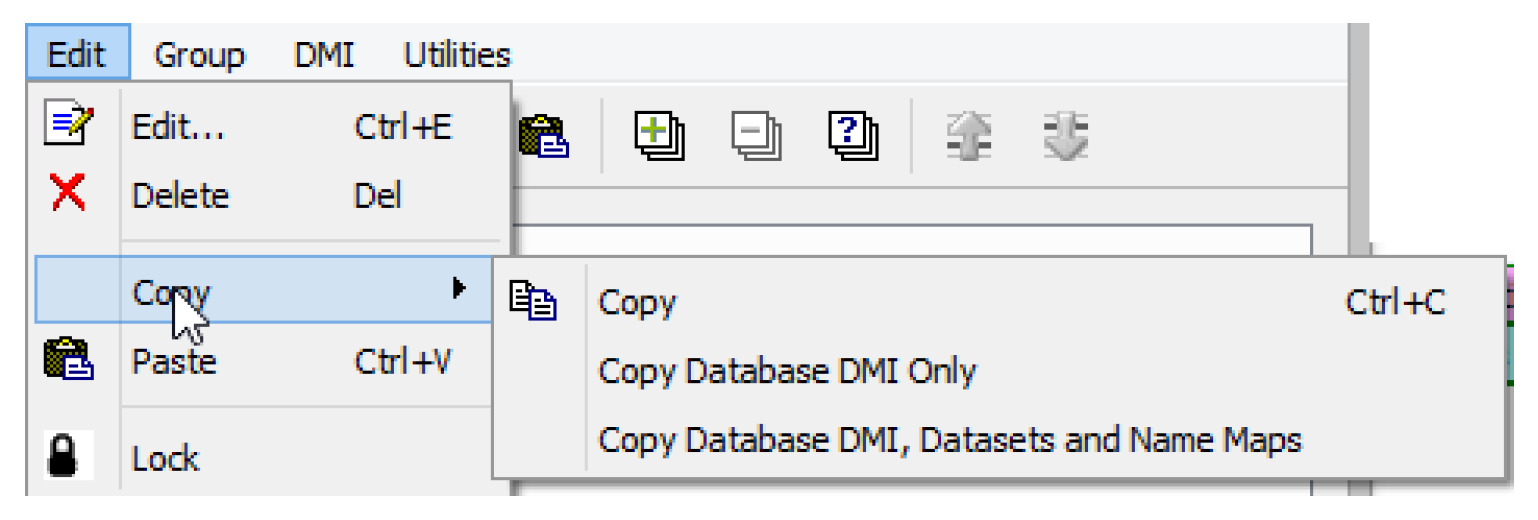
Copy and Paste DMIs
The Edit menu and right-click context menu have a Copy operation. This leads to the following options:
• Copy. For Control File - Executable DMIs, Trace Directory DMIs, and DMI groups, this is the standard copy operation. Only the DMI is copied.
• Copy Database DMI Only. For Database DMIs, this is a basic copy operation of the Database DMI only. None of the accessed Datasets or Name Maps are copied, only the Database DMI itself. When pasted, the new Database DMI refers to the original Datasets and Name Maps.
• Copy Database DMI, Datasets, and Name Maps. For Database DMIs, this operation provides a “deep copy” of the Database DMI and all Datasets and Name Maps accessed. When pasted, the new Database DMI is connected to the newly pasted Datasets and similarly, Name Maps.
A Paste operation will add the most recently copied items with the name “Copy of DMI Name 1”.
Creating, Deleting, and Sorting DMIs
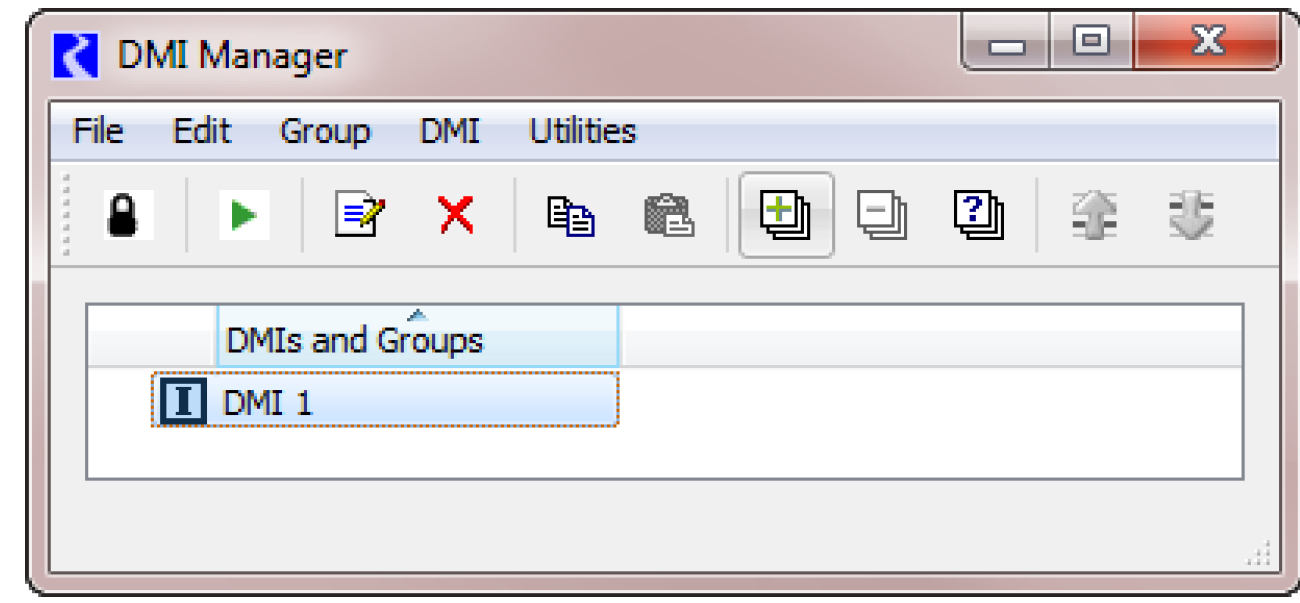
Create a new DMI under the DMI, then New DMI main menu item and choose the type of DMI to create; the DMI has a default name.
 indicates an input DMI; similarly
  indicates an output DMI.
Delete a DMI with the Edit, then Delete main menu item.
Open the DMI Editor dialog with the Edit, then Edit main menu item or double-click the row. The DMI Editor is different for the different types of DMIs. See DMI Editor Dialog for details on the DMI Editor dialog for the Control File-Executable approach. See Trace Directory DMI Editor Dialog for details on the Trace Directory DMI. See Creating a Database DMI for details on the DMI Editor for the Database DMI.
Sorting of DMIs and DMI groups is limited to sorting by name or type by selecting column header.
DMI Groups
A DMI group is an ordered collection of one or more DMIs. When a DMI group is invoked, its DMIs are invoked in order, until all have completed or one has failed. There are two kinds of groups:
•  DMI Group. This is a collection of DMIs to be executed in order.
DMI Group. This is a collection of DMIs to be executed in order.•  Year Mapping Group. This special type of group maps run years to years in the database. See Year Mapping Groups for details.
Year Mapping Group. This special type of group maps run years to years in the database. See Year Mapping Groups for details. Additionally, an icon indicates whether the group contains all Input DMIs  , all Output DMIs
  or a mix of Input and Output DMIs
, all Output DMIs or a mix of Input and Output DMIs Create a new DMI group with the Group, then New Group or New Year Mapping Group main menu item.
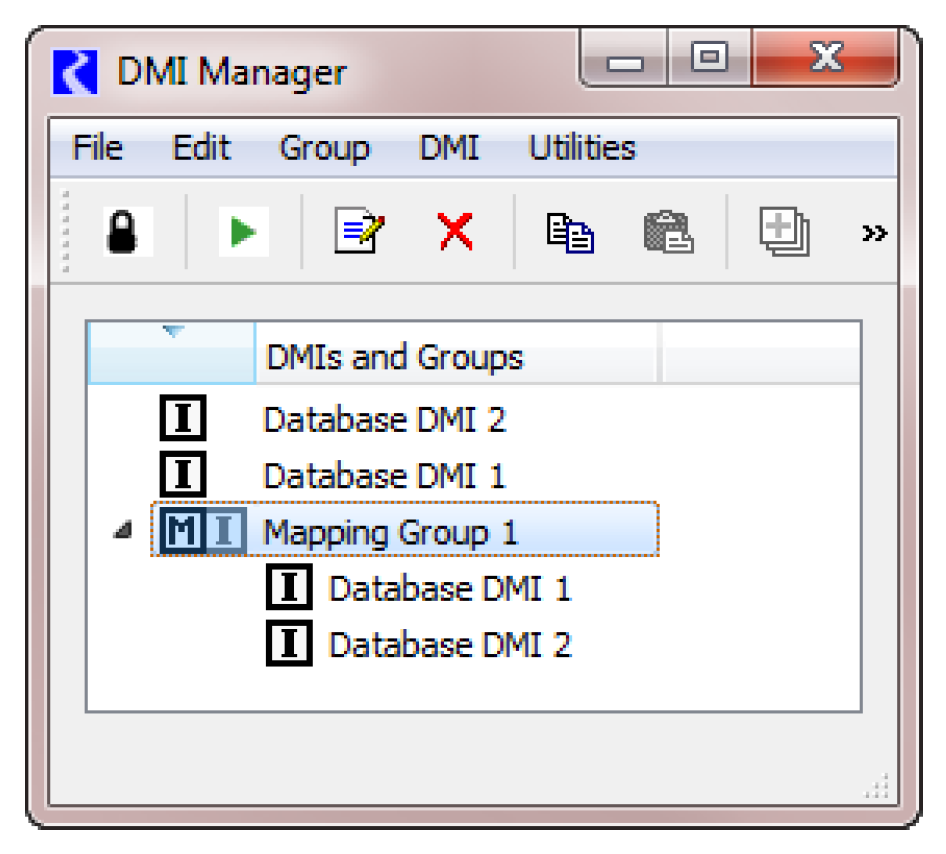
DMIs can appear one or more times in the DMI Manager dialog; once as a top-level DMI and zero or more times as a member of a group. Actions which pertain to a DMI globally (for example, editing it) are only valid when a top-level DMI is selected; actions which pertain to a DMI within a group (for example, moving it up or down) are only valid when a member DMI is selected. See Figure 1.3.
Figure 1.3
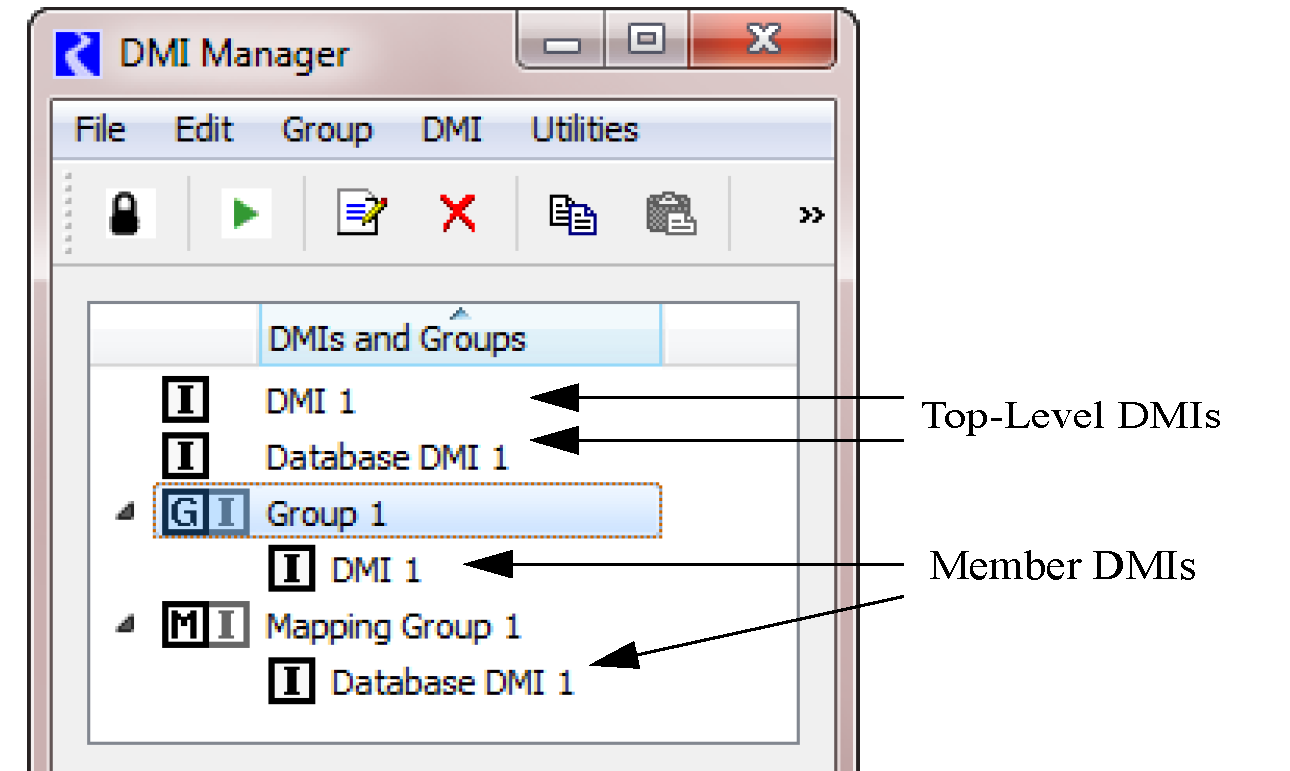
When the distinction is important, a DMI is referred to as either a top-level DMI or a member DMI.
Editing DMI groups includes:
• Editing a DMI group’s name
• Adding a top-level DMI to a group
• Removing a member DMI from a group
• Moving a member DMI within a group (e.g. ordering the DMIs within the group)
• Querying a DMI’s group membership
To edit a DMI group’s name double-select the name cell, to edit the name in place.
To add a top-level DMI to a group, select the DMI, then Add to Group main menu item. You are then presented with a dialog listing the available groups; select the desired group and select OK.
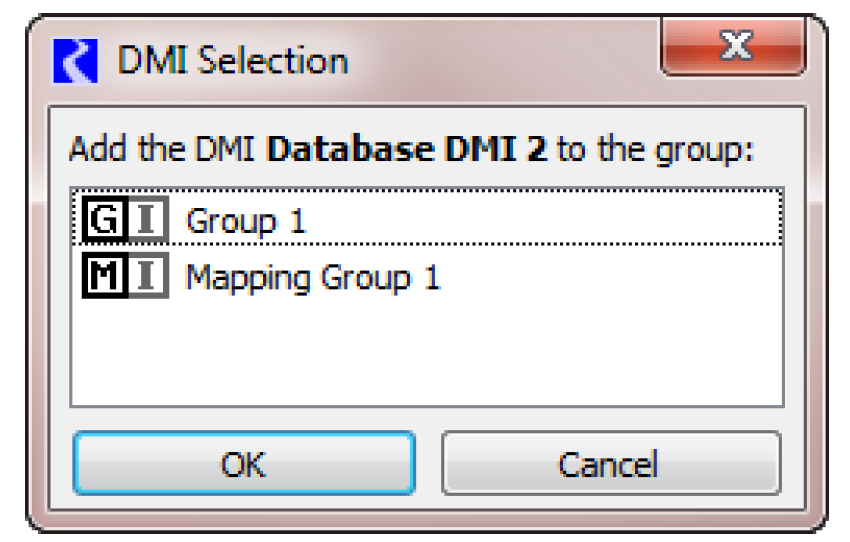
If no groups are available (e.g. there are no groups or the DMI is a member of all groups) you will be notified.
To remove a member DMI from a group, select the DMI, then Remove from Group main menu item.
To move a member DMI within a group, select either the DMI, then Move Up main menu item or the DMI, then Move Down main menu item.
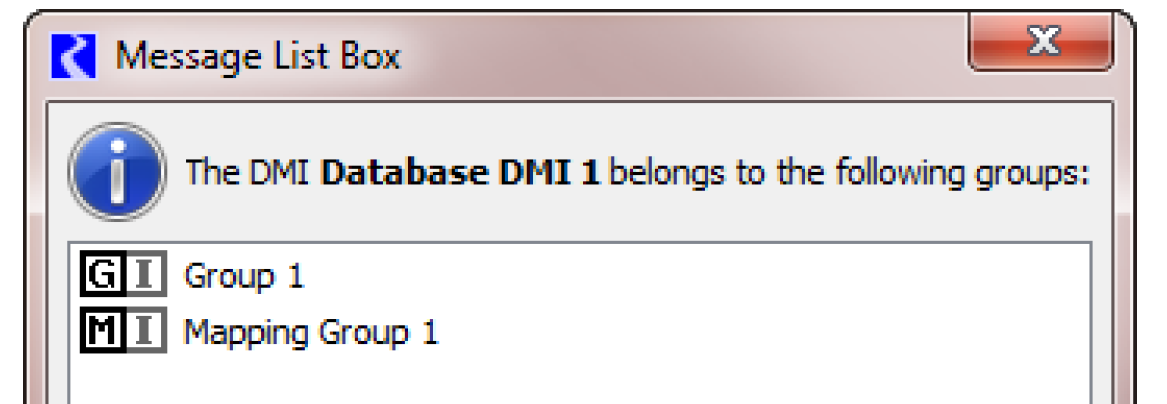
To query a group membership for a DMI, select the DMI, then Group Membership main menu item; the group membership is displayed.
Year Mapping Groups
A Year Mapping Group  allows you to import data from the specified years in your database to years in your run. For example, you might want to run your 5 year run (e.g. run dates from 1/1/2000 to 12/31/2005) with data from 1992, 1936, 1952, 1962, 1932. This tool allows you to create the map between the data in the database and the years of your run. It has a specific algorithm for dealing with leap days; see Year Mapping Algorithm for details.
allows you to import data from the specified years in your database to years in your run. For example, you might want to run your 5 year run (e.g. run dates from 1/1/2000 to 12/31/2005) with data from 1992, 1936, 1952, 1962, 1932. This tool allows you to create the map between the data in the database and the years of your run. It has a specific algorithm for dealing with leap days; see Year Mapping Algorithm for details. Before we describe it in detail, following are the limitations on this utility:
• Mapping groups are available for 1 Day timestep models only. Attempting to access mapping groups (creating, editing, invoking) with a model that has a timestep other than 1 Day, results in an error. The model run can start and finish on any day of the year. (Prior to RiverWare 6.9, the run had to start on Jan 1st and end on Dec 31st.)
• Mapping groups may only contain Input Database DMIs (DSS, HDB, or Excel)
You create the Year Mapping Group, add Input DMIs to the group, define the mapping, and then invoke the group. These steps are described in the following section:
Create a Year Mapping Group
Year Mapping Groups are added from the DMI Manager’s Group, then New Year Mapping Group menu item.
Adding DMIs to the Year Mapping Group
As described above, to add a DMI to a group, select the DMI, then Add to Group main menu item. You are then presented with a dialog listing the available groups; select the desired group and select OK. Remember, only Input Database DMIs may be added to Year Mapping Groups; other types of DMIs will not be shown when you add to the Year Mapping Group.
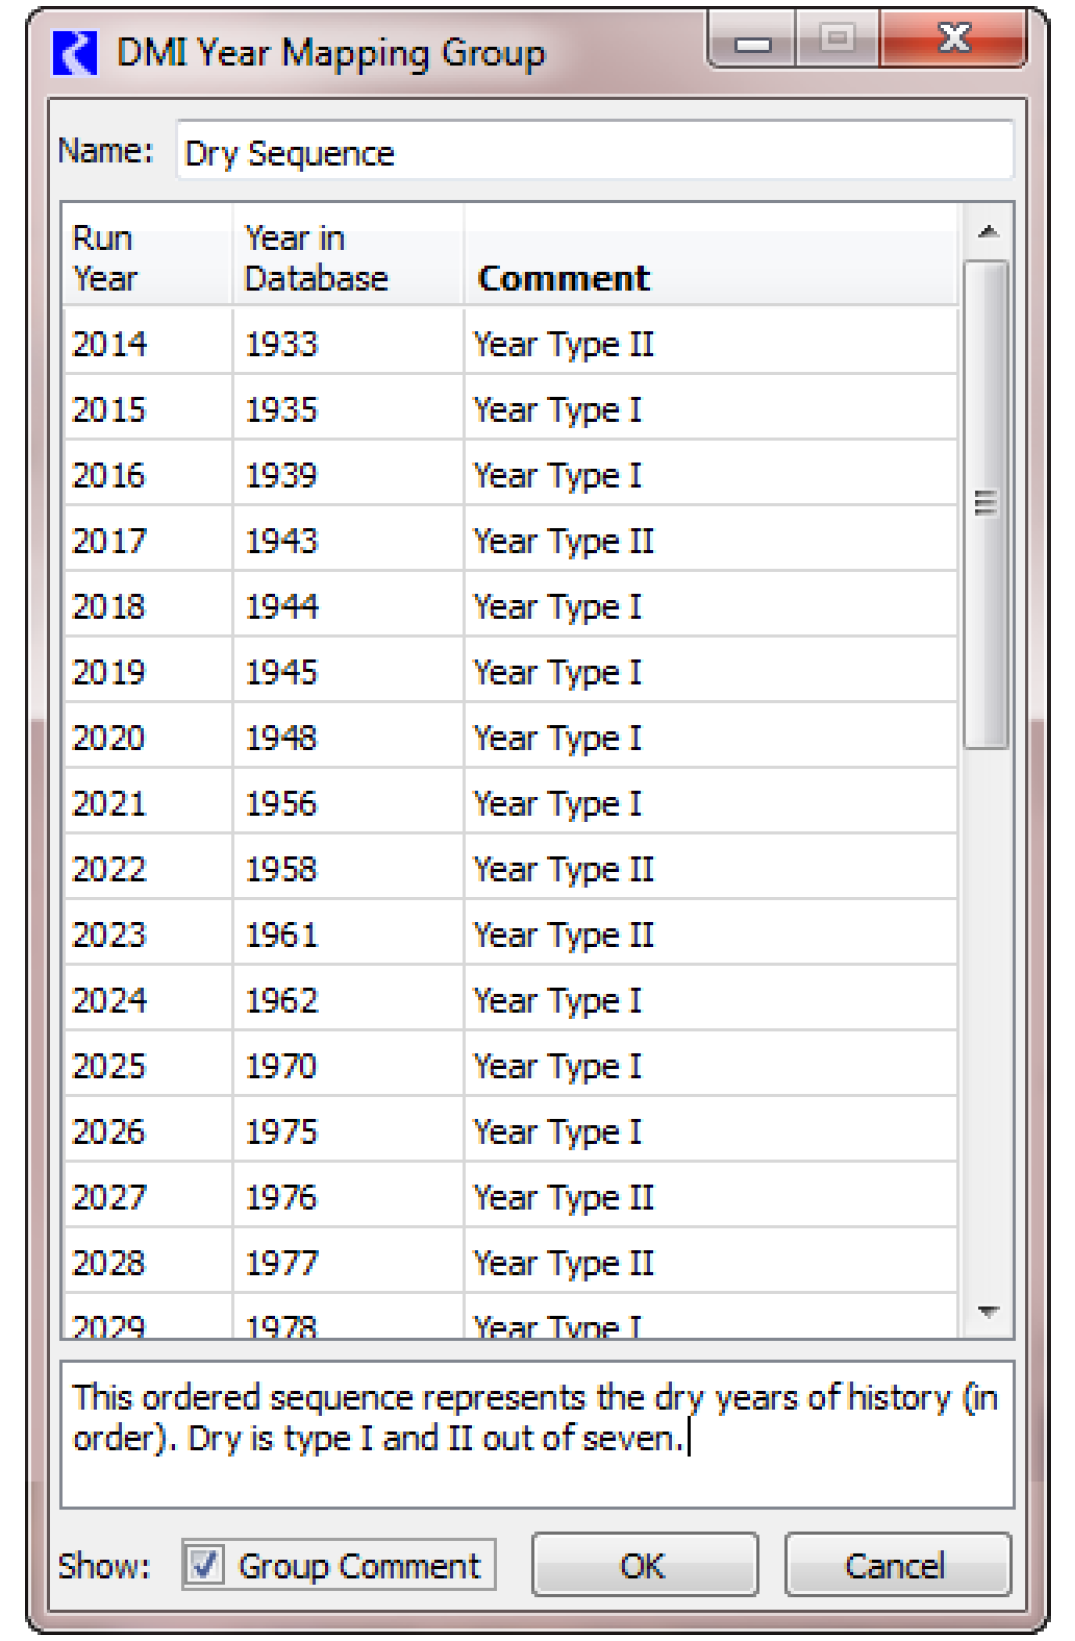
Defining the Map
Edit the group by double-clicking the item. This brings up a simple dialog where you may edit the mapping group's name, the Year in Database, and Comment for each run year.
• Run Year: The year in the RiverWare run. This is not editable and is taken from the Run Control.
• Year in Database: The year of data you wish to import for the given Run Year.
• Comment: A text field to annotate the entry.
You can copy and paste the information from and to external applications using the right-click context menus shown.
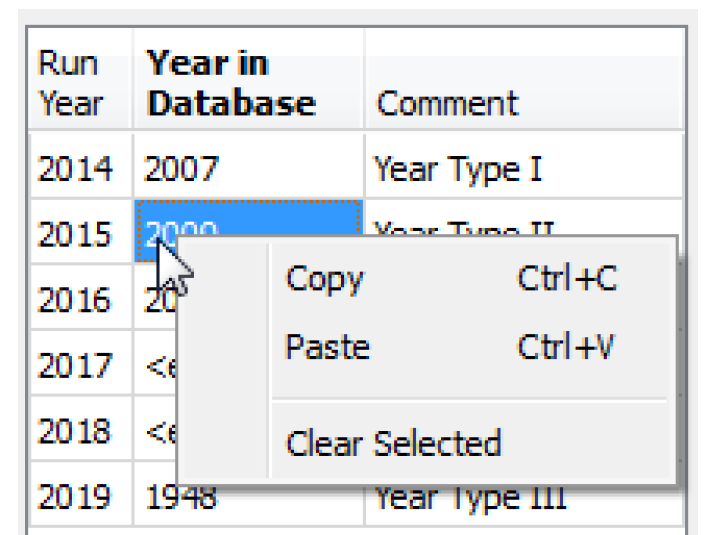
Clear the Years in Database or the selected Comments using the same menu.
Note: If the workspace run period changes, editing a Year Mapping Group adjusts the run period to match the workspace run period. For years which overlap, the Year in Database and Comment are preserved. You are notified that the mapping group's run period has been adjusted. If you cancel out of the confirmation dialog the adjustment is not canceled (only the changes made after the dialog opened are canceled).
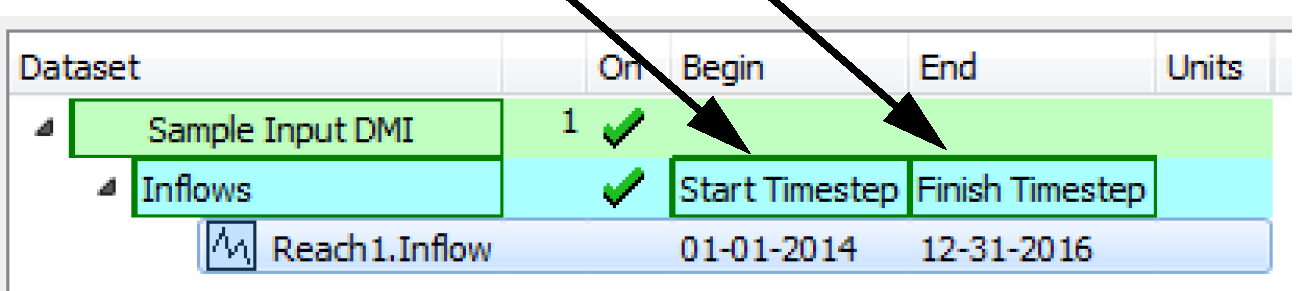
Note: In the input Database DMI specification, you should specify that the time range for each slot selection is Start Timestep to Finish Timestep. The Year Mapping Group will define the timestep, so it is only necessary to put in Start and Finish Timestep.
Invoking the Year Mapping Group
Invoke the Year Mapping group like any other group:
• DMI, then Invoke main menu item,
• the Invoke toolbar button,
• the DMI Invoke context menu item and
• the Control-I keyboard accelerator:
Year Mapping Algorithm
So what does this Year Mapping Group actually do? Following is the algorithm and description of errors.
For each DMI in the Year Mapping Group,
For each Run Year, X
Obtain the Year in the Database from the table, N
Query the database for N to get the series of data
Set the slot’s values for year X with returned data from year N, dealing with leap days as shown in the following table.
End For
End For
Table 1.1 describes how the mapping deals with Leap Years.
Year in Database | Run Year | Result |
|---|---|---|
Non Leap Year | Non Leap Year | Bring in data exactly from database |
Leap Year | Leap Year | Bring in data exactly from database |
Leap Year | Non Leap Year | Remove the February 29th value |
Non Leap Year | Leap Year | Repeat the February 28th value on February 29th |
Following are some possible error conditions:
• If the workspace run period has changed and you have not opened the Year Mapping Group, invoking a Year Mapping Group results in an error. Open the Year Mapping Group and specify a map for the new run range.
• Executing an Output DMI in a Year Mapping Group leads to an error.
• Unspecified Years in the Database lead to an error.
Locking the DMI Manager Dialog
To lock the DMI manager dialog, select Edit, then Lock main menu item. Before locking the dialog you must close the DMI Parameter and DMI Editor dialogs (and will be warned if the dialogs are open).
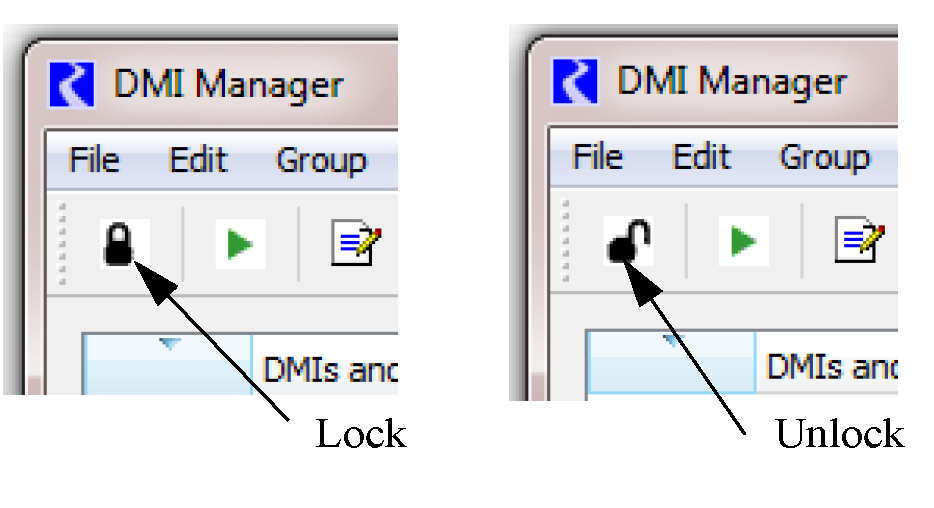
When the dialog is locked, you cannot edit the DMI or DMI group configuration.
To unlock the DMI Manager dialog, select the Edit, then Unlock main menu item.
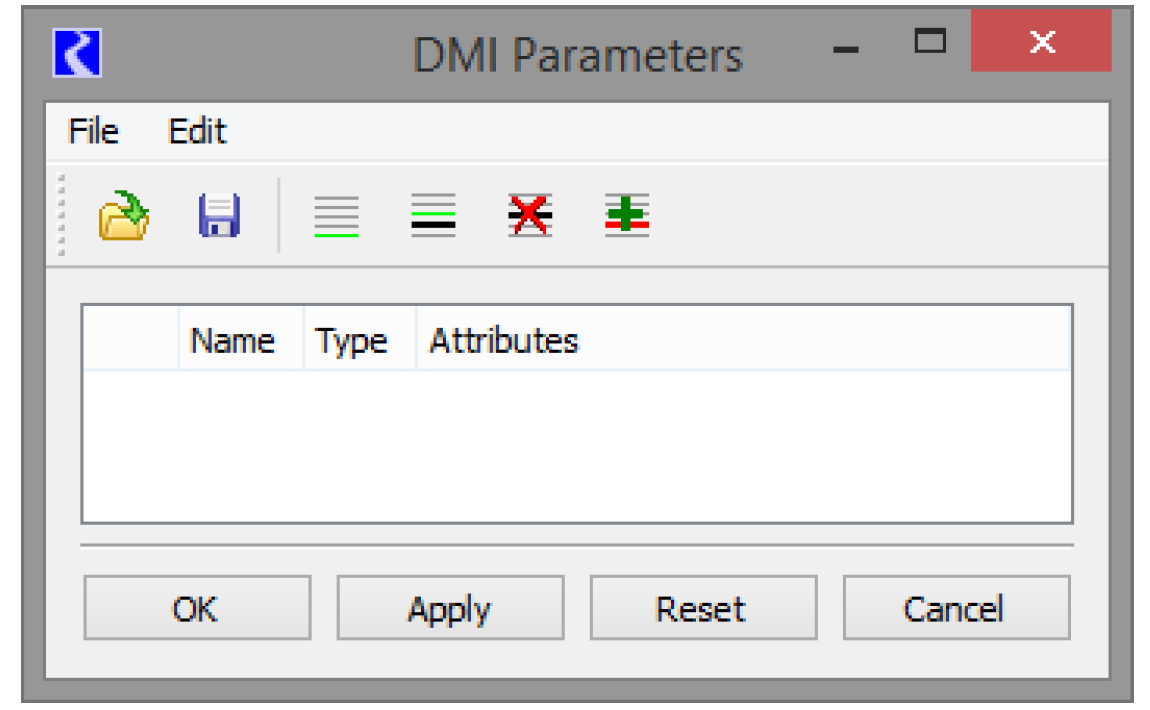
DMI Parameter Dialog
The DMI Parameter dialog enables the user to do the following:
• Create and delete parameters
• Edit a parameter’s name
• Edit a parameter’s type and attributes
• Order parameters
• Export and import parameters
Creating and Deleting Parameters
To create a parameter the user either:
• Appends the new parameter to the end of the list (selects the Edit, then Append Row main menu item)
• Inserts the new parameter into the list, before the currently selected parameter (selects the Edit, then Insert Row Before main menu item)
The parameter has a default name, and  marks it as a new parameter. When the edits are applied the
  mark is removed from the parameter.
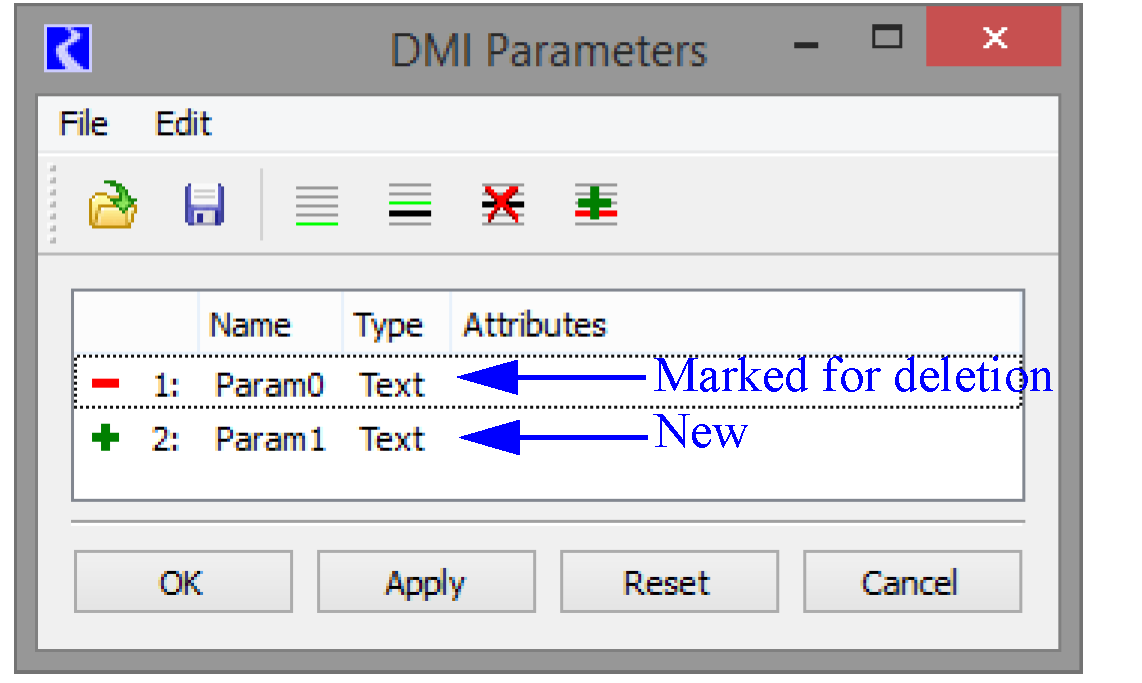
marks it as a new parameter. When the edits are applied the mark is removed from the parameter.To delete a parameter the user selects the Edit, then Delete Row main menu item. If the parameter is new (marked with  ) it’s removed from the list; otherwise
  marks it for deletion. When the edits are applied parameters marked with
  are removed from the list. See Figure 1.4.
) it’s removed from the list; otherwise marks it for deletion. When the edits are applied parameters marked with are removed from the list. See Figure 1.4. To restore a row, the user selects the Edit, then Undelete Row main menu item; the  mark is removed from the parameter.
mark is removed from the parameter.Figure 1.4
Editing a Parameter
When the user edits a parameter as described in the following sections  marks the parameter as modified. When the edits are applied the
  mark is removed from the parameter.
marks the parameter as modified. When the edits are applied the mark is removed from the parameter.Editing a Parameter Name
To edit a parameter name the user clicks twice in the Name cell, to edit the name in place. When the edits are applied the new parameter name is validated; the possible errors are:
• A blank name
• A name containing invalid characters (other than letters, digit and underscore)
• A duplicate name (the same name as another parameter)
Editing a Parameter Type and Attributes
Type | Attributes | DMI Editor Control |
|---|---|---|
Boolean | None | Menu containing “False” and “True” |
Text | None | One line text editor, constrained to non-white space characters |
Integer | None | Integer spinner, unbounded |
Integer List | Minimum and maximum integer values (Default is 0, 1) | Integer spinner, bounded by minimum and maximum integer values |
Double | None | One line text editor, constrained to syntactically valid double precision floating point values |
List | List of text items, constrained to non-white space characters (Default is empty list) | Menu containing list of text items |
To edit a parameter type, the user Click-Pause-Clicks in the Type cell, to activate the Type menu and then selects the parameter type.
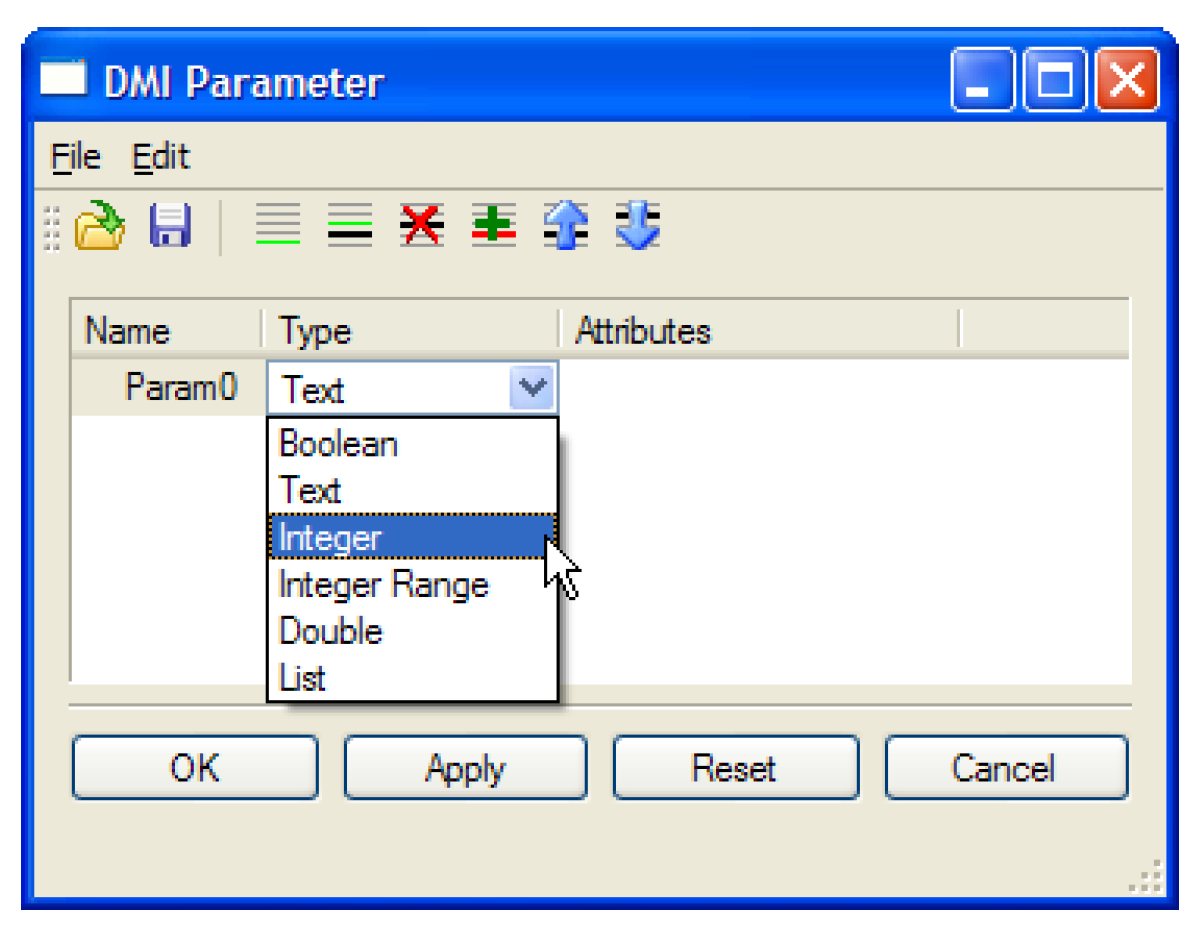
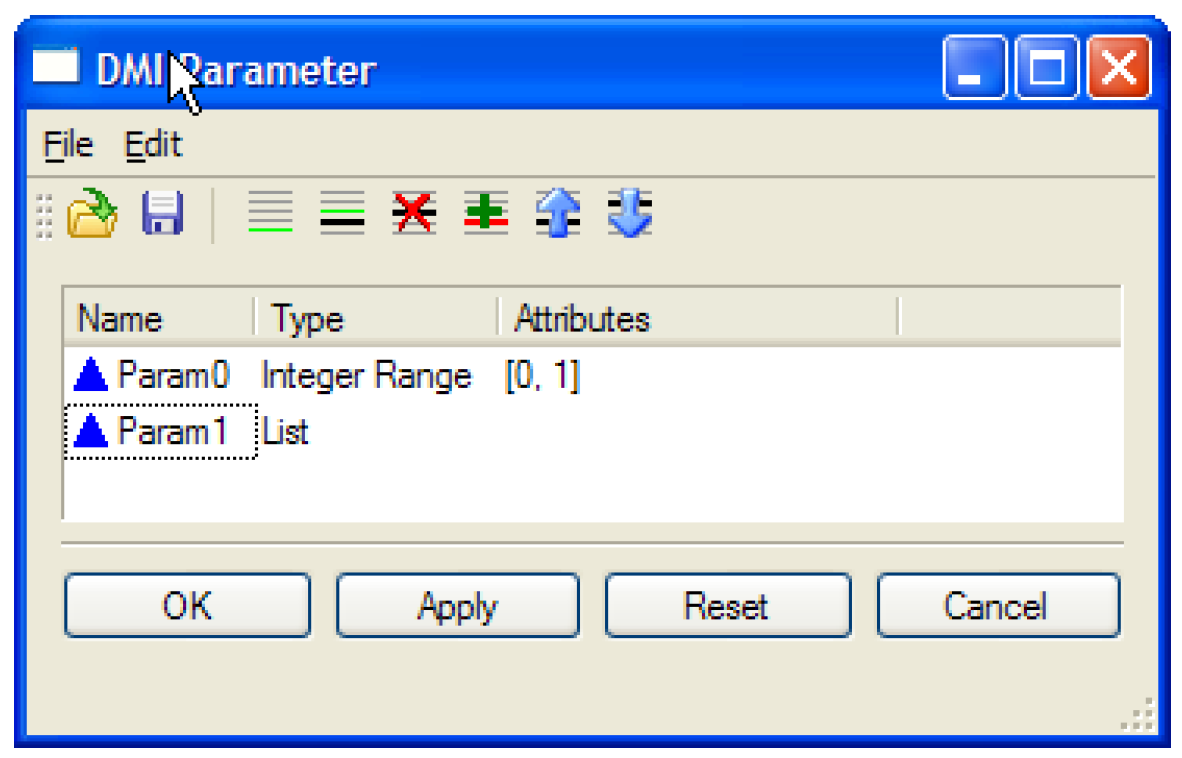
If the selected type has attributes the default attributes are displayed in the Attributes column.
Note: A List parameter’s default attribute is an empty list, so nothing is displayed.
To edit a parameter’s attributes the user double-clicks the Attributes cell to activate the  button, and then selects the
  button to open an attribute-specific dialog.
button, and then selects the button to open an attribute-specific dialog.For an Integer Range the attribute-specific dialog enables the user to enter the minimum and maximum values, ensuring the maximum value is greater-than the minimum value:
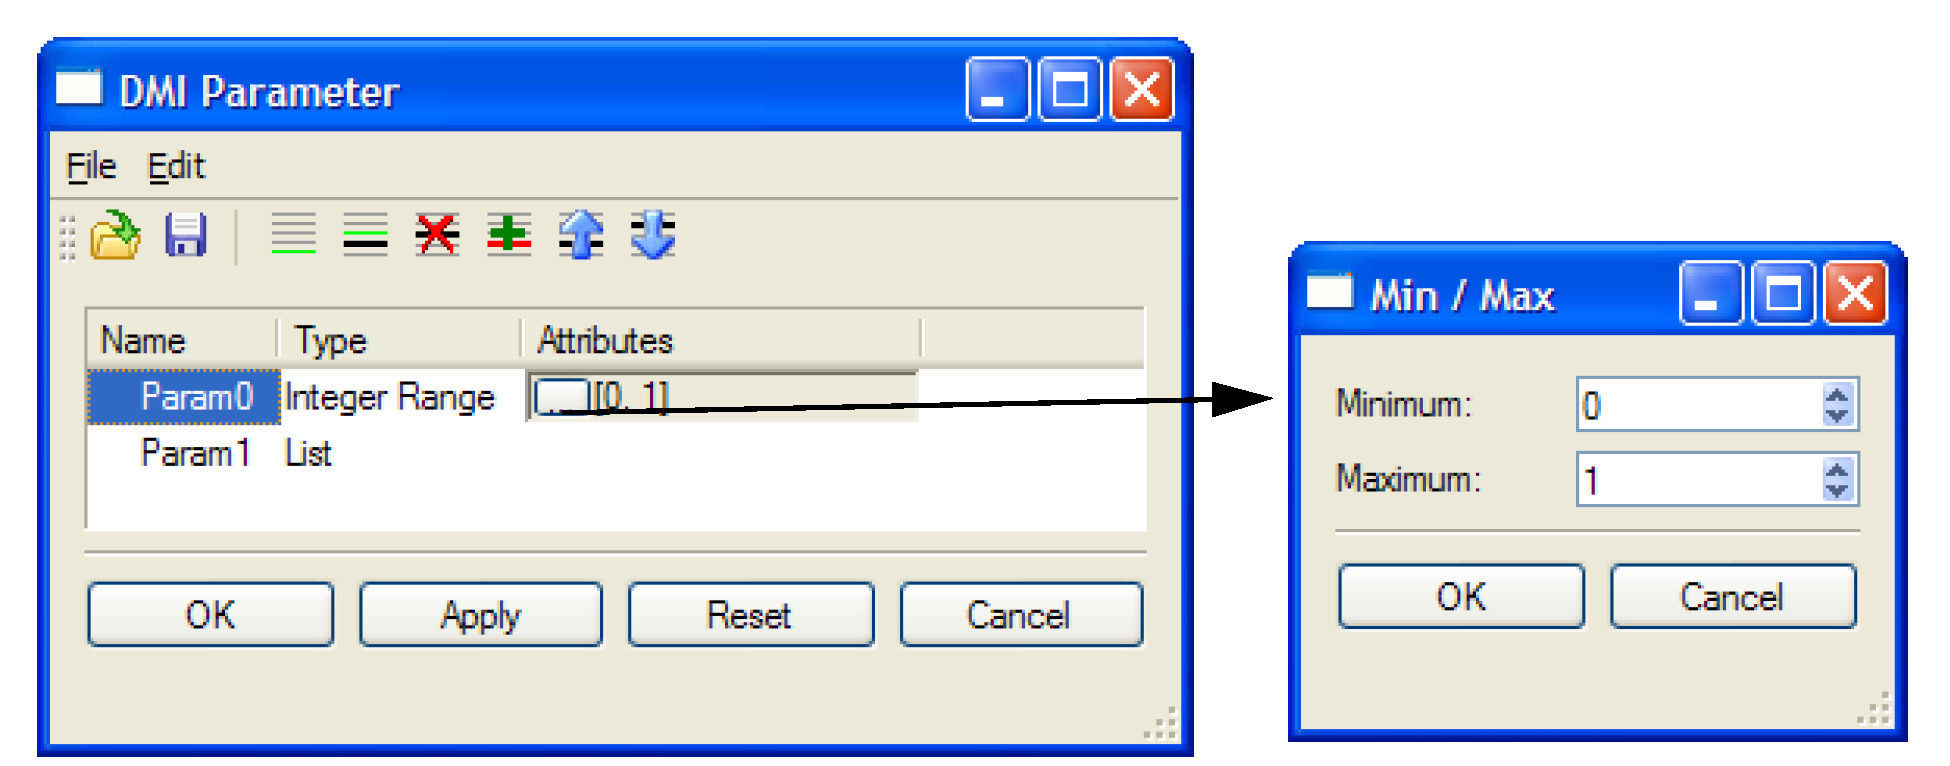
Figure 1.5 shows that for a List, the attribute-specific dialog enables the user to append, insert, delete, edit and order text items, ensuring the text items contain only non-white space characters (first image).
Figure 1.5
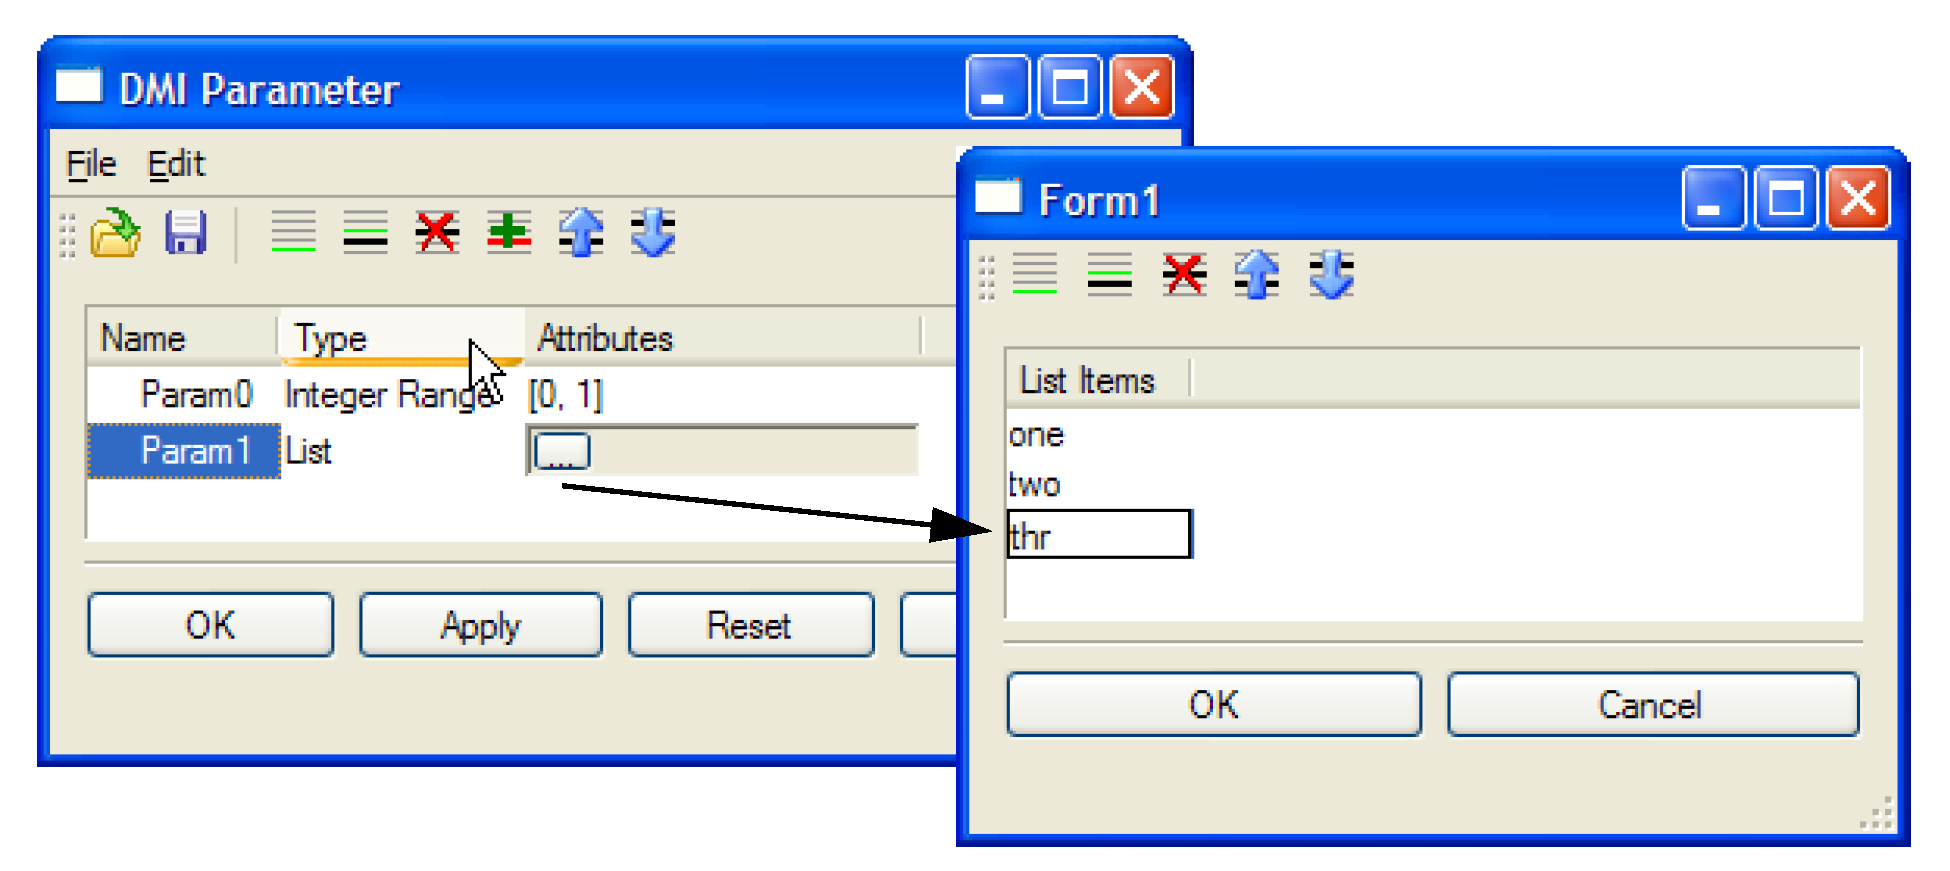
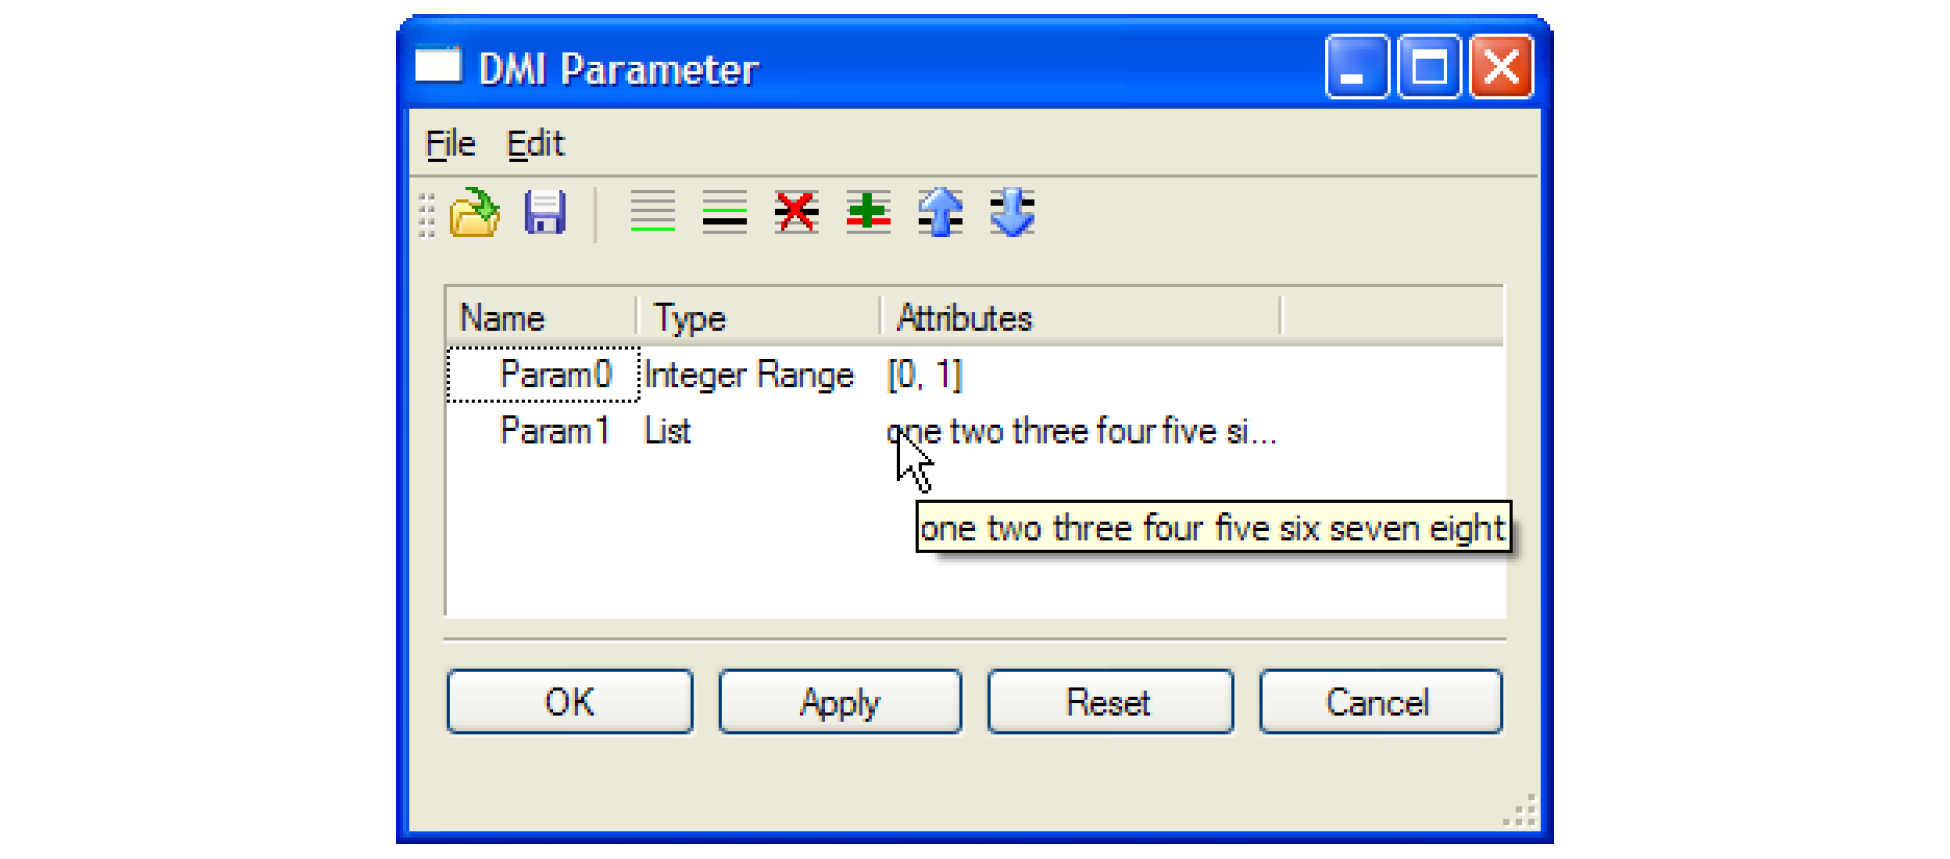
Figure 1.6 shows that if the resulting list contains more text than will fit in the Attributes cell, an ellipsis (“...”) is displayed and the entire list is displayed in a tooltip when the mouse pointer is paused on the Attributes cell (second image).
Figure 1.6
Exporting and Importing Parameters
Before exporting or importing parameters, all edits ( ,
,  or
or  ) must be resolved (applied or canceled).
, or ) must be resolved (applied or canceled).To export parameters the user selects the File, then Export Parameters main menu item, which opens a file chooser dialog. The user selects the file to export the parameters to, then selects Save. If the file has a “.gz” suffix the parameters are saved in a compressed format.
To import parameters the user selects the File, then Import Parameters main menu item, which opens a file chooser dialog. The user selects the file to import the parameters from, then selects Open.
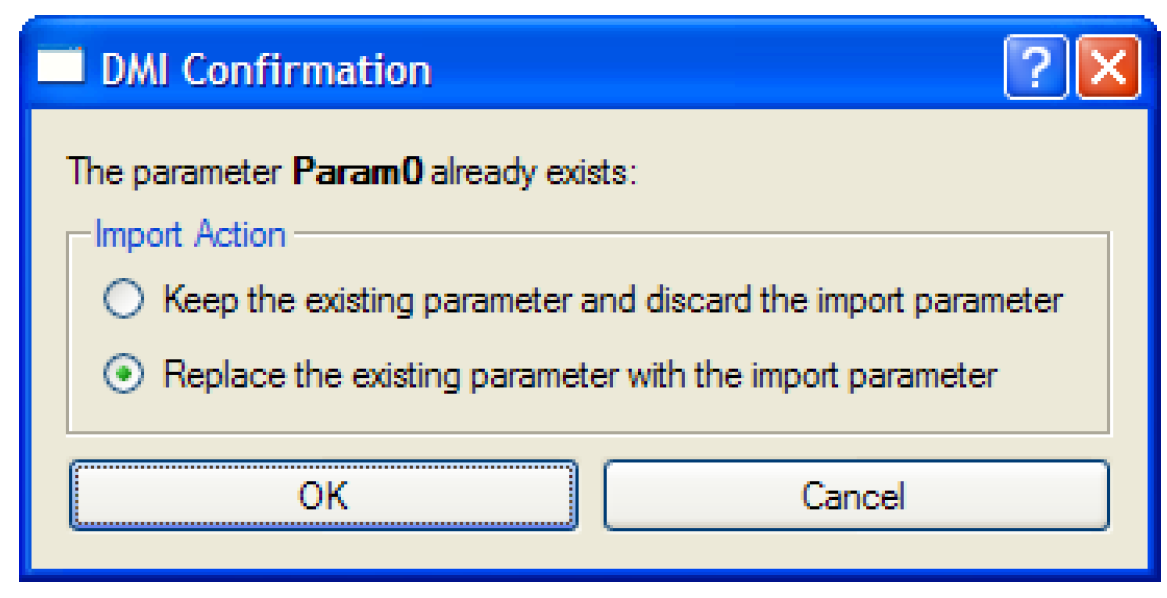
Parameters are imported by name; if the file contains a parameter which already exists, the user is asked whether to keep the existing parameter or replace it with the import parameter:
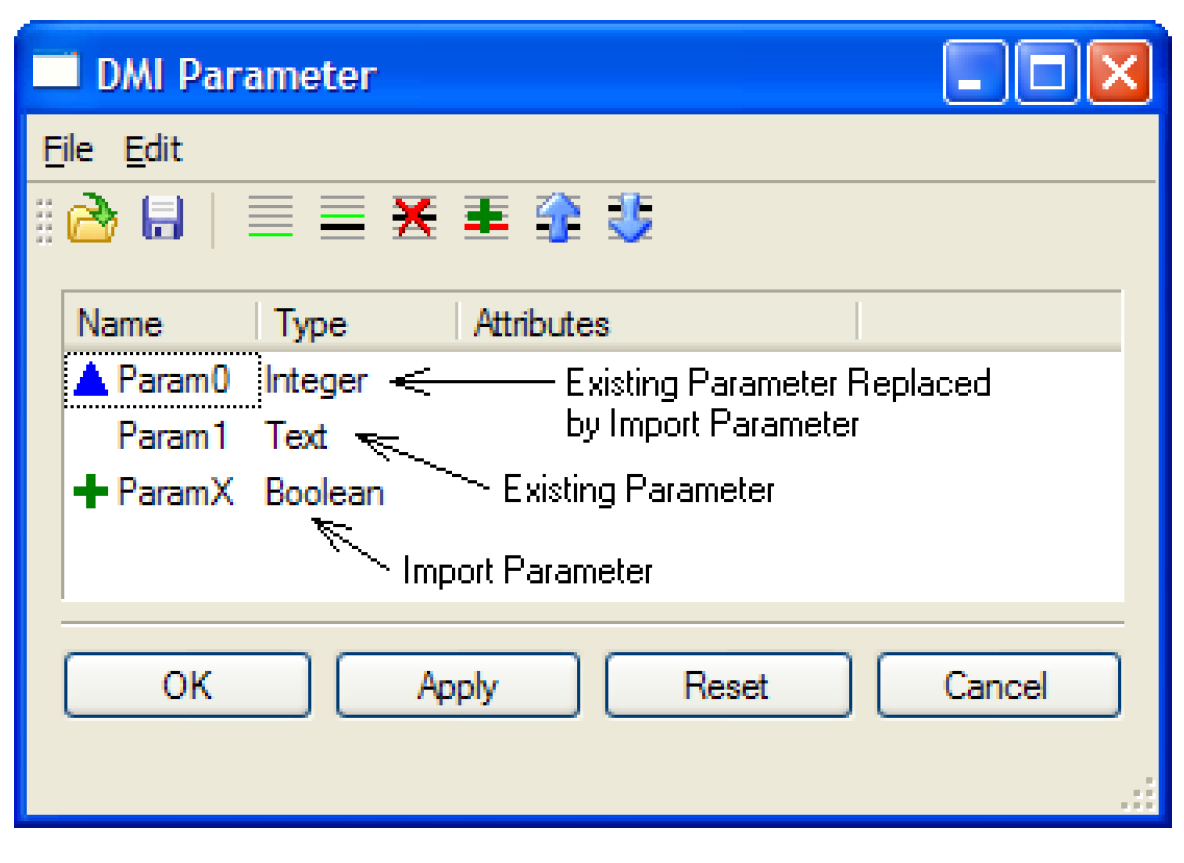
Also, parameters are imported as though they were edited. Import parameters which are new are marked with  ; import parameters which replace an existing parameter are marked with
  :
:
; import parameters which replace an existing parameter are marked with :The user can then:
• Apply the import
• Cancel the import
• Further edit the parameters before applying the import and edits
Reconciling Parameter Edits
When the DMI Parameter dialog edits parameters it can invalidate DMIs using the parameters. Consider Param0 (a Boolean parameter), Param1 (a Text parameter) and Param2 (an Integer Range parameter):
• Deleting Param0 would invalidate a DMI using the parameter.
• Changing Param1’s type from Text to Integer would invalidate a DMI using the parameter with a value of “xyz”.
• Changing Param2’s maximum value from 99 to 89 would invalidate a DMI using the parameter with a value of 93.
Although the DMI is invalid, it isn’t changed; that is, when the DMI is invoked its executable’s command line will still include:
-UParam0=True -UParam1=xyz -UParam2=93
However, when the user edits the DMI there will be a graphical indication that the DMI is invalid, and the user will be constrained in how the DMI can be edited.
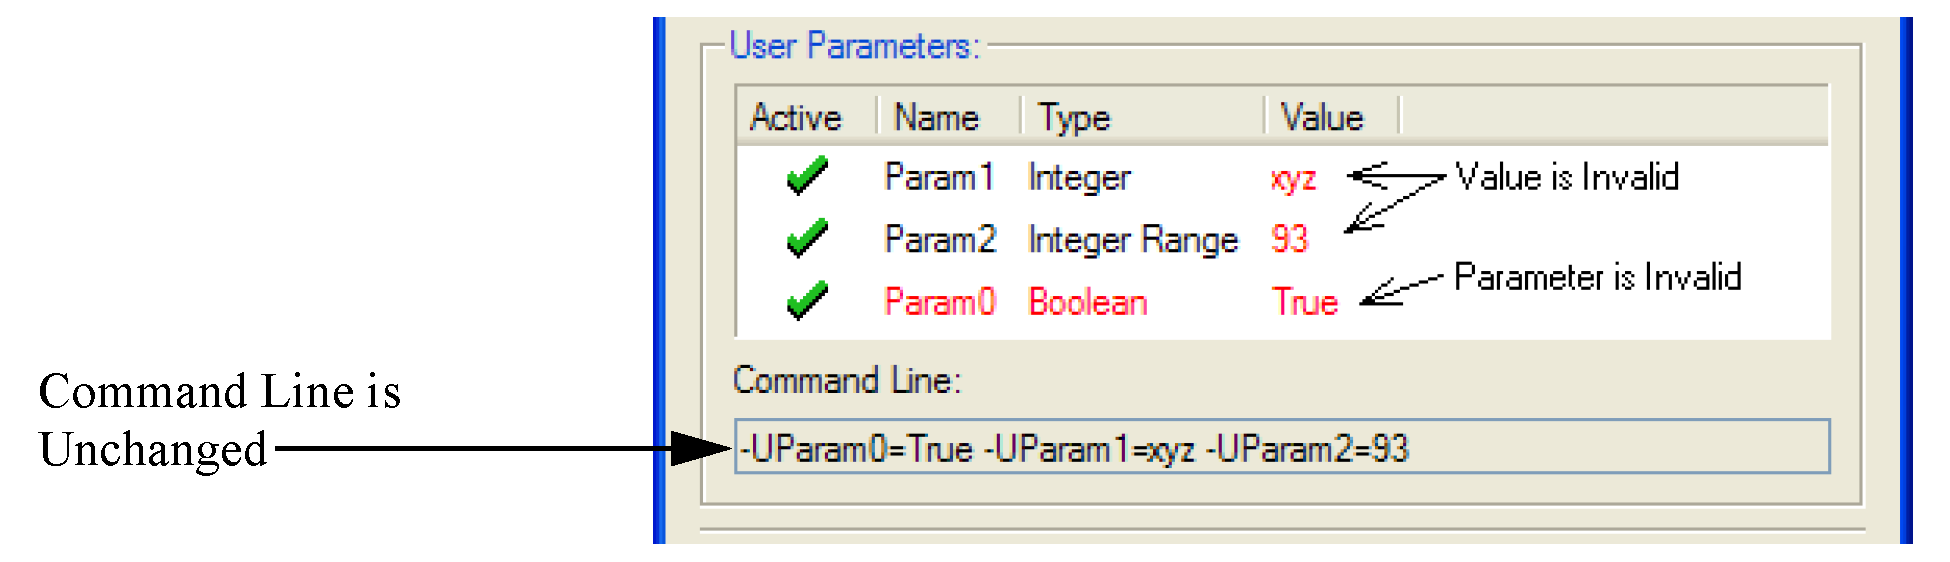
Param0 is shown entirely in red to indicate it is deleted; the user:
• Can deactivate the parameter
• Cannot edit the parameter’s value
Param1’s value and Param2’s value are shown in red to indicate they are invalid; the user:
• Can deactivate the parameter
• Can edit the parameter, constrained to the parameter’s new type or attributes. (In other words, Param1 can be edited as an integer, Param2 can be edited as an integer with a maximum value of 89.)
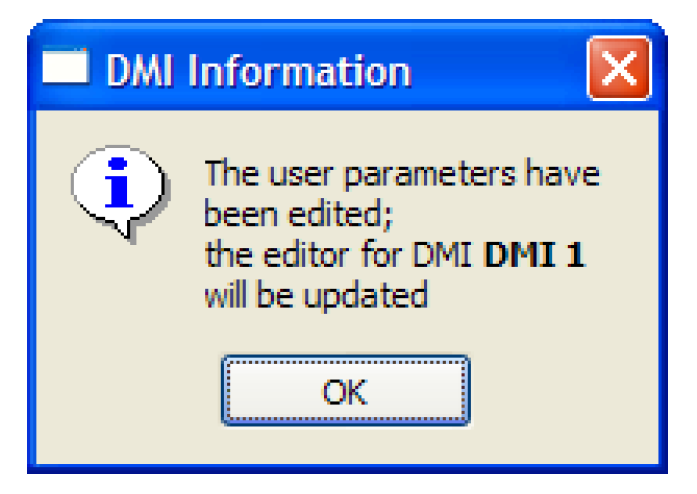
Finally, if the DMI Editor dialog is open when the user edits the parameters, a confirmation dialog appears, notifying the user that the DMI Editor dialog will be updated.
DMI Invocation Manager Dialog
The DMI Invocation Manager dialog displays all DMI invocations which RiverWare has recorded. From this dialog, the user can clear values that were set by a specific DMI.
Note: DMI invocations are only recorded for DMIs that have been explicitly configured to do so. See Record Invocations for details on Control File - Executable and Trace Directory DMIs. See Creating a Database DMI for details on Database DMIs.
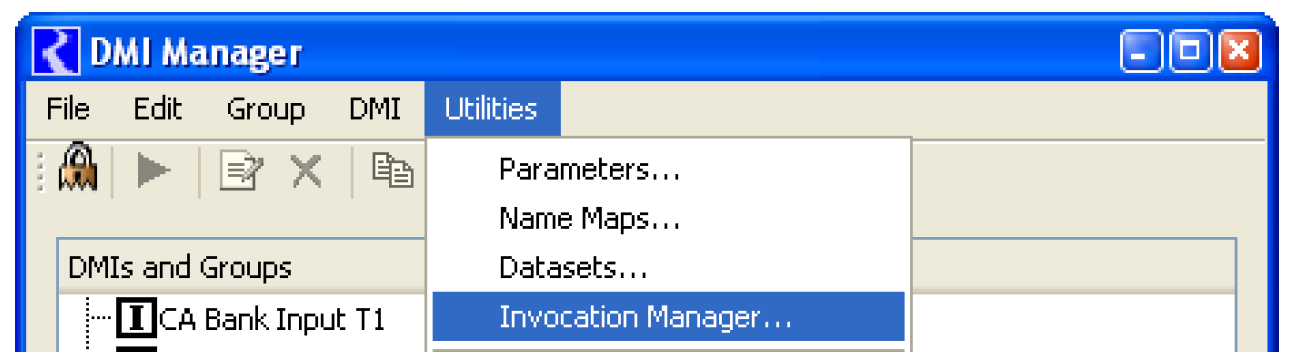
The dialog is opened from the DMI Manager dialog using the Utilities, then Invocation Manager menu.
Overview
For each invocation the dialog displays the following:
• The DMI name.
• The date and time the DMI was invoked.
• The invocation status, one of:
– “OK” - The invocation succeeded, without warnings.
– “Warnings” - The invocation succeeded, with warnings.
– “Errors” - The invocation failed, with errors.
• The user who invoked the DMI.
• The slots on which the DMI invocation set values and the number of values.
The DMI Invocation Manager is a singleton; that is, no other edits or views to any RiverWare window can be made while the DMI Invocation Manager is open. It must be closed first. Use the File, then Close Window menu, Ctrl-W shortcut or Close button.
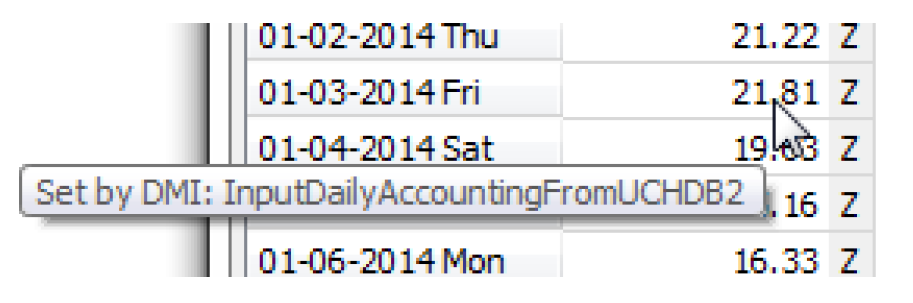
Values set by a DMI with Invocations Recorded are given the “Z” flag. Tooltips on the slot window displays indicate which DMI set each values on the slot. For example, in Figure 1.7, on Jan 3, 2014 the value 21.81 was set by the InputDailyAccountingFromUCHDB2 DMI.
Figure 1.7
Views
The dialog has two views, By DMI and By Date.
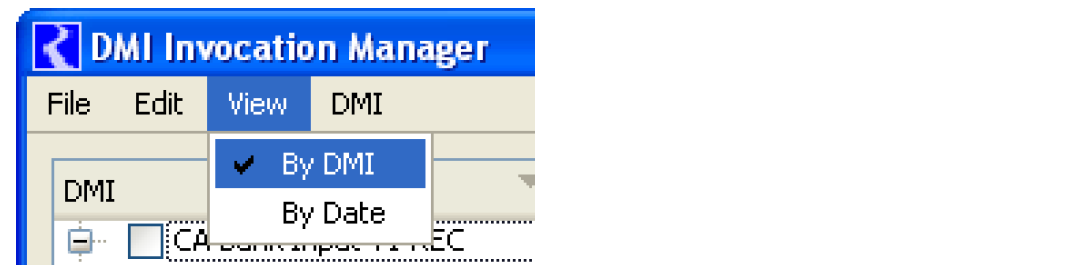
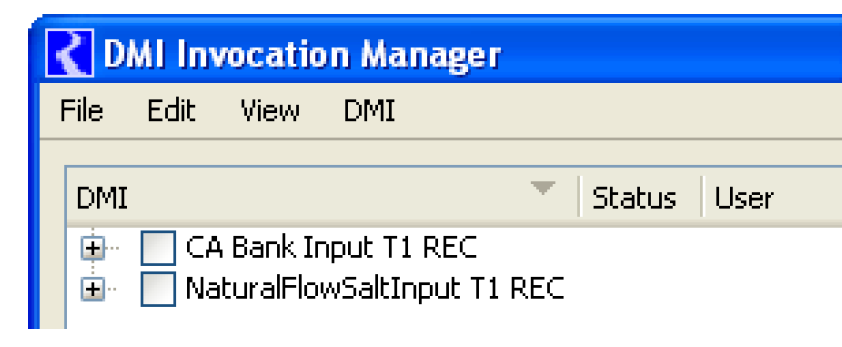
In the By DMI view, the invocations are grouped by DMI, with the invocations in reverse-chronological order (most recent is on the top).
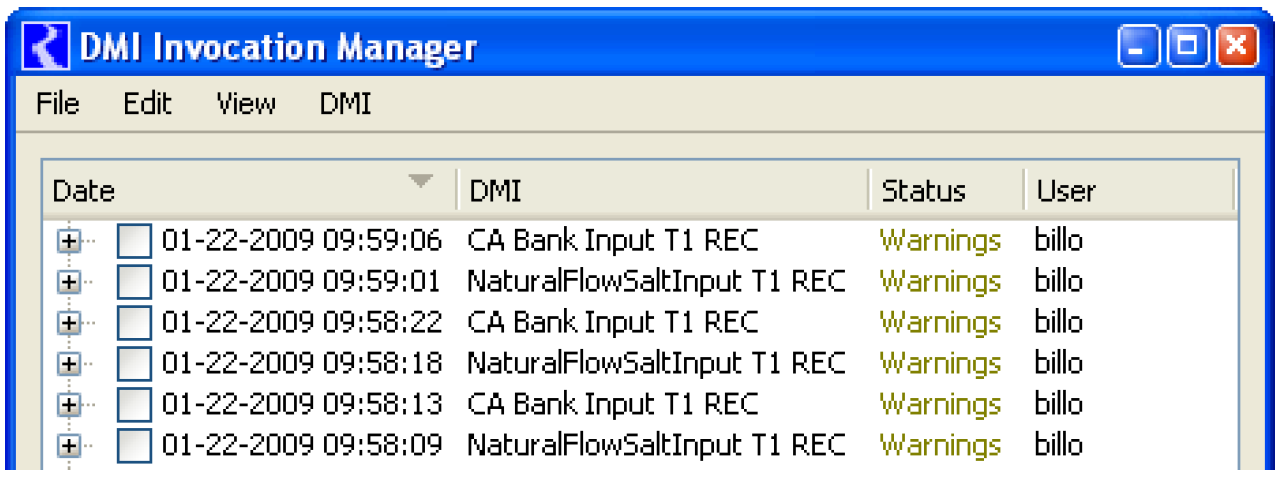
In the By Date view, the invocations are displayed in a list, in reverse chronological order.
Note: The columns are sortable by selecting the column heading.
In both views, the slots set by an invocation are displayed in a tree view in alphabetical order.
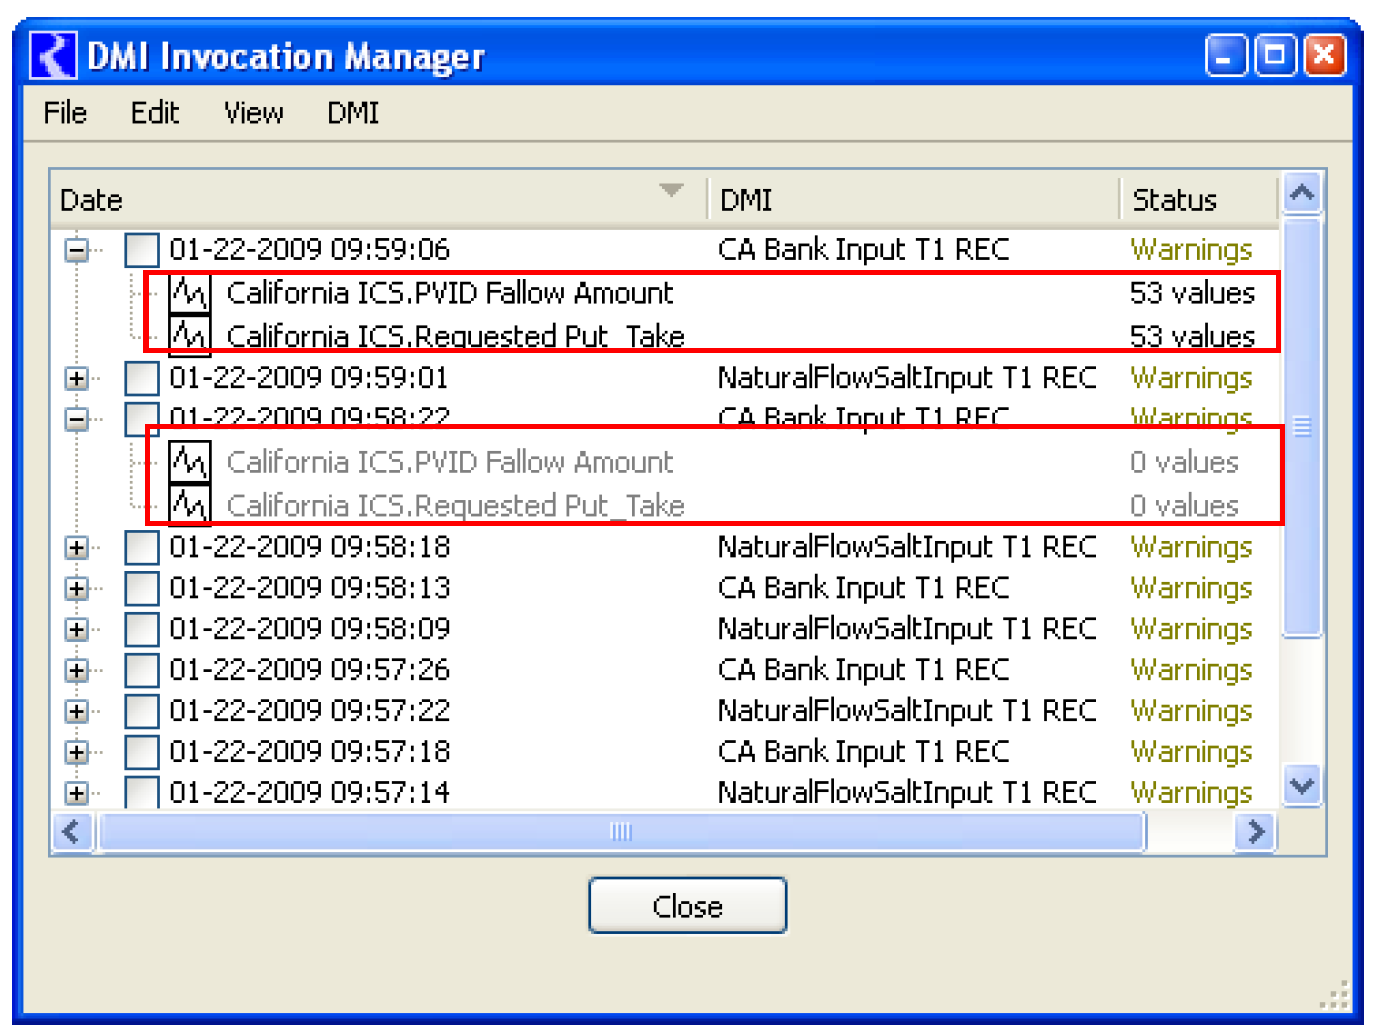
It is possible an invocation of a DMI will be superseded by other events, perhaps another invocation of the DMI or user inputs from the user interface. In Figure 1.8, the first invocation of “CA Bank Input T1 REC” (bottom) has been superseded by the second invocation (top), and consequently the first invocation (bottom) no longer is responsible for setting the values that are on the slot. This is indicated with the slot name grayed-out and “0 values” in the Status column.
Figure 1.8
Clearing Values
A user is able to select invocations, and then from the Edit menu Clear the values set by the invocation (i.e. the values in the slots).
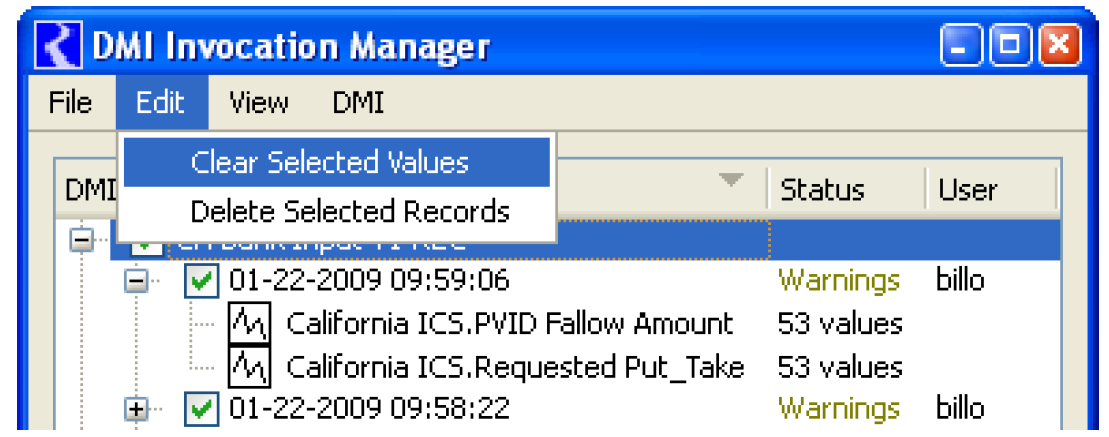
The Edit, then Clear Selected Values feature clears values set by DMIs on a per-invocation basis; a user selects the DMI invocations to clear, and only the values set during those invocations will be cleared. Suppose a DMI is invoked twice, setting values on a SeriesSlot at timesteps t1 and t2 during the first invocation and at timesteps t3 and t4 during the second invocation. If a user selects the first invocation, only the values set at timesteps t1 and t2 will be cleared.
Following are some limitations on the clearing of DMI values:
• Control File-Executable type DMIs which set values AND flags are not clearable.
• A user is able to clear values set by DMIs invoked from the user interface (the DMI manager dialog and the workspace menu) and from batch mode - not from RPL blocks or multiple run management.
• The feature clears values set by a DMI (as opposed to restoring values overwritten by a DMI). Specifically, if a DMI overwrites a non-NaN value, the clear feature will replace the value the DMI wrote with NaN - it will not restore the previous non-NaN value.
• The feature does not clear any “side effects” of a DMI. For example, if a DMI sets a Series Slot’s start date, the feature will not restore the previous start date.
• The feature clears values set by DMIs on series slots on a per-timestep basis. If a subsequent action (e.g., user input) overwrites a value set by a DMI, it will not be cleared.
• The feature clears table slots and scalar slots in their entirety. If a subsequent action (e.g., user input) overwrites a table value set by a DMI, it will be cleared.
DMIs can then be executed directly from the DMI Invocation Manager using the DMI menu.
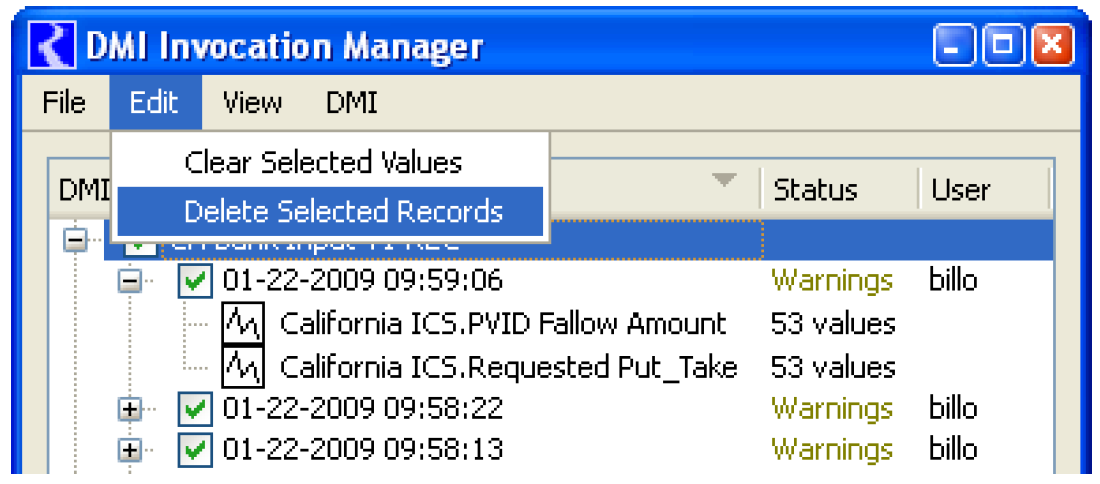
Deleting Invocation Records
A user is able to select invocations, and then delete the invocation record by selecting Deleted Selected Records in the Edit menu. This operation deletes the record from the list of invocations but does not delete any of the values.
Invoking DMIs and DMI Groups
There sere five ways to invoke a DMI or DMI Group: from the DMI Manager, from the Workspace, from the SCT, from the DMI Invocation Manager, or from RPL blocks.
DMI Manager
To invoke a top-level DMI, select DMI, then Invoke; to invoke a DMI group, select Group, then Invoke.
Workspace
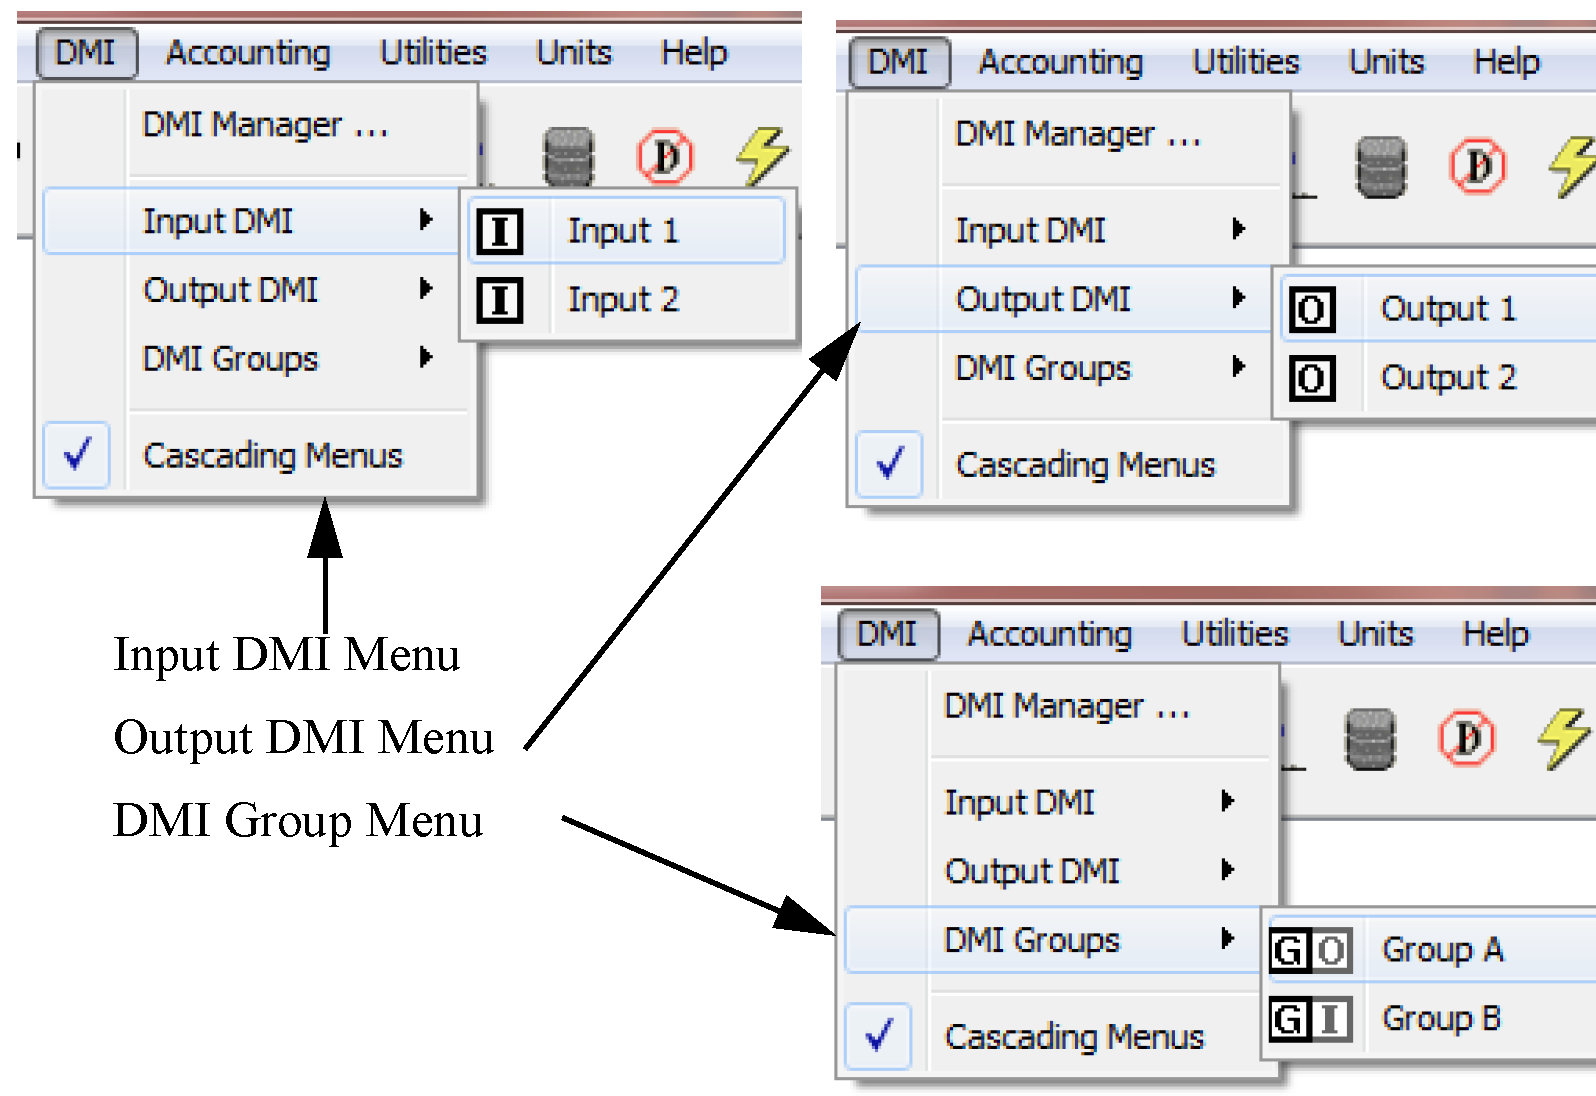
The Workspace DMI menu provides an alternate means of invoking DMIs and DMI groups - selecting the DMI or DMI group from the menu is equivalent to invoking the DMI or DMI group from the DMI Manager dialog (as described above). The user can alternate between a conventional menu (Figure 1.9) and a cascading menu (Figure 1.10). In the conventional menu the DMIs and DMI groups are sorted by name within type (first input DMIs then output DMIs then DMI groups).
Figure 1.9
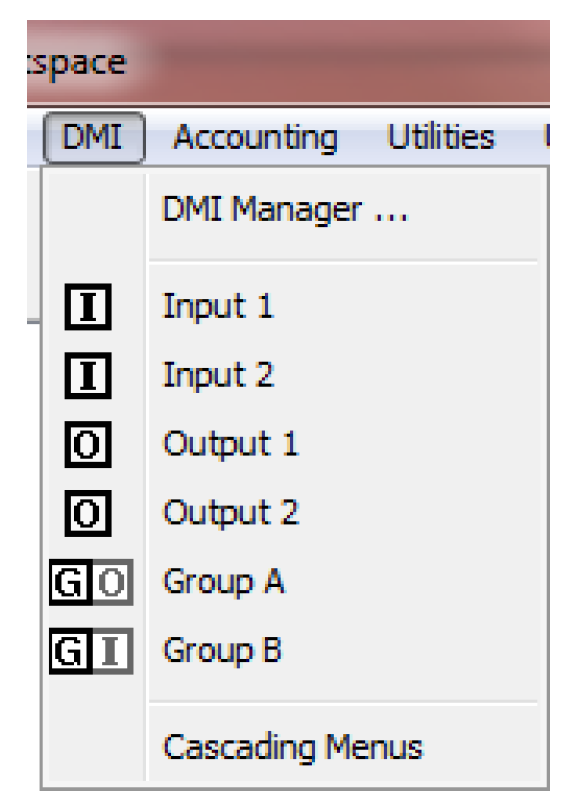
Figure 1.10
SCT
The SCT has the same DMI menu as the Workspace (described above).
DMI Invocation Manager
The DMI Invocation Manager has a similar menu to the Workspace DMI menu. The only difference is that there is no DMI Manager item on the DMI Invocation Manager. (The DMI Invocation Manager can only be accessed from the DMI Manager so closing the DMI Invocation Manager will go back to the DMI Manager).
RPL Blocks
A DMI or a DMI group can be executed from a RPL block (typically a rule) as either a pre-execution or post-execution. See Executing DMIs From Blocks in RiverWare Policy Language (RPL) for details.
Warning and Error Messages
When a DMI is invoked, each warning is displayed in the Diagnostic Output dialog.
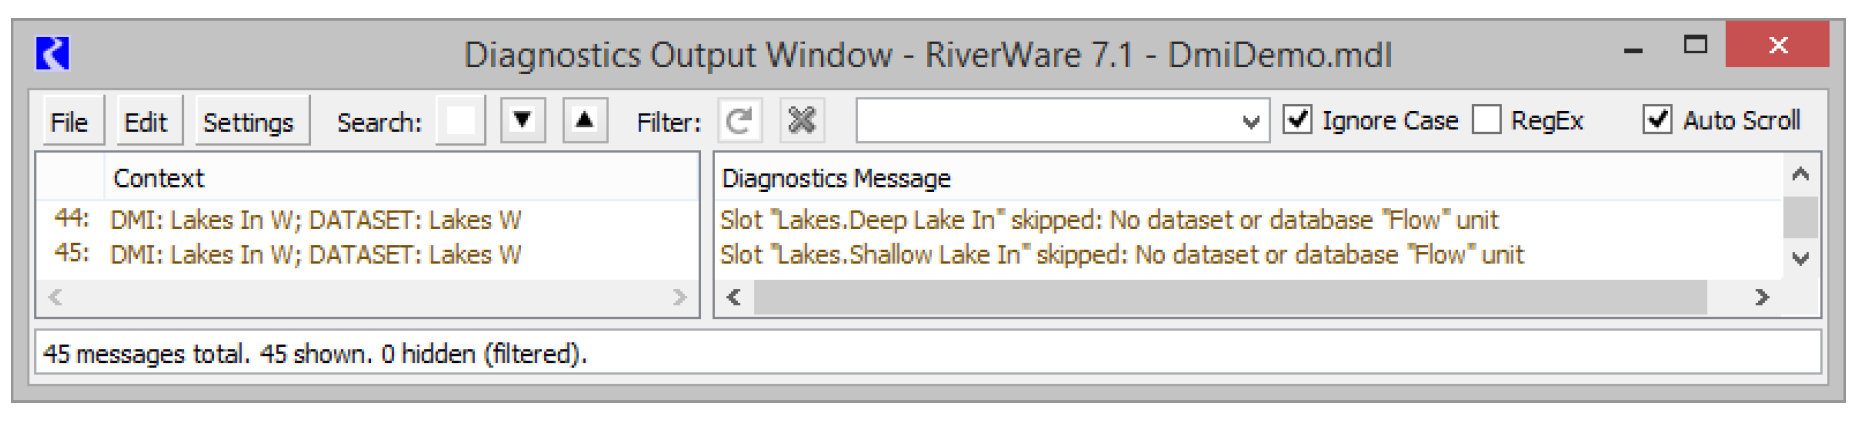
If the DMI is configured to Confirm Warnings (see Name and Type and Confirm Warnings Checkbox) or an error occurs, a separate dialog called the DMI Status Dialog will open. Figure 1.11 shows the warning or error messages.
Figure 1.11
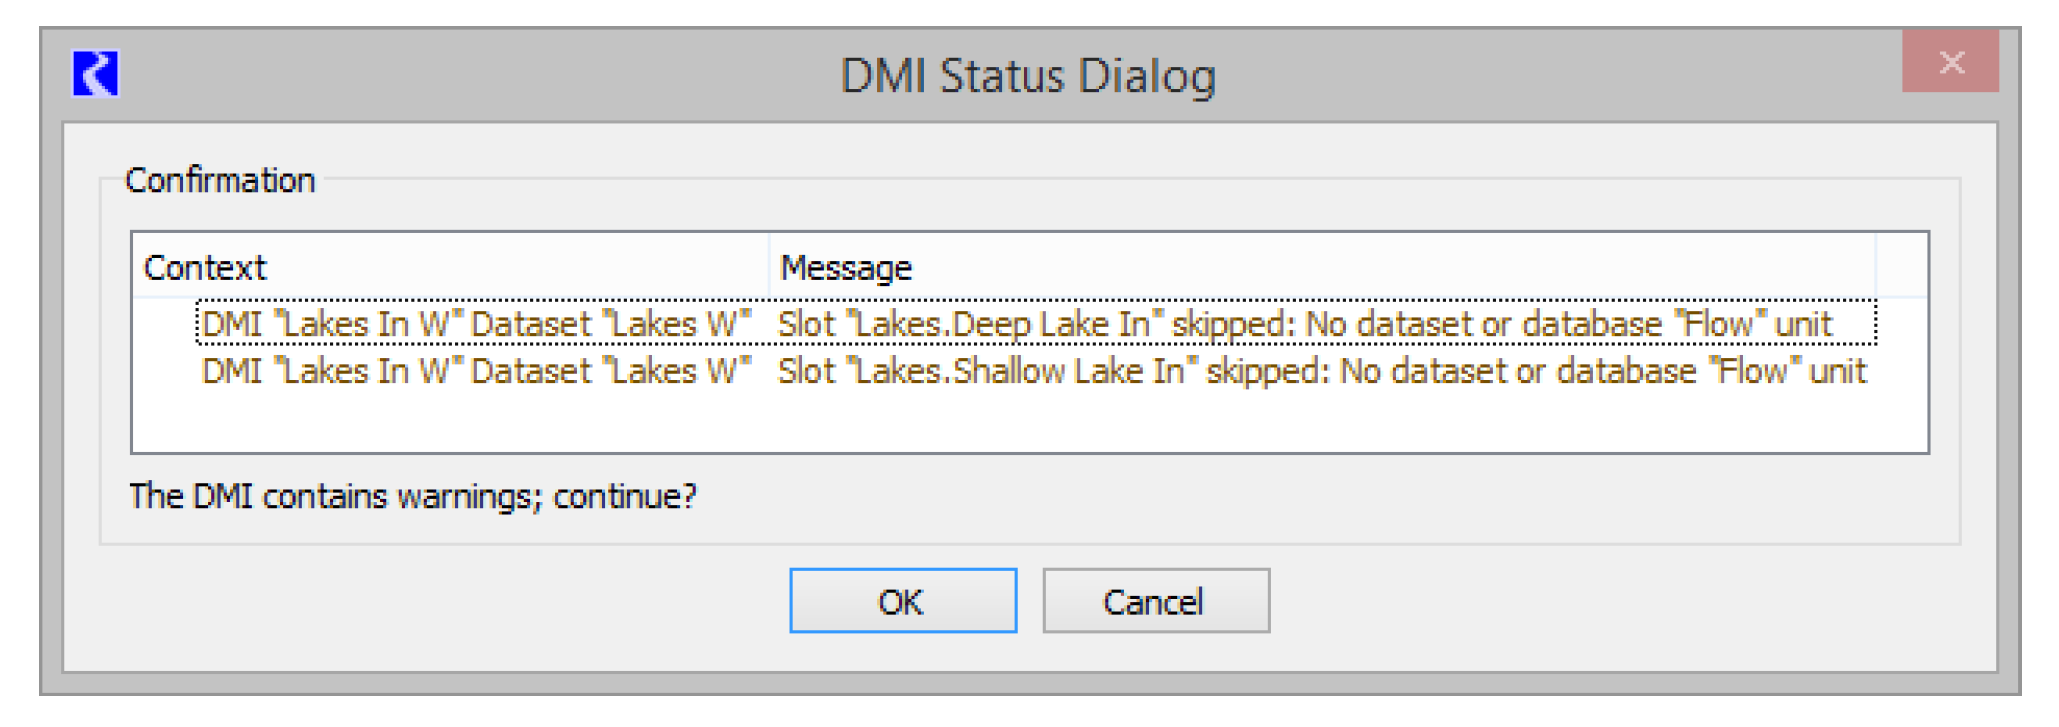
If the messages are just warnings and you wish to continue execution of the DMI (Confirm Warnings is selected), select OK. Otherwise, select cancel to stop execution.
Any errors generated by the DMI are displayed in the DMI Status Dialog and in the Diagnostic Output dialog in red text. After an error, the DMI stops executing.
Note: There are diagnostics available for DMIs. See Workspace Diagnostics in Debugging and Analysis for details.
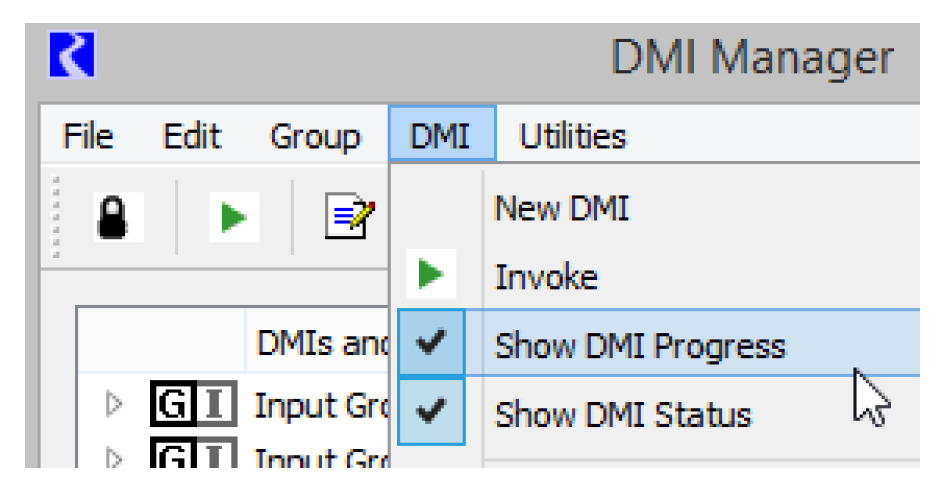
DMI Status and Progress
The status of an executing DMI is shown in the bottom of the DMI manager. You can also configure to show a separate DMI Status Dialog that has optional panels for the Progress, Status, and Confirmation. This dialog shows information on the DMI as it executes including the slots that it is processing and the location of the data being processed. To show this status dialog, from the DMI Manager, select DMI, then Show DMI Status or DMI, then Show DMI Progress. The selections are saved with the model file. In Figure 1.12, both Show DMI Progress and Show DMI Status are selected. In addition, there are Confirmation messages that must be confirmed before this DMI can continue.
Figure 1.12
In Figure 1.13, the Progress panel shows that the DMI is executing including the Group (if there is one), the DMI, and the slots being processed.
Figure 1.13
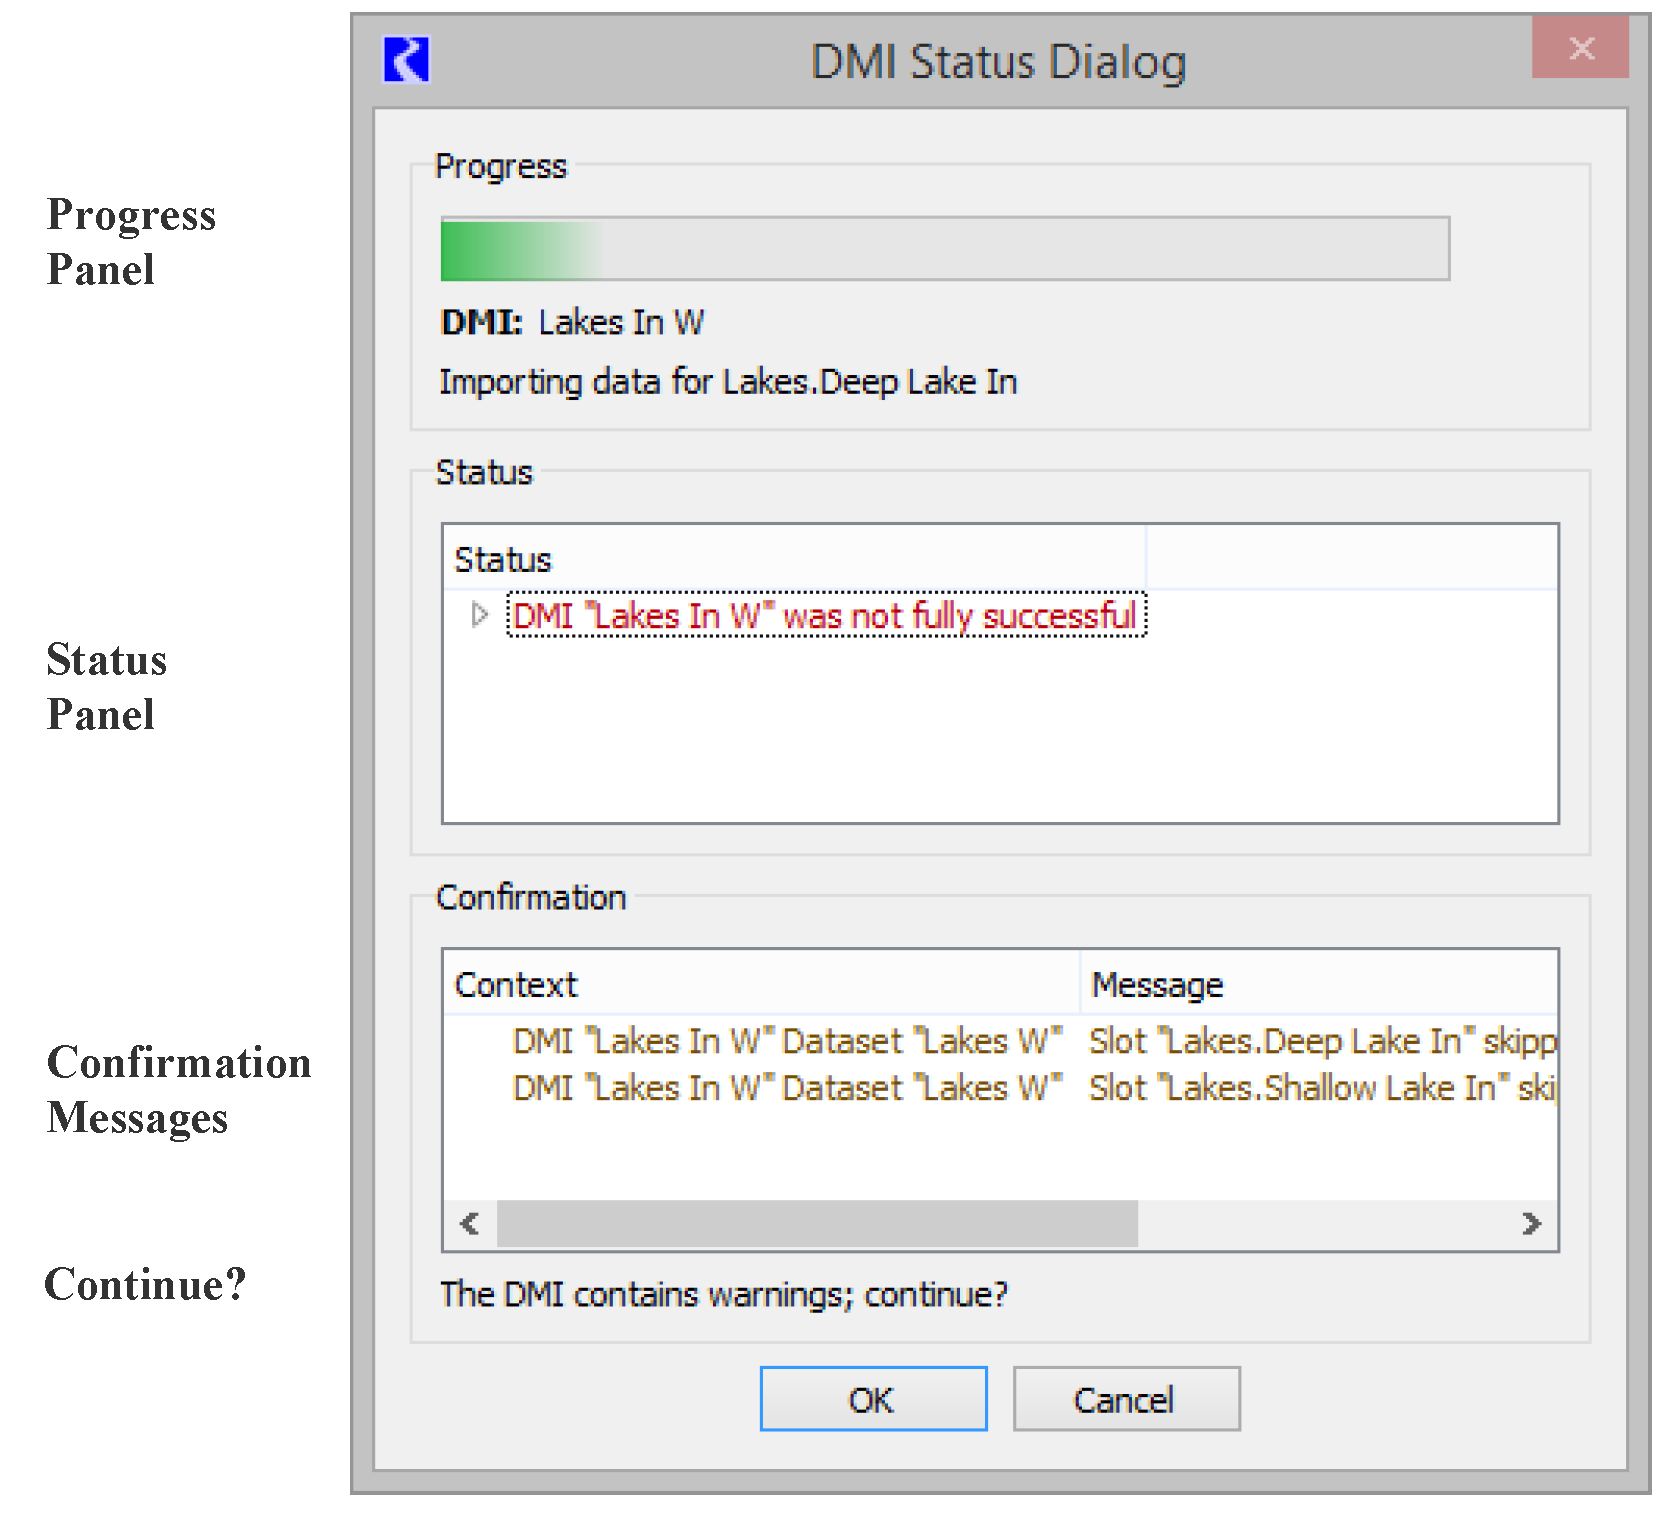
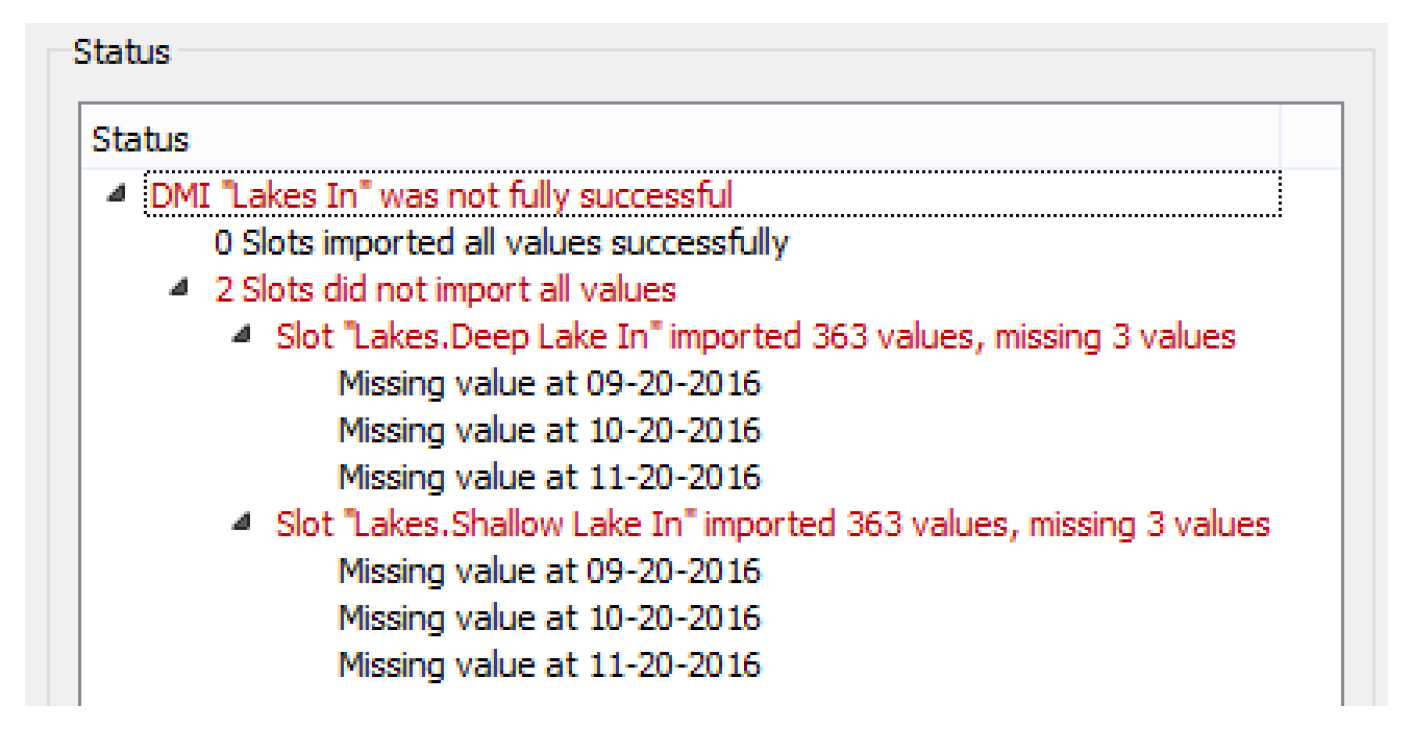
The Status Panel shows the results (for an Input DMI only). For example, in Figure 1.14, the treeview has been expanded to show all of the information. This indicates that 363 values were imported for each slot, but three values in each slot were missing. The red messages are also copied to the Diagnostics Output Window so you can see the messages after closing the DMI Status dialog.
Figure 1.14
Icon Quick Reference
Icon | Meaning |
|---|---|
 | Invoke the selected top-level DMI or DMI group |
 | Edit the selected top-level DMI |
 | Delete the selected top-level DMI or DMI group |
 | Copy the selected top-level DMI or DMI group |
 | Paste the previously selected top-level DMI or DMI group, creating a new top-level DMI or DMI group |
 | Add the selected top-level DMI to a DMI group |
 | Remove the selected member DMI from its DMI group |
 | Display the selected DMI’s group membership |
 | Move the selected member DMI up within its DMI group |
 | Move the selected member DMI down within its DMI group |
 | Select to unlock the DMI Manager dialog |
 | Select to lock the DMI Manager dialog |
Icon | Meaning |
|---|---|
 | Append a row to the list |
 | Insert a row into the list, before the selected row |
 | Delete the selected row |
 | Undelete the selected (and previously deleted) row |
 | Move the selected row up one position |
 | Move the selected row down one position |
 | Import parameters from a file |
 | Export parameters to a file |
 | Imported parameters which replace an existing parameter are marked with this icon |
 | Imported parameters which are new are marked with this icon |
Icon | Meaning |
|---|---|
 | Add a new Name Map |
 | Edit the selected Name Map or Dataset |
 | Copy the selected Name Map or Dataset |
 | Paste a copied Name Map or Dataset |
 | Delete or remove the selected Name Map or Dataset |
 | Choose a file using a file selector |
 | The name map, dataset or DMI has changes that have not been applied |
 | Indicates the name map, dataset, or DMI is locked by another dialog and cannot be edited. |
 | Indicates the name map, dataset, or DMI is scheduled for deletion and locked by another dialog and cannot be edited. |
Revised: 08/02/2021