
Saving Models
There are three ways to save a model in RiverWare: the default Save, Save As, and Save As Baseline.
Save
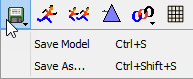
The Save command saves the current model with the same name and in the same directory as it was last opened or saved. Use the Save button and then Save Model.
Save As
The Save As command invokes a file chooser to select a new name and/or directory into which to save the current workspace. Once a Save As has been performed, any subsequent Save will use the same file name and directory until a new model is loaded, the RiverWare session ends, or a new Save As overrides it.
Use the Save button and then Save As.
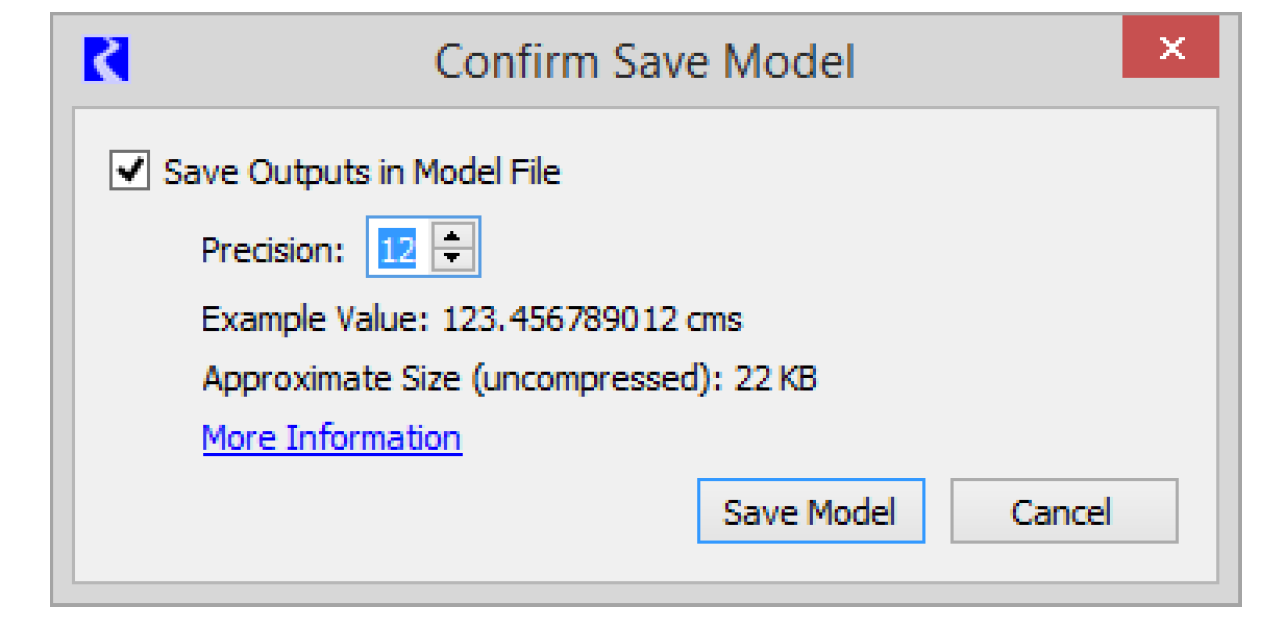
When using Save As, after you specify the file, a confirmation will allow you to specify whether to Save Outputs in the Model File and the Precision with which to save outputs. See Saving Output Values for details.
Save As Baseline
The Save As Baseline option is used to create an unalterable baseline model for generating alternate simulation scenarios with the Scenario Manager. Creating alternate scenarios is described in greater detail in the Scenario Manager section.
Note: You can save a model for use in the RiverWare Interactive Scenario Explorer (RiverWISE) using the Export to RiverWISE option. See RiverWare Export to RiverWISE in RiverWISE Model Developer’s Guide for details.
Saving Output Values
As models can be large and take up significant disk space, several options are available for minimizing the saved model size.
Saving Output Options
One option is whether or not to save the model with its calculated output values (series values with the Output or Rule flag). The model file size is greatly reduced if the output values are not saved. This is the recommended option for saving small, frequently run models. Since only the input values are required to reproduce a run, the output may be regenerated by re-running the simulation once the model has been re-loaded. But, if your model is large or takes a long time to run, you will likely want to save results, so that you can look at output values without re-running. Only Save As prompts for whether or not to save output values. The selected choice is then applied for all subsequent Saves until a new model is loaded, the RiverWare session ends, or a new Save As overrides it. The default Save behavior for a new session or model is to save output values. All series slot values with the Input flag (I, Z or i flag) and all values on non-series slots are always saved in the model file with full precision (17 digits).
Precision for Outputs
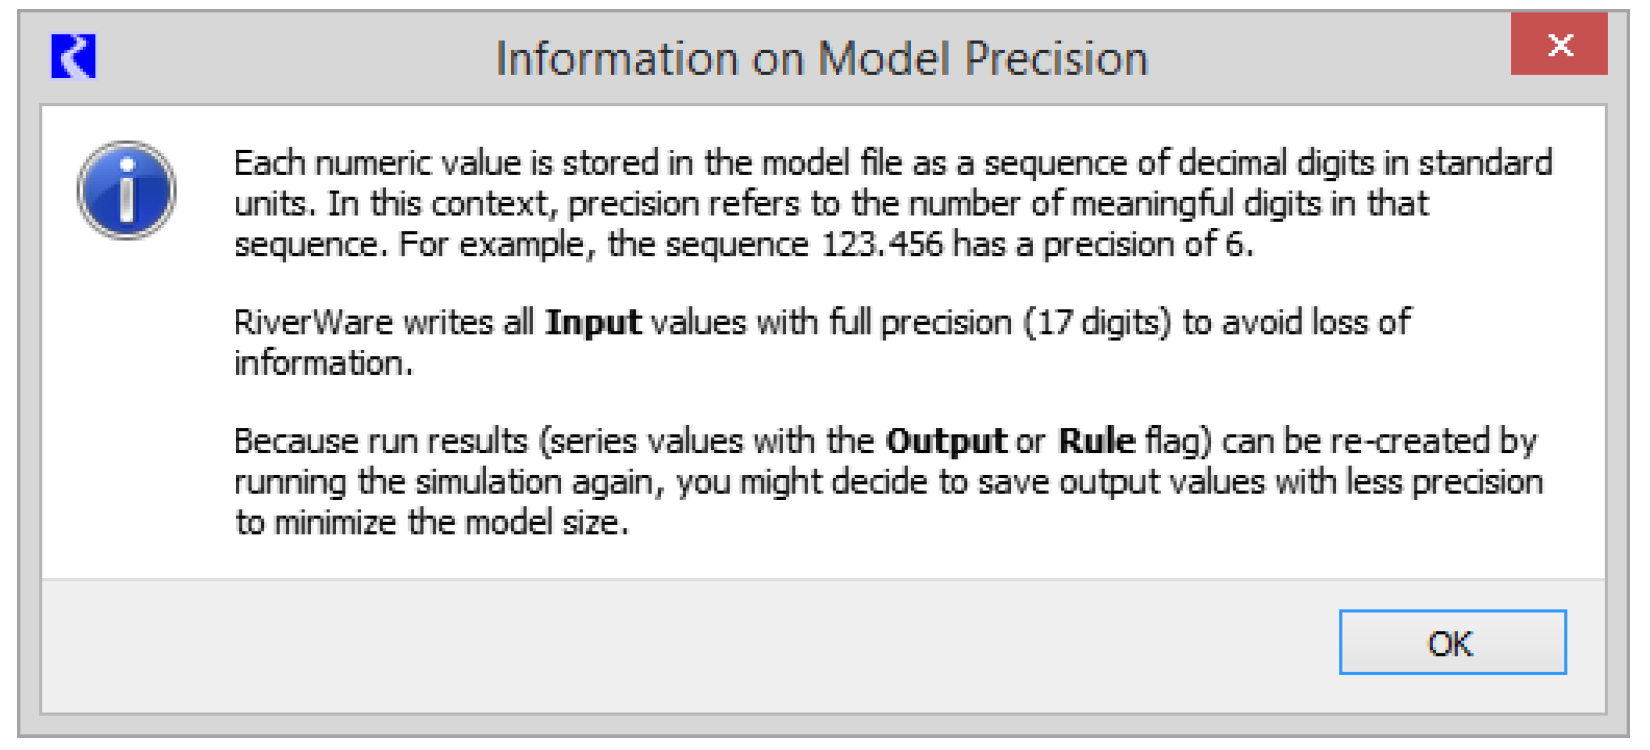
Precision refers to the number of meaningful digits in a numeric value. In the Save As confirmation, if you select the option to Save Outputs in the Model File, you will also have the option to set the Precision with which to save output values. You can save outputs with 1 to 17 digits of precision. Saving with higher precision will increase model size. In the interface, select the More Information link for additional information about precision. All series slot values with the Input flag (I, Z or i flag) and all values on non-series slots are always saved in the model file with full precision (17 digits).
Naming Conventions
Although there is no required extension for RiverWare model files, the .mdl extension is often used to identify a file as a model file, and a .rls extension is used to identify a ruleset file.
Further, files that end in the .mdl extension will display the RiverWare model file icon in windows explorer. Double-selecting the icon will open the latest installed version of RiverWare and load that model.
Compressing Model Files
Model files may be automatically compressed when they are saved by giving their file name a .gz extension (the gnu zip compression). When the model is re-loaded, the extension is detected, and the file is uncompressed automatically. Thus, the .mdl.gz extension is often used to identify a file as a model file and a .rls.gz extension is used to identify a ruleset file when compression is desired.
In Windows, the association between RiverWare and the .gz file extension has not been made because of the general nature of the .gz extension,. You can manually associate .gz files with RiverWare so that RiverWare will automatically open when you double-click a .gz file. To do this, right-click a .gz file and select Properties. Then select the Change button and select RiverWare from the list of files.
Backup Files Created When Saving Manually
The first time a model is saved to an existing file, a backup of the original file is made. This prevents data loss if an overwrite is unintentional or the save process fails and the model is corrupted. The backup file has the same name as the original with a .bak extension. A single backup file is made for each model. When upgrading to a newer version of RiverWare, the backup model file name will contain the previous RiverWare version number to the model file (e.g., SampleModel.6.5.mdl.gz). This ensures that there will be a model file compatible with RiverWare version 6.5 until the user explicitly removes it.
Automatic Backup Save
The automatic backup save utility saves a backup file in a temporary directory at a defined interval. It is strictly a backup save of the model file, and it never overwrites the model open currently.
The feature is configured from the workspace File, then Automatic Backup Save Configuration menu item, which opens the Automatic Backup Save Configuration dialog.
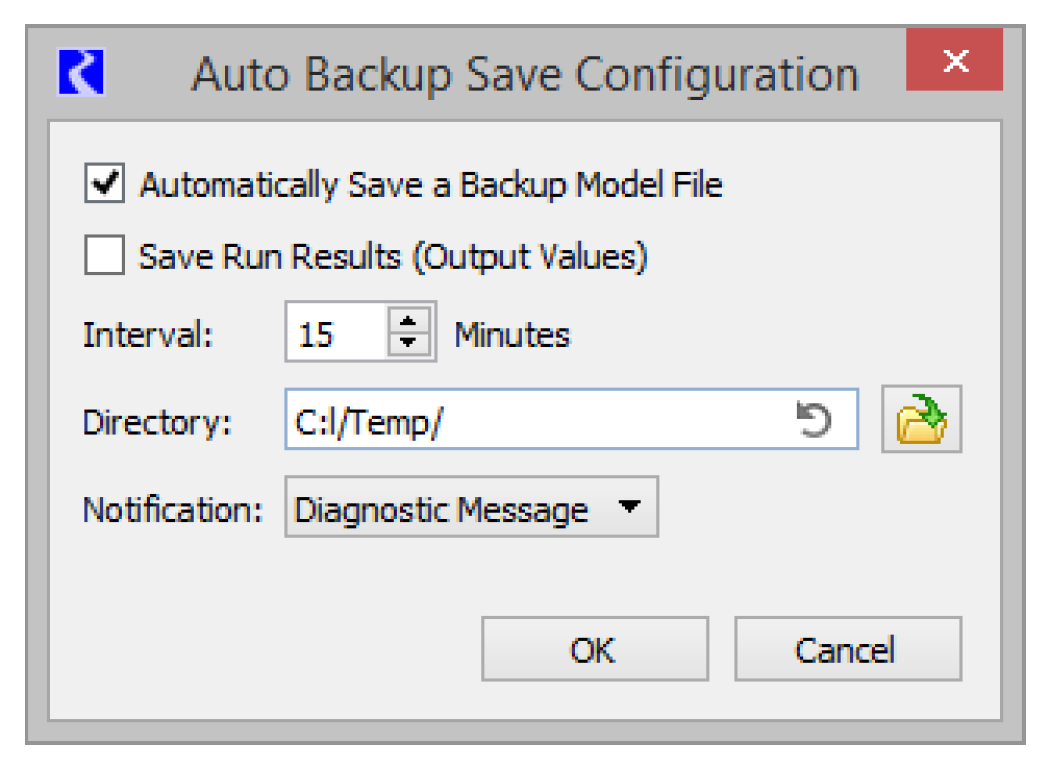
From the dialog, you configure the following:
• Whether the model file should be Automatic Backup Saved. If unchecked, the remaining fields are irrelevant.
• Whether the Automatic Backup Saved backup file should contain run results (output values).
• The Automatic Backup Save interval. See Automatic Backup Save Interval for details.
• The Automatic Backup Save directory, by default the user's temporary directory. See Automatic Backup Save Directory for details.
• The Automatic Backup Save notification:
– None. RiverWare beeps at the beginning of the Automatic Backup Save and provides no further notification.
– Diagnostic Message. RiverWare beeps at the beginning of the Automatic Backup Save and displays a diagnostic message upon its successful completion. A single message is posted in green if successful.
– Status Dialog. RiverWare opens a notification window at the beginning of the Automatic Backup Save and closes the window upon its successful completion. If the Automatic Backup Save is unsuccessful the notification window remains open and displays the error.
In all cases, if the Automatic Backup Save is unsuccessful an error message is displayed and Automatic Backup Save is disabled (with a red highlight message in the diagnostics):
Auto-saving the model file failed: Cannot open "C:\Bad\Directory\Model.mdl" for writing: No such file or directory
Automatic Backup Save has been disabled for model file(s)
If you want to see additional messages on the automatic backup save process, turn on Workspace, then Model Load/Save diagnostic category.
Automatic Backup Save Interval
RiverWare performs activities during which an Automatic Backup Save is not appropriate, for example during a simulation. If an Automatic Backup Save comes due during such an activity the Automatic Backup Save feature enters retry mode:
• The Automatic Backup Save interval is set to one minute.
• Within a minute of the activity's completion the model file is Automatic Backup Saved.
• The Automatic Backup Save interval is restored to its configured value.
Automatic Backup Save Directory
By default the Automatic Backup Save directory is the user's temporary directory. On recent versions of Windows this is:
C:\Users\<user name>\AppData\Local\Temp
It's unlikely a user will have write permission for another user's temporary directory. To facilitate sharing models, if a user loads a model file with Automatic Backup Save enabled and doesn't have write permission for the Automatic Backup Save directory, the Automatic Backup Save directory is changed to the user's temporary directory (with a green highlight diagnostic message):
Automatic Backup Save directory has been changed to: C:/Users/Voltaire/AppData/Local/Temp/
Finally, because the Automatic Backup Save directory might not be obvious to all users, the configuration dialog has a Reset button, which resets the Automatic Backup Save directory to the user's temporary directory, as shown in Figure 2.1.
Figure 2.1

Open Automatic Backup Save Model Menu Item
If the model file has been Automatic Backup Saved, the backup file can be opened by selecting the File, then Open Automatic Backup Save Model menu item. (If the model file hasn't been Automatic Backup Saved, the menu item is hidden.) This is equivalent to selecting the File, then Open Model menu item, navigating to the Automatic Backup Save directory and selecting the backup file.
Backup File Name
If the model file name ends with either .mdl or .mdl.gz, the extension is preserved and the backup file name is <file name>.~1~.mdl or <file name>.~1~.mdl.gz. Otherwise the backup file name is <file name>.~1~. If there is not a model file loaded from a named file, the backup file name is Workspace.~1~.
Model History and Comments
When a model is loaded, a diagnostic window opens with the Model Save History. The model save history appears as a brown diagnostic message with information regarding the date and time when the model was last saved, the username of person who save the model, and the RiverWare version in which the model was last saved. The last save is part of the Model File Information and is stored with the model file when a model is saved. The model save history is automatically updated each time a model is saved.
The save history is also accessible within the Model Info dialog accessed by selecting File, then Model Info from the main RiverWare workspace. This dialog includes the Last Save, Run History and Comment.
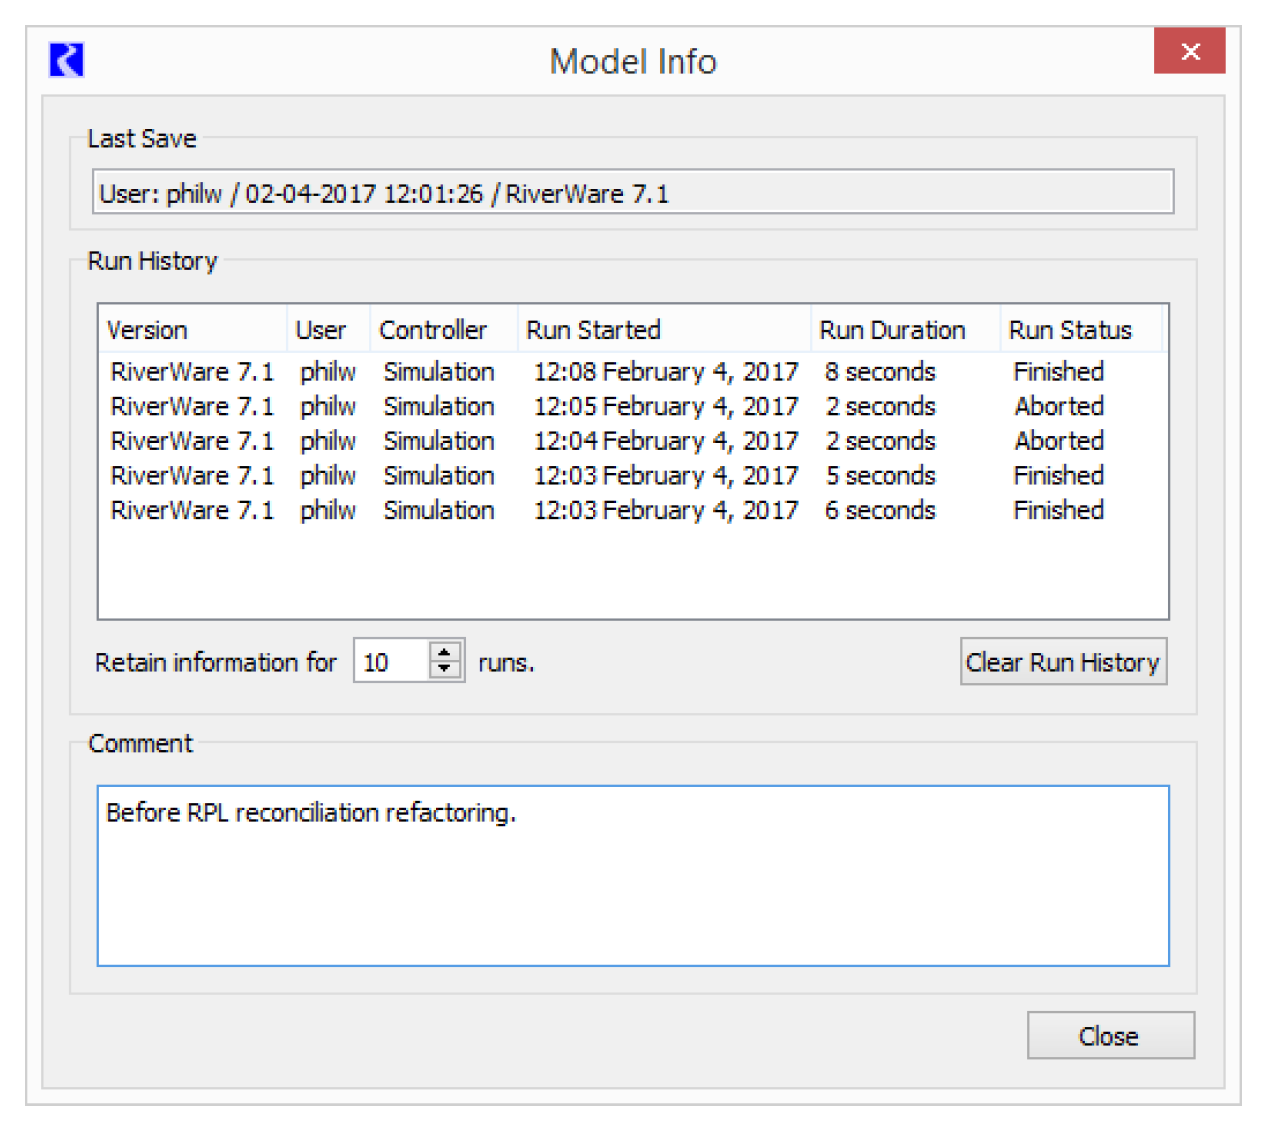
Last Save
The Last Save shows a single line, as information for only the last save operation. This text can be selected and copied to the system clipboard.
Run History
The Run History panel lists a user specified number of run history records including
• Version
• User
• Controller used
• Time the run was started
• Run duration
• Run status
You can control how many run history records to save in the Retain information for N runs field. This panel has a Clear Run History operation to clear all of the records. Because the records are saved in the model file, specifying a large number of runs to save will make the model file larger. Clearing these can recover that space.
Note: Since run history items are stored in the model file, items for runs performed since the model load will be retained in the model file only if the model is subsequently re-saved.
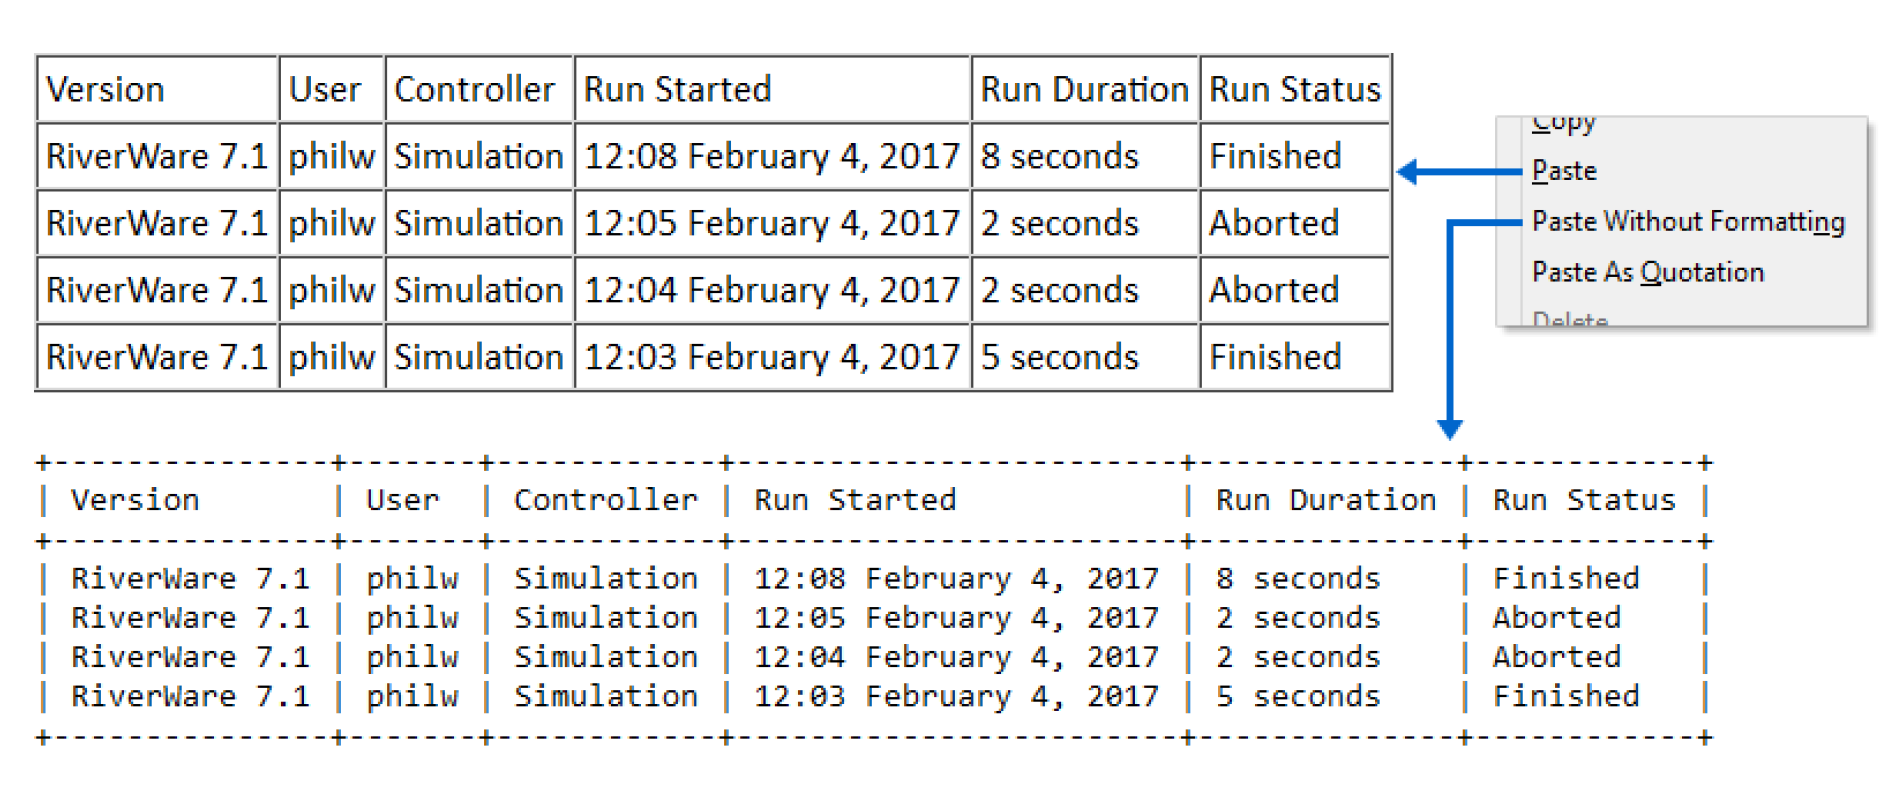
The Run History panel allows you to right-click and Copy selected items to the system clipboard. When you paste, you can either paste in a standard formatted (i.e. HTML table) or unformatted tabular form. Figure 2.2 shows a sample of the paste results for an email program.
Figure 2.2
Comments
Enter comments about a model into the Comment section. Like the save history, this information is saved together with the model file. You can write comments or a brief description of a model.
Note: Model Info can be shown in a Model Report using the Model Information (see Model Information in Output Utilities and Data Visualization) and Run History (see Run History in Output Utilities and Data Visualization) items.
Revised: 08/02/2021