
Multiple Object Method Selector
Before the Multiple Object Method Selector dialog box was available, a user had to select methods from the Open Object dialog for each object. For example, if a new engineering method was developed for use for all reservoirs in basin, a user would have to select this new method on each Reservoir object. For large models, this could be a tedious and time-consuming task. The purpose of the Multiple Object Method Selector is to allow the user to set an engineering method for a group of objects from a single dialog.
All objects of the same type do not necessarily have the same engineering methods or method categories available. For example, it is not always possible for a user to select a given method on all Level Power Reservoirs. The currently selected engineering methods on an object determine the currently available methods and method categories.
To overcome these difficulties, this dialog indicates which objects have a given method category available and therefore which objects will need to be re-configured in order to make the given category available. The dialog similarly indicates which engineering methods are available on each object for a given category. Once an engineering category and method is selected, the dialog only changes the engineering method on objects which have the desired category and method available.
Usage Overview
• Open the Multiple Object Method Selector from the main RiverWare workspace by selecting Workspace, then Objects, then Select Methods on Objects.
• Add objects to the object list by selecting the Add Objects button, then select objects in the object selector and select Ok.
• Optionally, filter the objects by type.
• Highlight the desired objects to which a new method should apply.
• Select a category from the category list.
• Verify that the category is available on the desired objects by inspecting the Current Method column in the object list.
• Select a new method from the method list.
• Verify that the selected method is available on all desired objects by inspecting the Available column in the object list.
• Apply the new method to the highlighted objects by selecting the Apply New Method button.
• Verify that the objects listed in the confirmation dialog are the objects you intend to affect, and select OK.
Accessing the Dialog
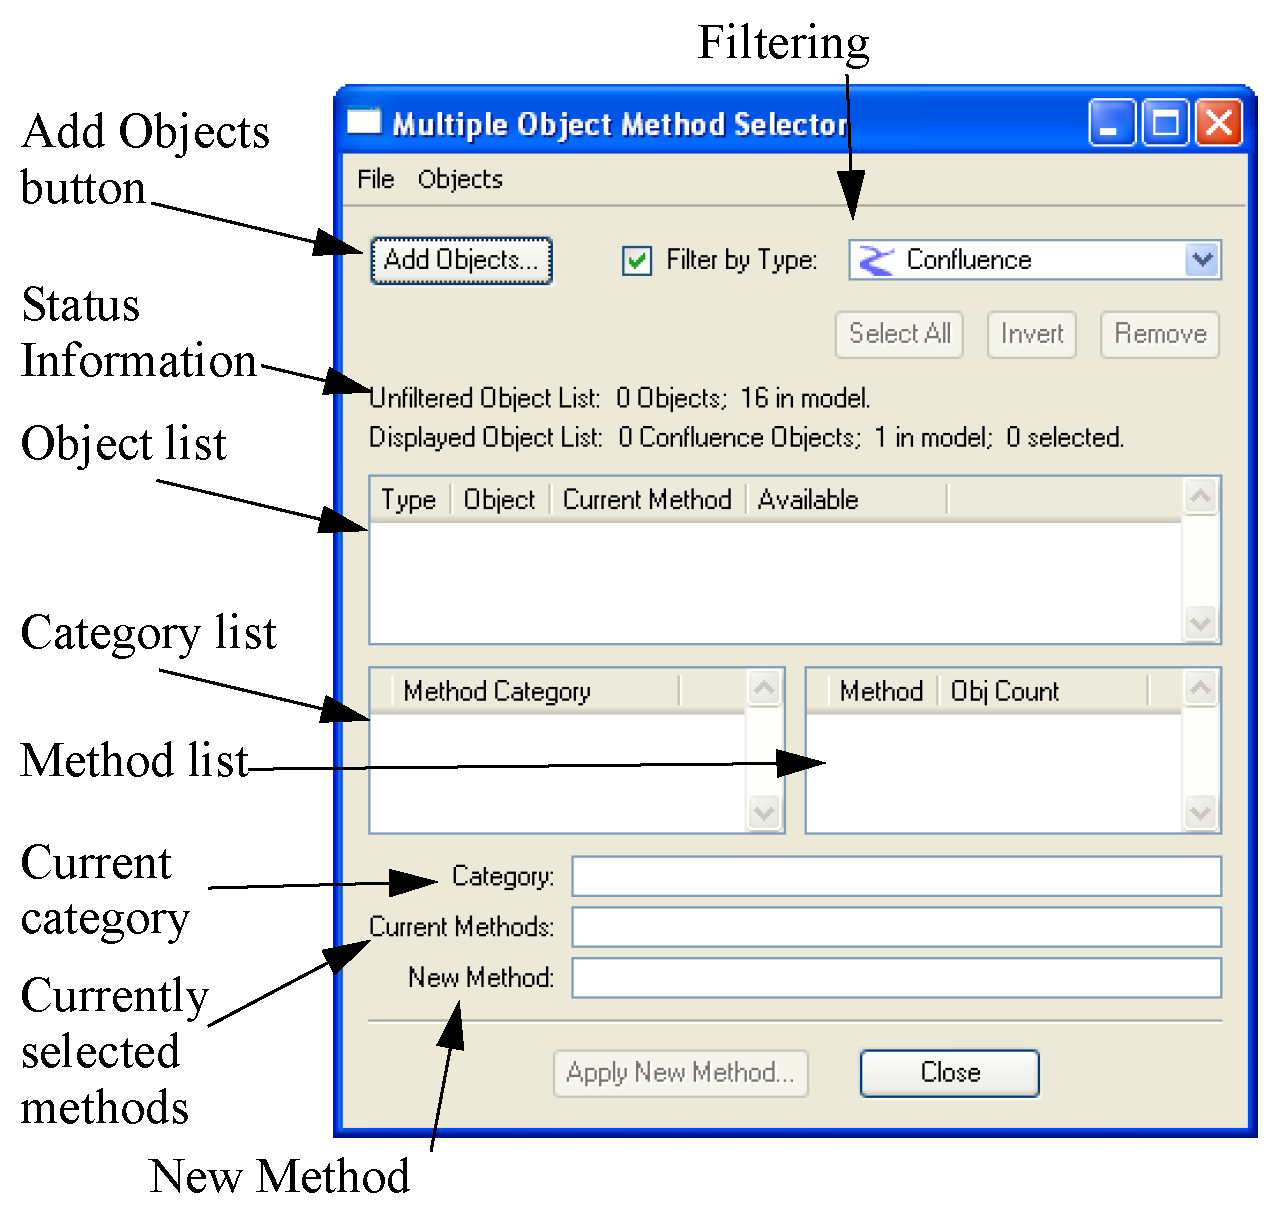
The dialog is invoked from the main RiverWare workspace using the menu sequence: Workspace, then Objects, then Select Methods on Objects. This displays a blank Multiple Object Method Selector dialog.
Figure 4.19
It is also possible to bring up the dialog from the Open Object, Methods tab by right-clicking a row and then selecting Show in the Multiple Object Method Selector. In this case, the selected object is added to the object list and the selected category and method are already highlighted.
Dialog Overview
Selecting methods on multiple objects consists of the following steps:
1. Select a group of objects.
2. Select a method category.
3. Select a new engineering method.
These steps are accomplished using the three sections of the dialog. The dialog is designed so that the user progresses from top to bottom with each successive task. From top to bottom, we will refer to these sections as: Object List, Category List, and Method list.
Object List
The selection of new methods is performed on the selected objects in the list of objects. This list is created/edited by the user by adding/removing objects, filtering, and finally making a selection.
Adding Objects
Adding objects is accomplished using the selector. This dialog is displayed using the Add Objects button or the corresponding menu item: Objects, then Invoke Object Selector.
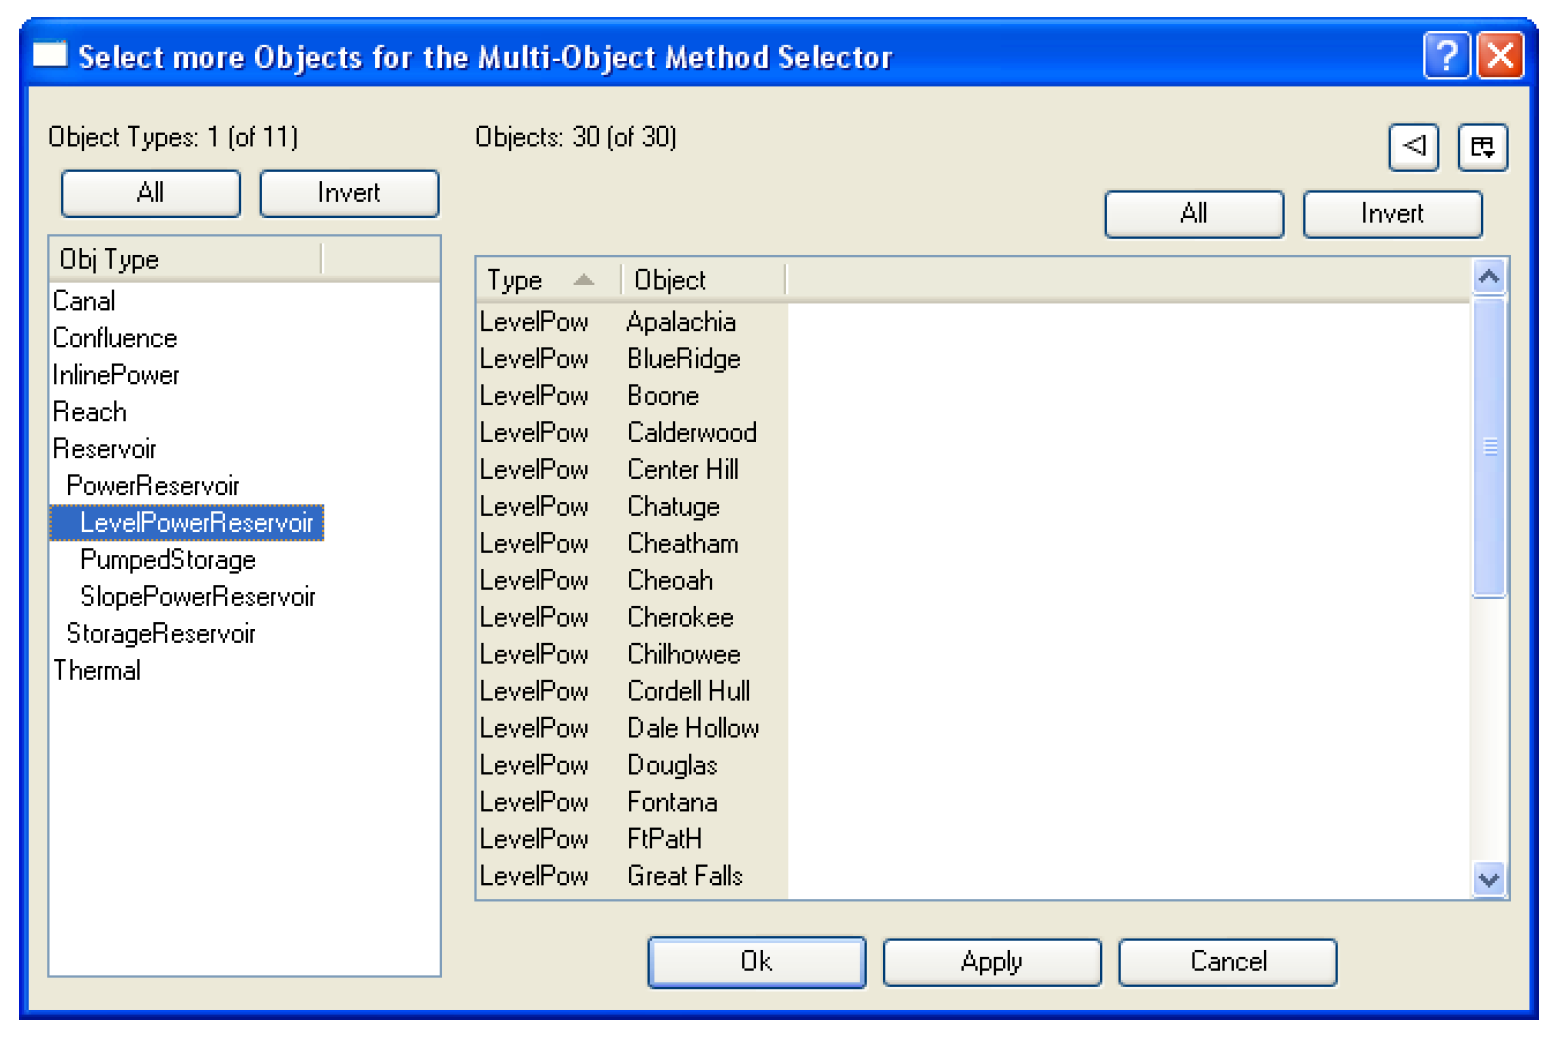
Use of this dialog proceeds from left to right. The user first selects an Object Type. This populates the list of objects of the given type in the Objects list. Multiple object types can be selected simultaneously by pressing Ctrl while selecting the object types.
Objects in this list can be filtered using the standard object filters: Object Name Filter, Has Accounts Filter, and In Subbasin Filter. The user then selects objects from this list. This can be done with the following methods:
• Manually selecting individual objects;
• Selecting multiple objects by Ctrl on the keyboard and selecting multiple objects with the mouse;
• Selecting all the objects in the list by selecting the All button under the Object list in the dialog.
Once the desired set of objects has been selected, the OK or Apply button adds the objects to the list in the Multiple Object Method Selector. See Selecting Objects for details on using the selector.
If after adding objects to the Multiple Object Method Selector, more objects need to be added, the object selector can be invoked again. Objects are appended to the current object set in the Multiple Object Method Selector.
Note: The list of objects added using the selector is called the unfiltered list and can contain many different types of objects.
Note: Regarding aggregate objects, parent aggregate objects and their child segment objects appear as separate items in this object selector dialog. The parent object will appear as an object of the aggregate type. The child objects will appear as objects of their individual type. For example, an AggReach with 2 child/segment objects are treated as follows: the parent object is an object of type AggReach; the 2 child objects are objects of type Reach. They can each be added by selecting the given type then the given object.
Removing Objects
A user removes objects by selecting one or more objects in the list and then clicks the Remove button or all objects can be removed using the menu item: Objects, then Remove All Objects.
Filtering Objects
When the user adds objects to the list using the Add Objects button and the selector, the user is able to select multiple types of objects. Applying new methods is specific to a type of object, e.g. Reach methods do not apply to Reservoirs. If the user adds multiple types of objects, every method category for all object types will be added to the list. It is frequently overwhelming to sort through the various user methods to find the desired method. To avoid this, the object filter can be used to only show objects by type. Select the checkbox to Filter by Type, then select a type of object from the menu. Abstract object types like Reservoir or Power Reservoir can be selected. Now only the objects matching that type are shown in the list. This is now called the filtered list.
Note: If you wish to switch object types, the original list of objects added remains as the non-filtered list. Select a new filter type (including disabling the toggle) to show a different set of objects. The status of the number of objects in the filtered and unfiltered objects lists is shown on the dialog. This filtering functionality allows users to add all the objects in a subbasin or geographic region, then select methods on each type of object without losing the list of objects in the subbasin.
Selecting Objects
Application of a new method is performed on the objects selected in the object list, not all of the objects displayed. You can use the following methods to select objects:
• Manually select individual objects.
• Select multiple objects by highlighting multiple objects or use the <Control> key on the keyboard.
• Select all the objects in the list by selecting All under the Object list in the dialog.
• Invert the selection using the Invert button.
Any new method selection will be applied only to the selected objects.
Selecting a Method Category
Once objects have been added to the object list, the category list will be updated to display the union of all active categories on the selected objects. It is important to understand that this list displays the union, so some objects may not have a given category available.
Note: Object Level Accounting Methods are shown with a grey background.
Selecting a category selects the category. When a category is selected the object list and method selection controls are updated to display information about the selected category.
Determining Which Objects Have a Category Activated
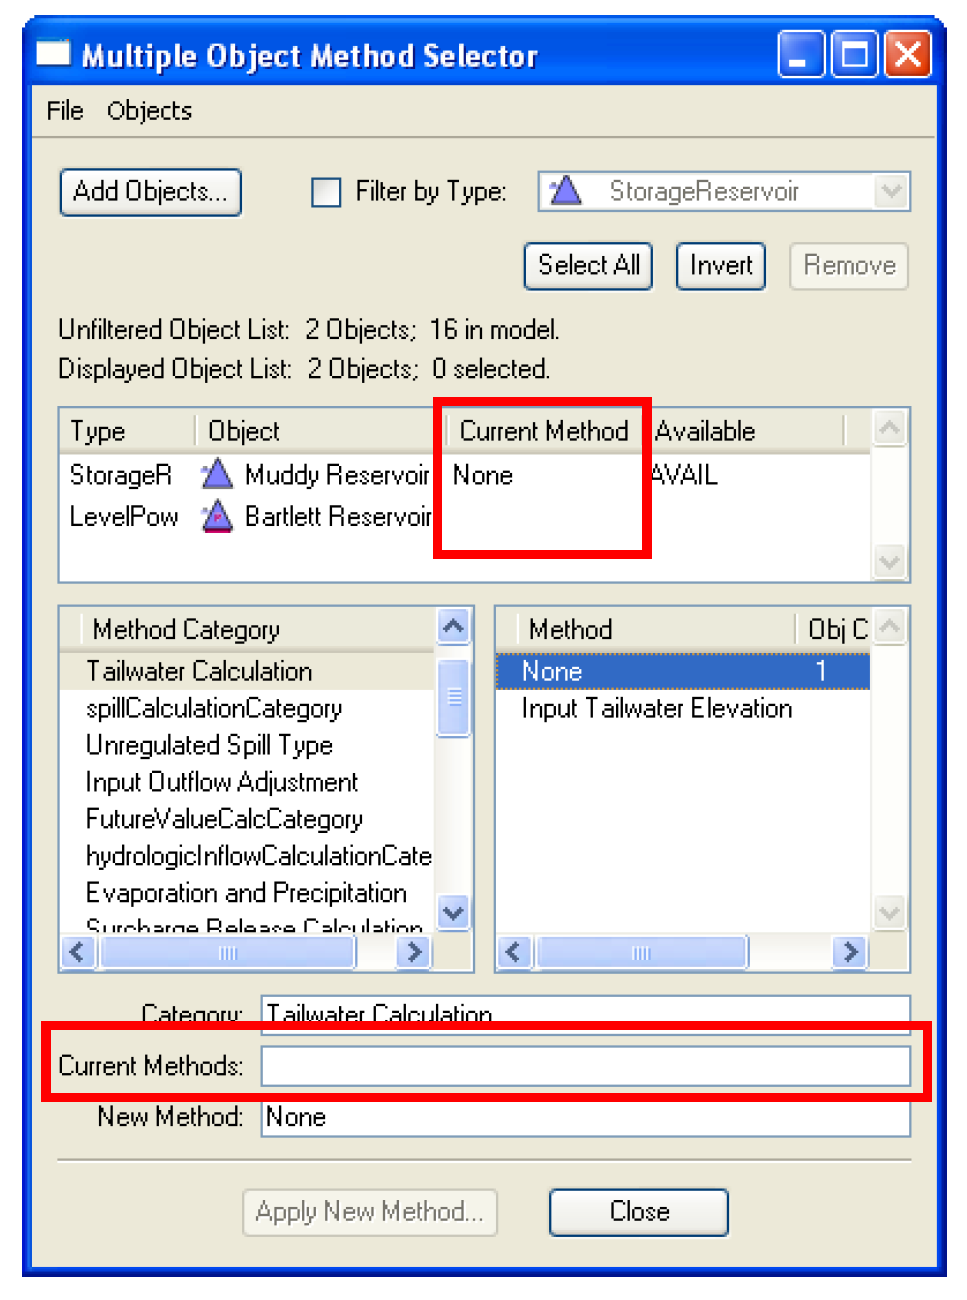
When a category is selected, the object list displays which objects have the selected category available. The third column in the object list, Current Method, is one of the following:
• Empty - indicating that the selected category is not available on this object
• Displays a method name - indicating that the selected category is available, and that the displayed method is the currently active method for the category on this object.
The user should scroll through the object list, looking for empty values in the third column. This information is useful when the user intends to set a common method on all the objects in the set. In this case, the user can quickly determine which objects need to be reconfigured to make the desired category available.
Determining the Currently Active Method
Information about the currently active method is contained in two places in the dialog: the Current Method column in the object list, as discussed previously, and the Current Methods text box in the method selection section. The Current Methods line displays a comma-separated set of selected method for all the objects in the set.
Selecting a New Method
Once a category has been selected, the user can select a new method for this category. The new method is selected from the list of methods in the right pane. Once a method is selected, it is added to the New Method line at the bottom of the dialog.
Like method categories, methods may not be active on some objects, even though their category is active. The method list displays the union of all methods available on the selected objects that have this category active. Since some methods may not be available on all objects, the object list displays whether a given method is available on each object. Once the user has selected a new method from the method list, the objects list is updated. The forth column in the object list, Available, now displays the text AVAIL if the selected method is available on the given object, or display nothing if the method is not available on the object.
Once a method has been selected the user should scroll through the object list to determine which objects can have the new method activated. Any method with AVAIL in the Available column are allowed to have the new method activated. If this column is empty for an object, the object will not be affected if this new method is applied.
Unlike the OpenObject dialog, selecting a method from this menu does not immediately set the method on all affected objects. Instead, the user must select the Apply New Method button to change the method on the objects. This Apply New Method button remains inactive until a new method has been selected from the menu, at which time it will be enabled. Selecting Apply New Method will set this method as the active method on highlighted objects in the object list with this category and method available.
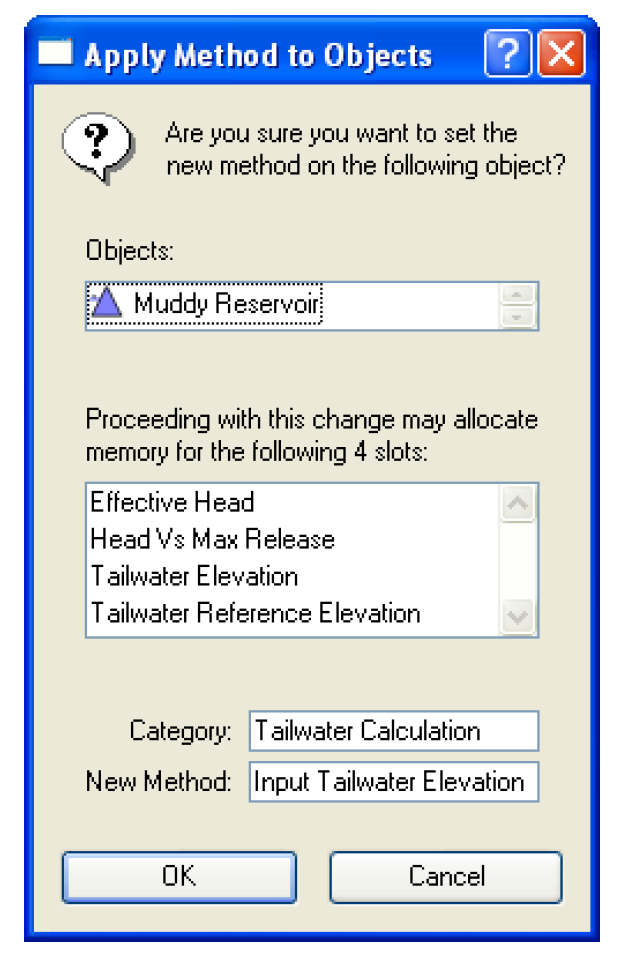
Confirming Changes
After the new method has been applied using the Apply New Method button, a confirmation dialog appears. This dialog lists all the objects which will have this new method activated. This is the selected objects the list that have the desired category and method available. Canceling this dialog will prevent the method from being changed on any of the objects. Also, the dialog informs the user of the new slots which may be instantiated when this new engineering method is activated. Canceling this dialog will prevent the method from being changed on any of the objects.
Once the confirmation dialogs have been accepted, the objects will be modified. A busy cursor indicates that the methods are being changed. For a large set of objects this operation can take some time.
Once the methods have been changed, the Multiple Object Method Selector dialog will be updated to display the new methods on the objects. A quick inspection of the object list shows that the method has been changed on the objects with this category and method available.
Selecting Object Level Accounting Methods (OLAMs)
The Multi-Object Method Selector dialog can be also used to select Object Level Accounting Methods (OLAMs). See Object-level Accounting Methods (OLAMs) in Accounting for details on OLAMs. Figure 4.20 shows aspects of this dialog specific to OLAMs.
• OLAM category items are shown with a grey background. In Figure 4.20, see the bottom three rows in the method category list.
• When an OLAM category is selected, additional controls are shown below the method list. In Figure 4.20, see the Method Execution Time selector and Set button. These controls are described on the following pages.
Figure 4.20

Setting the Execution Time of OLAMs
When an object level accounting category is selected, that category’s method options are shown in the methods list (shown here).
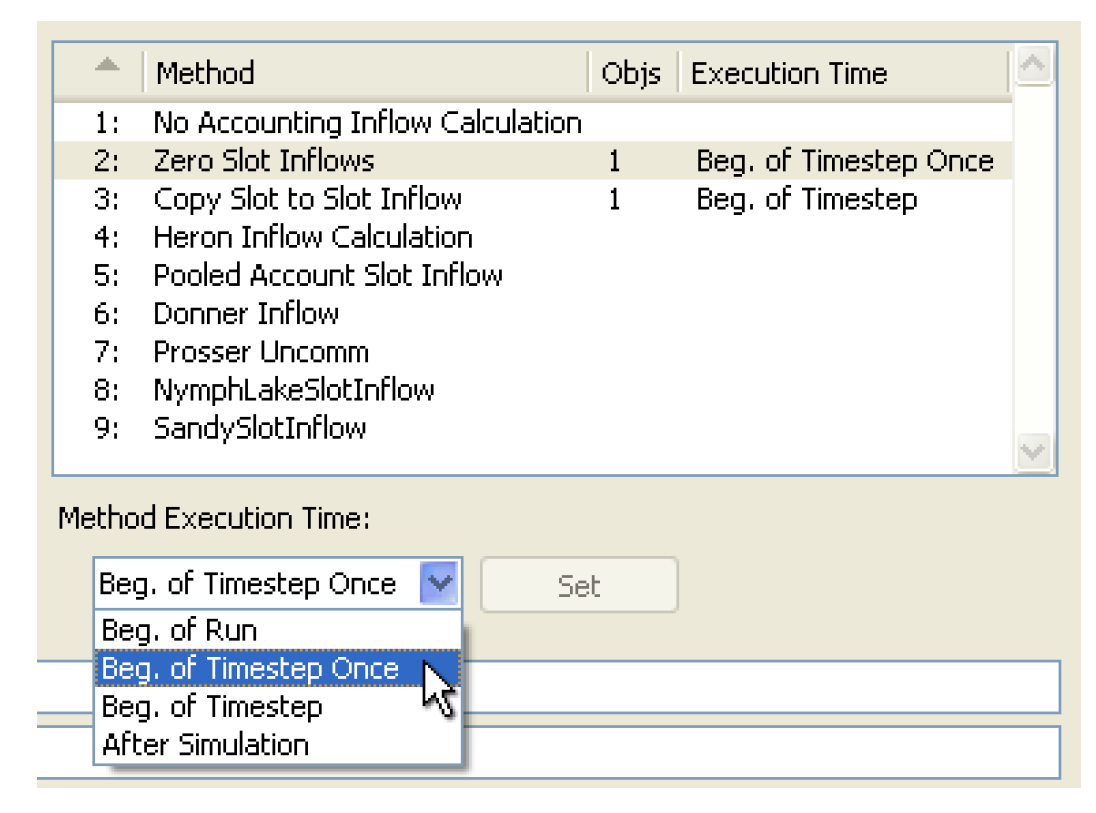
When selecting a method item selected on at least one simulation object, the Method Execution Time combo box is set to the indicated execution time -- or, if multiple execution times are indicated for that method item, one of those several execution times are used. You can selected a different execution time in the combo box. See Execution of OLAMs in Accounting for details on execution times.
In this dialog, there are two ways of setting the execution time of OLAM methods:
• By selecting the Set button next to the Method Execution Time selector. This effects the methods on the objects currently having that method setting.
• By selecting the Apply New Method button at the bottom of this dialog. (See previous page). This simultaneously sets the selected method item on the selected objects AND sets the execution times of those methods.
Special Support for Copy Slot to Slot Inflow: Set Target Account List Slot
The Multiple Object Method Selector also has special features for the Copy Slot to Slot Info OLAM; see Copy Slot to Slot Inflows in Accounting for details.
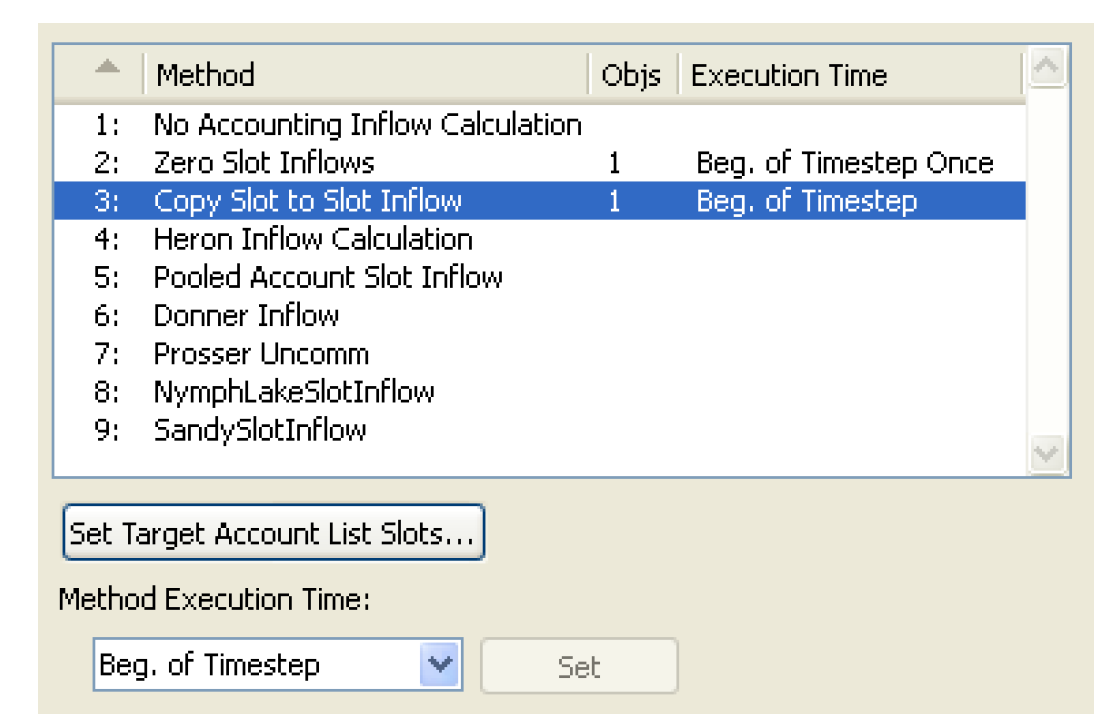
When that method is selected, the Set Target Account List Slots button is shown below the methods list. This button is enabled if any objects currently have the Copy Slot to Slot Info method selected. Selecting this button brings up the new Set Target Account on Objects dialog.
The Set Target Account on Objects dialog operates on each simulation object being editing in the Multi-Object Method Selector which has the Copy Slot to Slot Inflow method selected.
Figure 4.21
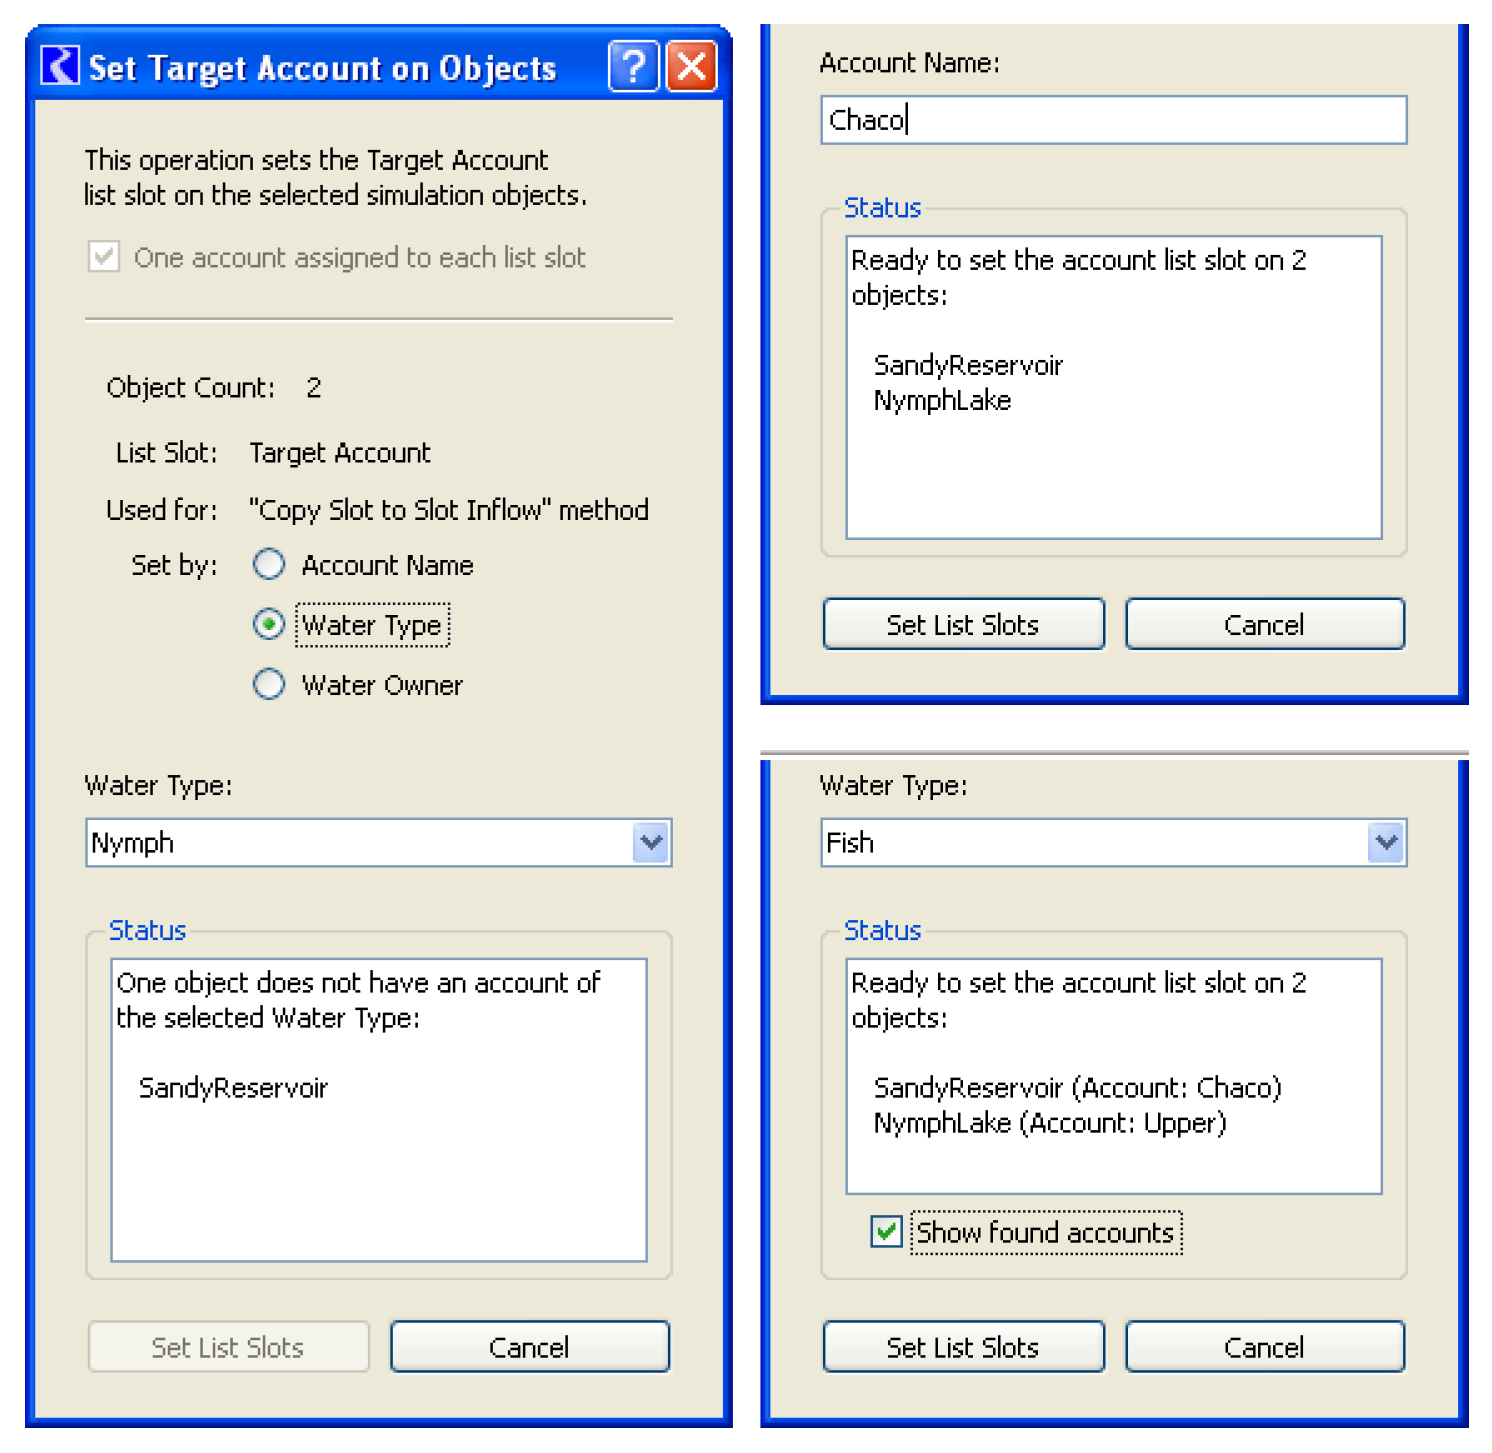
The user selects one of three criteria for choosing an Account on each simulation object to be assigned to that object’s Target Account List Slot:
• Account Name
• Water Type
• Water Owner
There must be exactly one Account on each object matching the criteria. This information is displayed in the Status area.
In the case of the Set List Slots operation being ready (i.e. exactly one Account matching the entered criteria for each simulation object), the Status panel enumerates the simulation objects; see Figure 4.21. Otherwise, the Status panel enumerates the simulation objects which either have no Accounts matching the criteria, or have more than one Account matching the criteria. Additionally, when the Water Type or Water Owner criteria are selected, the names of the matching Accounts can optionally be shown.
Selecting the Set List Slots button, when enabled, assigns the object Target Account List Slots and closes the dialog.
Revised: 08/02/2021