
Editing Links
The following utilities allow you to view, create, and delete links.
• Shortcut menus—create links between any two slots on the workspace; delete any existing links from the workspace.
• Smart Linker—create recommended links between two objects; delete existing multiple links between two objects in one operation.
• Edit Links dialog—create a link between any two slots; delete any existing link.
These utilities are described in the following sections.
Tip: You can also create and delete links in a RiverWare script. See Link Slots in Automation Tools for details.
Shortcut Menus
You can use right-click shortcut menus on the workspace to create or delete links.
Creating Links
The Link Slots option on the shortcut menu allows you to link any two slots. To create a link, right-click an object; then in the shortcut menu, select Link Slots, then the slot to link. A link is started. Next, right-click the object where the link will end, select Link Slots on the shortcut menu, then select the slot on that object. The link is created.
Note: Using this method, you can link any two dispatch slots in the model regardless of whether the link makes physical sense; this practice is not recommended.
Deleting Links
To delete a link between objects, hover over the link and right-click. On the shortcut menu, select Delete Link, then select a link from the list. The link is deleted.
Smart Linker Dialog
The Smart Linker dialog simplifies the process of linking slots by recommending a set of links between two selected objects based on the type of object, their method selections, and the relationship between the two objects.
Note: The recommended links have been defined by CADSWES based on common modeling practices, experience, and existing models. You may want to link other slots, however, in which case you would not use the Smart Linker.
For example, if you select a Reach and a Groundwater Storage object, and the Head Based Seepage method is selected on the Reach and the Head Based Groundwater Grid method is selected on the Groundwater Storage object, the Smart Linker proposes the following links:
• Reach.Previous Water Table Elevation to Groundwater.Elevation Previous and Reach
• Seepage to Groundwater.Inflow from Surface Area
If you are also modeling evaporation or salinity, the Smart Linker proposes another set of links.
Opening the Smart Linker Dialog
To open the Smart Linker, select two objects on the workspace, then do one of the following.
Note: You must select exactly two objects; if you select more than two, a warning dialog opens.
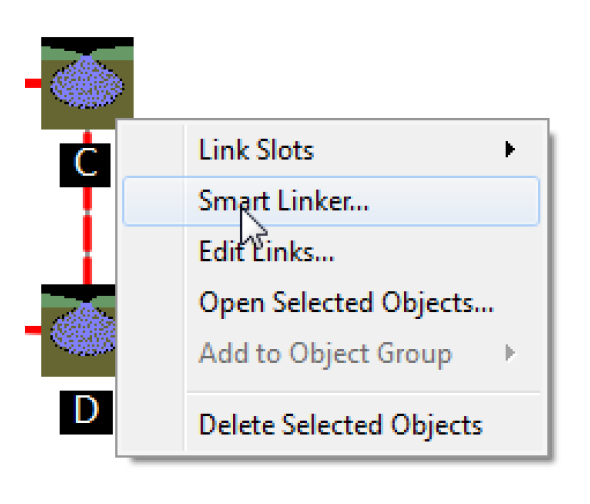
• Right-click and select Smart Linker.
• On the workspace toolbar, select Link  , then Smart Linker.
, then Smart Linker. • On the workspace menu, select Workspace, then Smart Linker.
If the two selected objects do not have any defined recommended links, a warning dialog opens. If you want to link slots on these objects, use the Link Slots shortcut menu or the Edit Links dialog.
About the Smart Linker
Figure 1.3 shows the Smart Linker dialog, which is described below.
Note: Also, see the Smart Linker video for a demonstration of its use: https://riverware.org/tutorials/SmartLinker/index.html
Figure 1.3 Main regions of the Smart Linker dialog
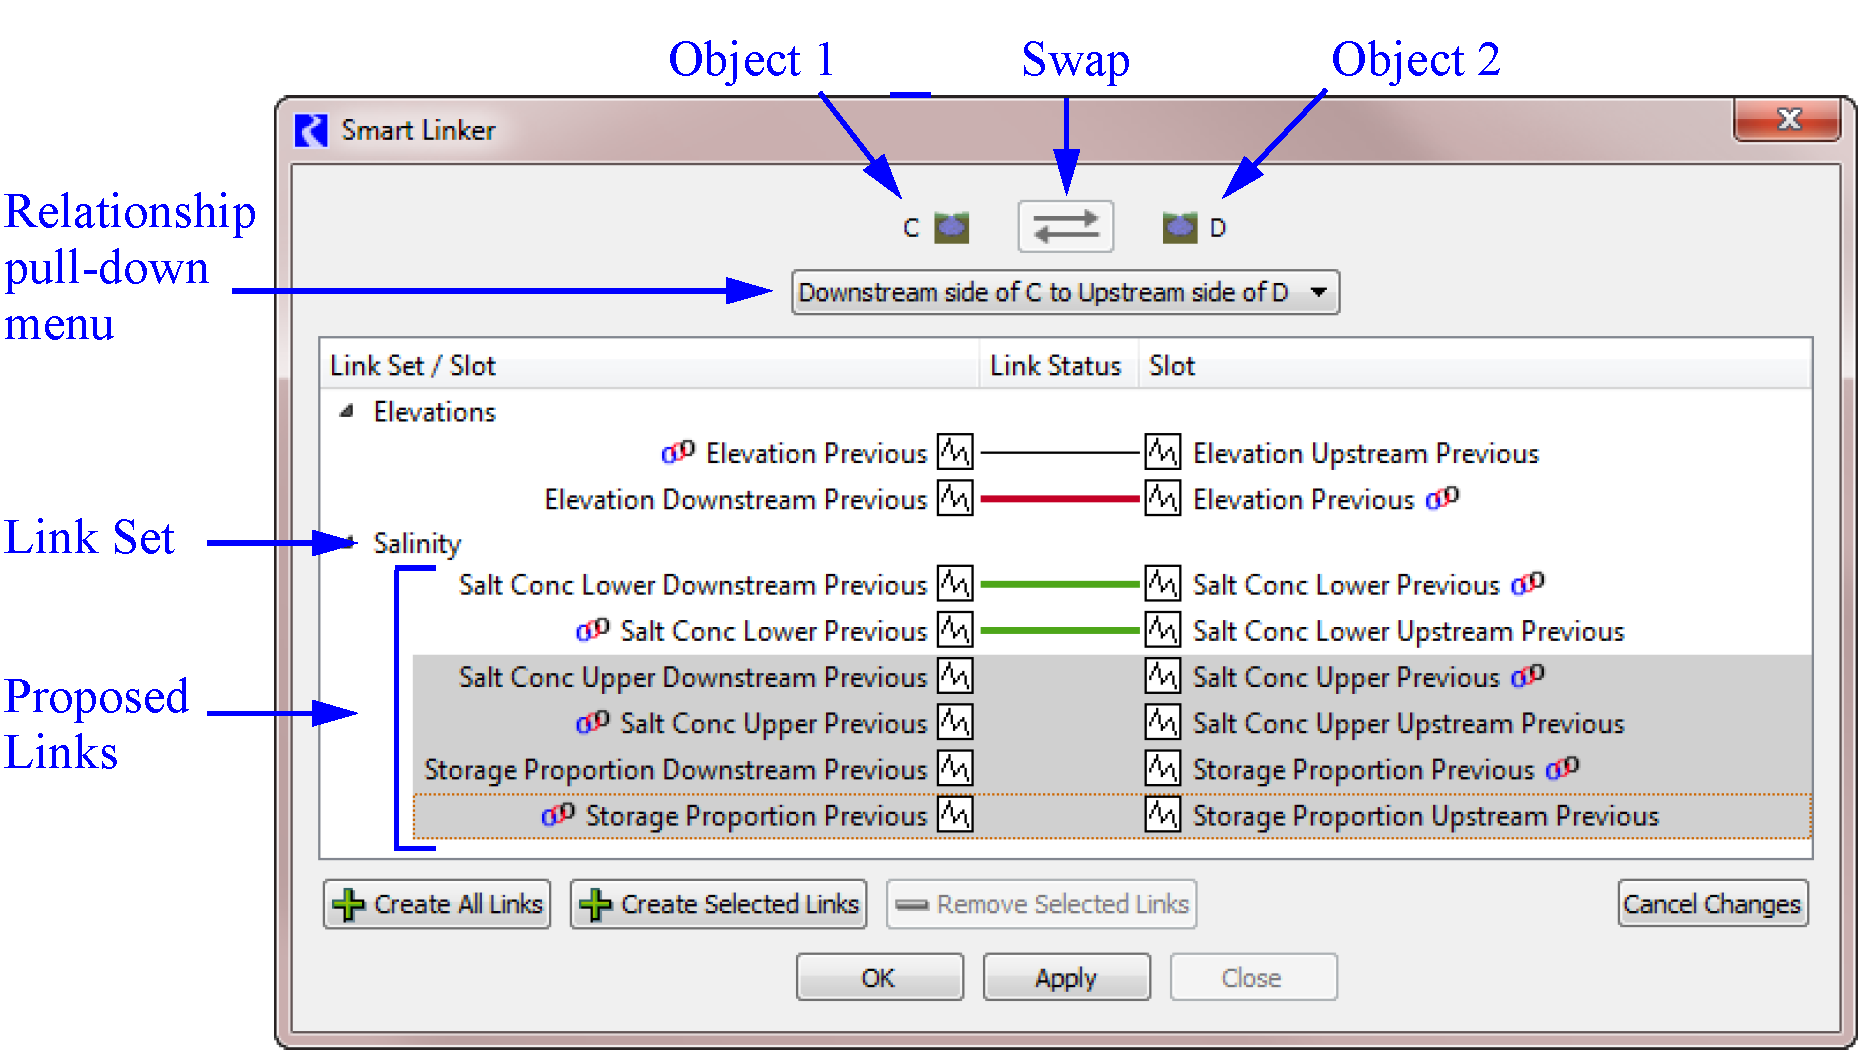
The Smart Linker dialog displays the two selected objects at the top. The Swap button  swaps the two objects in the dialog, left to right. It is disabled if there are unapplied link additions or removals, or if the reversed order is not supported.
swaps the two objects in the dialog, left to right. It is disabled if there are unapplied link additions or removals, or if the reversed order is not supported. The relationship menu lists the available spatial relationships between the two selected objects. Use this menu to indicate the relative position or relationship of the two objects. For example, is Object 1 upstream or downstream of Object 2? Possible options include: upstream / downstream; left / right; diverts from / diverts to; returns from / returns to. The relationship you select leads to different recommended links.
In the body of the Smart Linker dialog, sets of recommended links are listed in a tree view with the specific slots shown.
Table 1.1 lists the meaning of each type of horizontal line that may appear in the Link Status column.
Image | Color | Description |
|---|---|---|
 | thin black | Existing link |
 | thick green | Tentatively added link |
 | thick red | tentatively removed link |
Buttons along the bottom of the dialog allow you to create or delete selected links. These changes are made tentatively. You can select OK or Apply to complete the operation or Cancel Changes to cancel the changes.
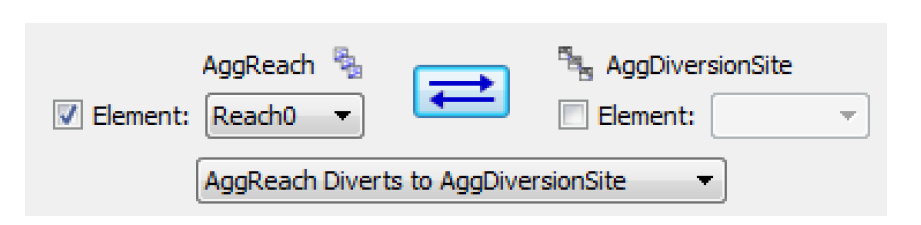
Selecting Aggregate/Element Objects
Aggregate objects are handled a little differently from other objects. Because the Smart Linker is opened by selecting two objects on the workspace, when you select an aggregate object, there is no way for you to select an element; you can, however, select the element in the Smart Linker.
When an aggregate object is shown in the Smart Linker, the Element checkbox is displayed. To link the aggregate object, leave the Element checkbox cleared. To link the element object, select the Element checkbox, then select the element. For example, in the following figure, the Reach0 reach element will be linked to the aggregate diversion site.
Creating Links
To link the slots shown in a particular row, highlight the row, then select Create Selected Links. Alternatively, select Create All Links to create all recommended links. The Link Status for the row then turns to a green line. Select OK or Apply to confirm creation of the links.

Deleting Links
You can delete any existing link by highlighting the row and selecting Remove Selected Links. The Link Status for that row turns to a red line. Select OK or Apply to confirm deletion of the link.
Using the Smart Linker
Following are the basic steps for using the Smart Linker to create all recommended links between two objects.
1. Select two objects on the workspace that you want to link. Right-click and select Smart Linker.
2. In the Smart Linker, use the Swap button to orient the two objects as you want.
3. If applicable, use the relationship menu to specify the relation ship between the two objects. After each change, a different set of slots is listed as recommended links.
4. Select Create All Links to create all recommended links.
5. Select OK to confirm creation of the links and close the dialog.
Edit Links Dialog
In some situations, the link operations described in the previous sections may not provide enough flexibility for you to view, create, or edit links. In these cases, the Edit Links dialog provides a central location for you to perform these activities.
Opening the Edit Links Dialog
You can use either of the following methods to open the Edit Links dialog.
• On the workspace menu, select Workspace, then Edit Links.
• On the workspace toolbar, select Link  , then Edit Links.
, then Edit Links. About the Edit Links Dialog
Figure 1.4 shows the Edit Links dialog, which is divided into two areas: one for Existing Links and one for Link Creation.
Figure 1.4 Main parts of the Edit Links dialog
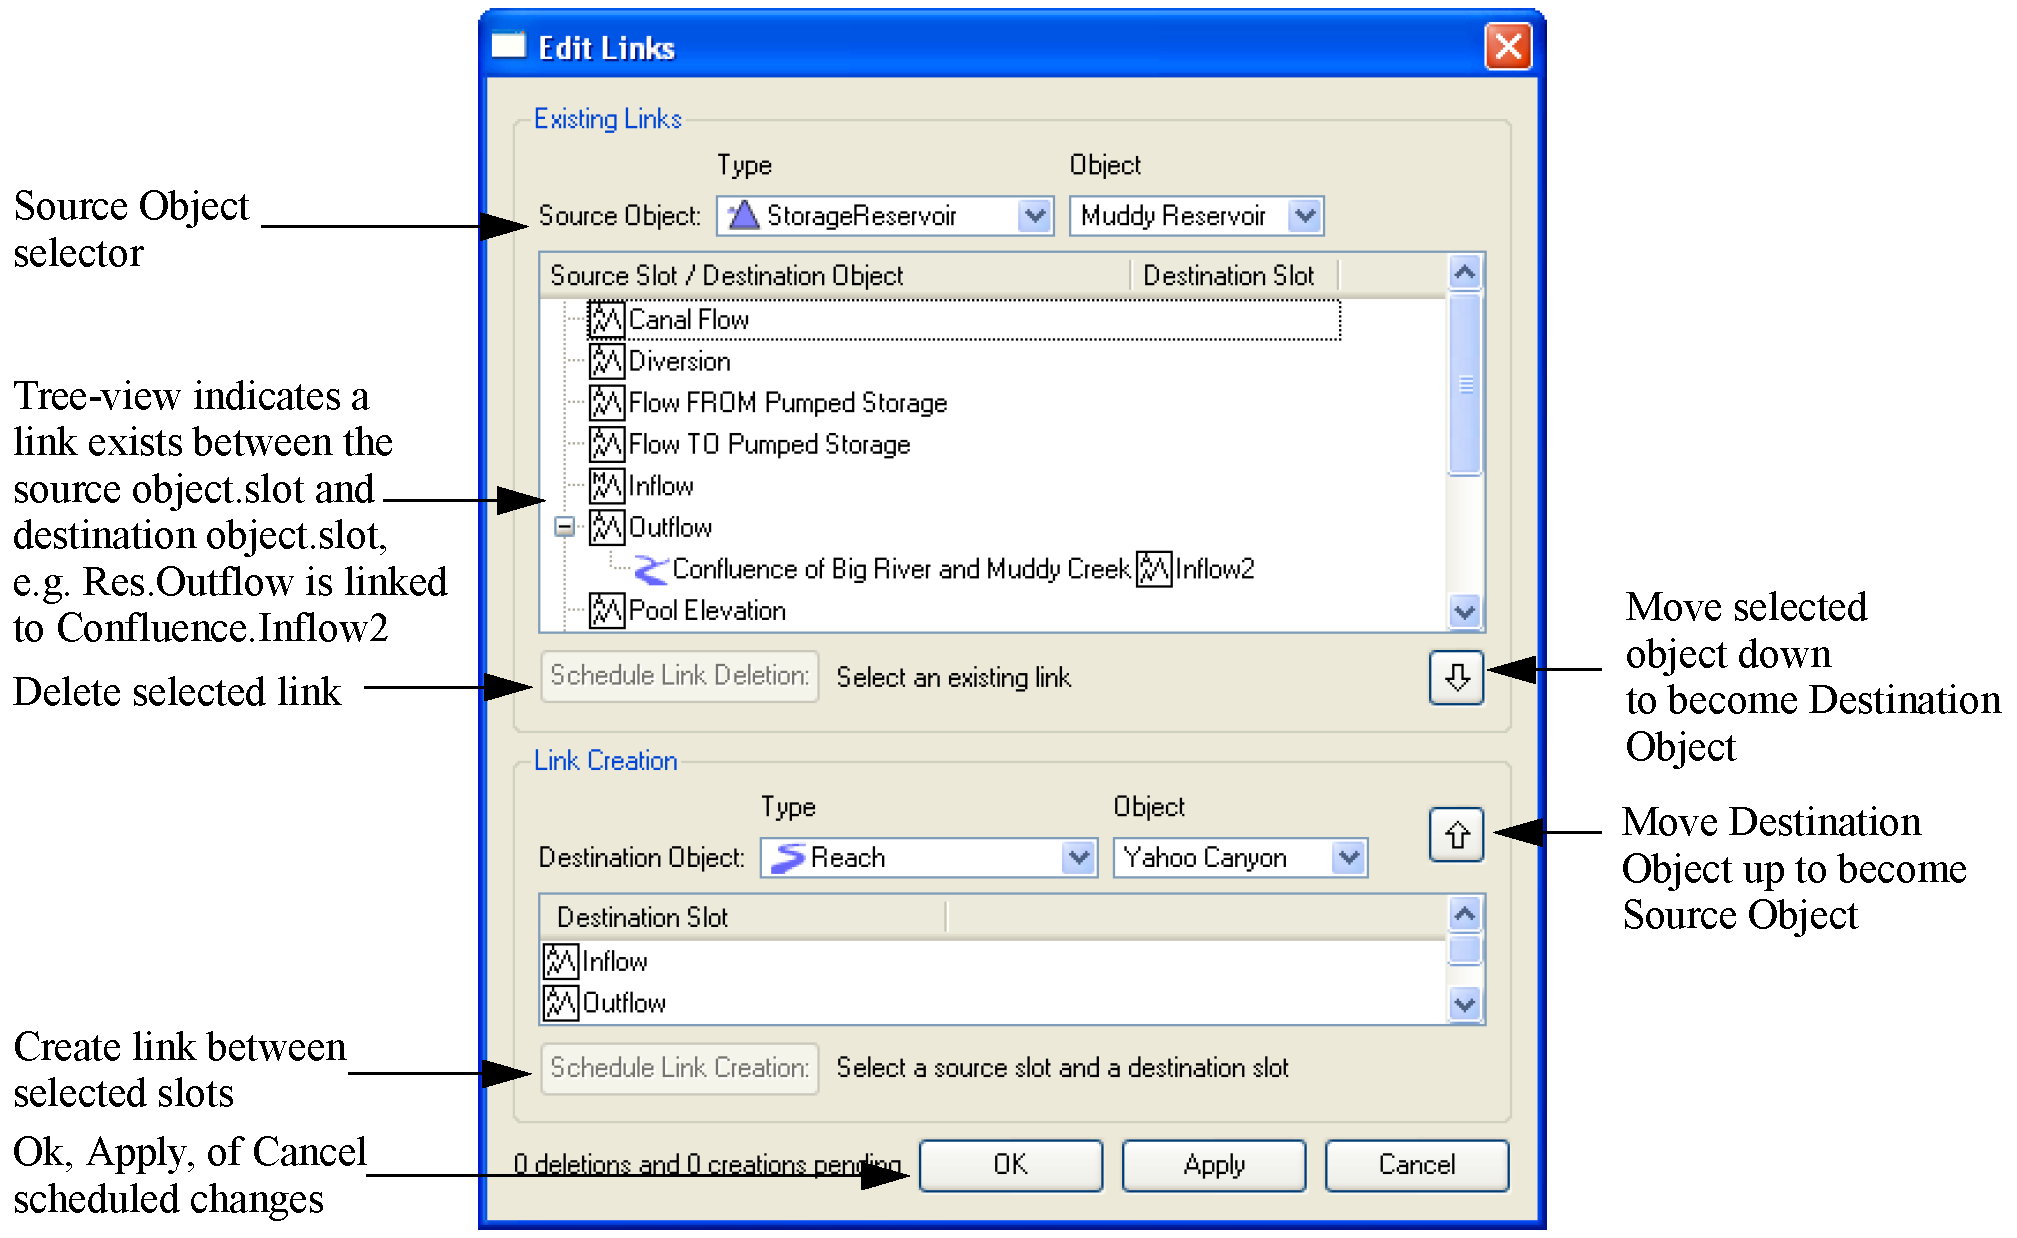
Viewing and Deleting Existing Links
The Existing Links area of the Edit Link dialog is used to view and delete existing links.
To generate a list of slots, on the Source Object menus, select an object Type and an Object. All linkable slots on that object are then listed in the Source Slot tree view. For aggregate objects, the upper-level aggregate and each element are listed; the expander arrow (>) next to each element allows you to expand the element to show the member slots, similar to the Object Viewer (or Open Object) dialog.
The expander arrow (>) next to a slot name indicates the slot has a link. You can select the expander arrow (>) to expand the tree view and show the Destination Object and Destination Slot for all slots linked to the given slot.
If you highlight a row that includes a Destination Object and Destination Slot, the Schedule Link Deletion button becomes active. Selecting this button schedules the link for deletion; the link is not actually deleted until you confirm the deletion by selecting Ok or Apply. When a link is scheduled for deletion, the link name is displayed in strikethrough font, and there is an explanatory note next to the Schedule Link Deletion button.
Note: You can create a link between two slots and then change methods on one or both objects so the linked slots are no longer visible or in use. The link remains on the workspace, and in the Edit Links dialog, the Source Slot is shown in italics to indicate that it is not currently visible in the model. You cannot create links between slots that are not visible, but you can view and delete links between them.
Creating Links
Both the Existing Links and Link Creation areas of the Edit Link dialog are used to create new links. First, on the Source Object menus, select an object Type and an Object. Then on the Destination Object menus, select an object Type and an Object. Select the source and destination slots in the upper and lower lists, then select Schedule Link Creation to schedule the link for creation. The link is created when you confirm by selecting OK or Apply. A link scheduled for creation is shown in green text, and the tree view is automatically expanded.
Note: Links can be created between any pair of slots when one slot is listed in the Existing Links area of the dialog and the other slot is listed in the Link Creation area. Some links may not make physical sense, but any combination can be defined.
Moving Objects Between Source and Destination
You may want to use the Edit Link dialog to create a series of links in a specified order, such as upstream to downstream. To accomplish this, you can use the Up arrow  to move a Destination Object in the Link Creation area up, to become the Source Object.
to move a Destination Object in the Link Creation area up, to become the Source Object. Similarly, you can use the Down arrow  to move a Source Object down, to become the Destination Object. When you use this button, the object in the selected row is moved down. Thus, you can either select a slot (or make no selection) and the Source Object moves down; or you can highlight the linked Destination Object and Destination Slot row (through the tree view) and select the Down arrow to move the selected Destination Object down, to become the object selected in the Link Creation area.
to move a Source Object down, to become the Destination Object. When you use this button, the object in the selected row is moved down. Thus, you can either select a slot (or make no selection) and the Source Object moves down; or you can highlight the linked Destination Object and Destination Slot row (through the tree view) and select the Down arrow to move the selected Destination Object down, to become the object selected in the Link Creation area. Revised: 01/10/2022