
Plot Page
Once a Plot Page has been configured in the Plot Page Editor, it can be viewed in the Plot Page dialog. Use of the Plot Page dialog is described in this section.
Accessing the Plot Page
The Plot Page dialog can be accessed in the following ways:
• From the main workspace, select Utilities, then Plot Page or select Plotting  .
.
. If there are no pre-configured plots saved in the model, this will open the Plot Page Editor. If there are pre-configured plots already saved in the model file, this will open the Plot Page dialog with the most recently selected plot displayed.
• From the Plot Page Editor, select Generate in the bottom left corner to open the Plot Page dialog for the Plot Page currently open in the Editor.
• From an already open Plot Page dialog, select File, then Open from the list of Plot Pages saved in the model file to open a Plot Page dialog displaying that plot.
• From the Output Manager, select an existing Plot Page in the list of output devices, and then select Generate. This will open a Plot Page dialog displaying that plot. Alternatively, select Generate, then Generate Selected Outputs from the menu bar.
Using the Plot Page
Most of the tools and actions used in the Plot Page dialog are the same as those used in the Plot Page Editor. See Editing a Plot Page for details.
Components of the Plot Page dialog that are not in the Plot Page Editor are the Plot Page List, and the New and Edits.
Select Plot Page List
The right portion of the Plot Page has controls to step through saved Plot Pages. Select any of the items to open that Plot Page in the current window. Right-click any item to add the slots in that list to an SCT. If the Select Plot Page List is not shown, select the  button, or select Window, then Show Plot Page Selection List.
button, or select Window, then Show Plot Page Selection List.
The buttons on the toolbar can also be used to navigate the list of plots or show the plot list. See Figure 2.25.
Figure 2.25
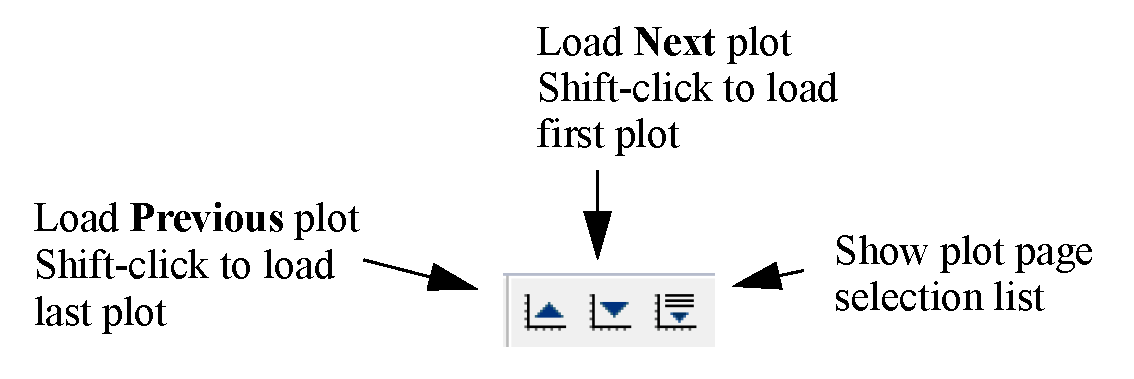
Select  to close the plot list.
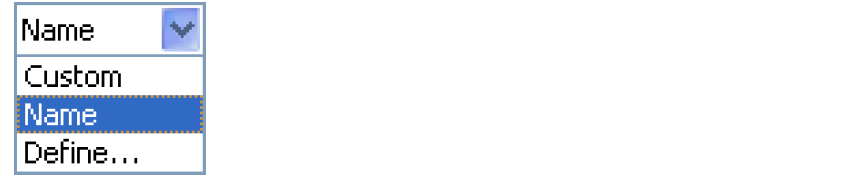
to close the plot list. The Plot Pages in the selection list are ordered using the Order menu, as follows:
• Custom: Use the custom order as defined by the user. See the third option for how to define this order.
• Name: The plot pages are sorted alphabetically by name.
• Define: This option takes the user to the Output Manager where a custom order can be defined. See Sorting for additional information.
Note: In the Plot Page list, only Plot Pages are shown, so only the relative order in the Output Manager is important. Other types of output devices can be intermixed as desired
Create New Plot Page
To create a new Plot Page from the Plot Page dialog, select New in the bottom right corner. This will open a blank Plot Page Editor.
Edit Plot Page
To edit the current Plot Page, select Edit in the bottom right corner. This will open the Plot Page Editor for the current Plot Page.
Plot Page Menus
Following is a description of each menu in the Plot Page dialog.
File Menu
The File drop-down menu offers options for opening a new Plot Page, exporting the Plot Page to a file and printing plot images. Following are descriptions of the available selections.
• Open: Selecting the Open menu item will show the Plot Page Selection list at the right of the Plot Page Dialog; see Select Plot Page List. If the Plot Page Selection list is already displayed, then the Open menu item will be disabled.
• Export Plot Page Configuration allows the selected Plot Page configuration to be exported to a file. Select or enter a desired file path and name in the resulting File Chooser dialog, and select Save. All Plot Page configuration information is saved to the file.
• Export Image allows saving of the image of a selected plot or all plots on the Plot Page to a graphics file. The graphics file can be in one of a number of image formats. Other options include the export image’s size (number of pixels) and resolution (low-medium-high). See Printing and Exporting Plots for additional information.
• Print Preview will show of preview of the plot as it would appear on the specified printer. See Printing and Exporting Plots for additional information.
• Print will send a selected plot or all plots on the plot page to your printer. See Printing and Exporting Plots for additional information.
Edit Menu
The Edit menu options to create a new Plot Page or edit the current Plot Page.
• Create New Plot will open a blank Plot Page Editor. This is the same as selecting New in the bottom right corner of the Plot Page.
• Edit Selected Plot will open the Plot Page Editor for the current Plot Page. This is the same as selecting Edit in the bottom right corner of the Plot Page.
• Copy Plot Image copies the plot or plot page as an image for pasting to a document or email. See Copy Plot as an Image for additional information.
Plot Menu
The options in the Plot menu are the same as for the Plot Page Editor, with the exception that there is no option to paste a plot into a Plot Page. See Plot Menu for details. A plot can only be pasted into a Plot Page Editor. (More generally, changes to the Plot Page configuration can only be made in the Plot Page Editor.)
Window Menu
The Window menu includes an option to show or hide the Plot Page Selection List. See Select Plot Page List for details.
Other options in the Window menu show or hide components of the tool bar.
Revised: 01/10/2022