
RPL Printing and Formatting
Blocks written in the RiverWare Policy Language can be complex, and with lengthy verbose object, slot, and function names, blocks can have very long lengths. RiverWare provides a mechanism to print blocks and dynamically format blocks to fit the width of desktop window or a printer page.
Printing
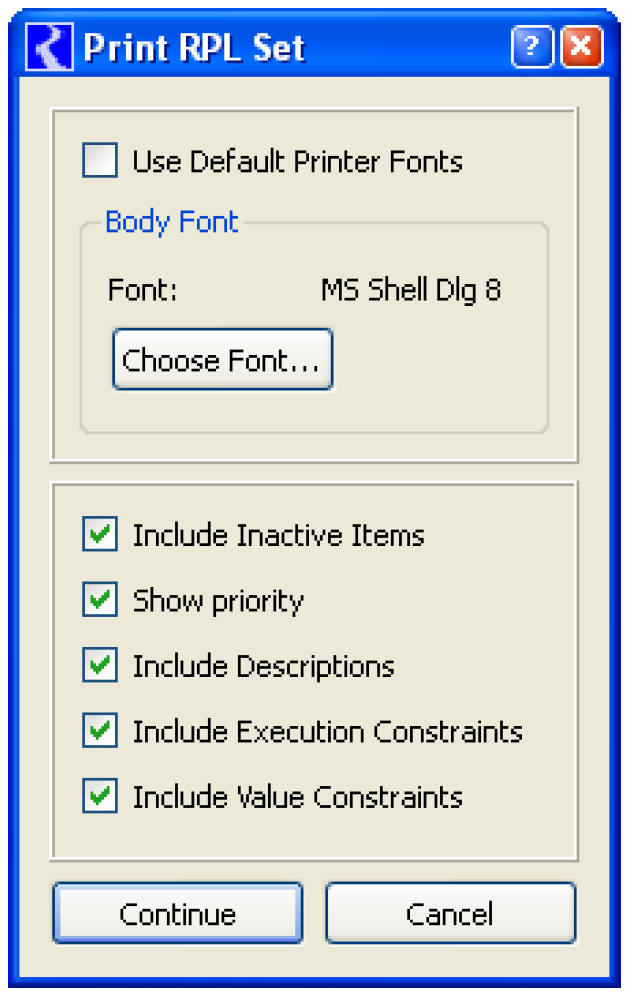
Rules and user defined accounting methods written in the RiverWare Policy Language can now be printed. A Printing dialog is available at each editor level from the File, then Print X menu. This provides you with the means to print an individual block from the Editor, an individual function from the Function Editor, an individual group from the Group Editor, or the entire RPL Set from the RPL Set Editor.
Using the print dialog, the block, function, group, or RPL set can be sent directly to the printer or to a file. You may select landscape or portrait printing. You may choose to include or exclude inactive items, descriptions, execution constraints, and value constraints. You may also choose the print font. A note on font selection. The font selection dialog presents a list of fonts that are available on computer console, these fonts may or may not all be available on the printer. If the font is not available on the printer, a default font will be chosen by the printer and the printout may be misaligned—formatting will be corrupted. Some experimentation may be necessary to determine which fonts an individual printer supports.
Formatting: Display Settings
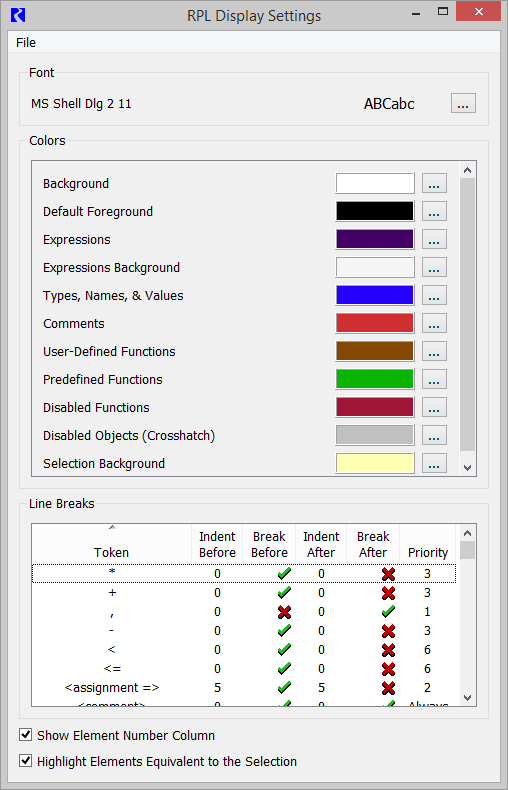
Expressions written in the RiverWare Policy Language can be complex and very long. RiverWare provides a RPL Display Settings dialog to control the fonts, colors, showing element numbers, and a dynamic formatting algorithm. This algorithm formats the blocks to fit the width of desktop window or a printer’s page. The dialog is accessed through the Display Settings button in the editor Set menu. These settings will be automatically saved in the model file. This allows RPL logic to look the same from one user to the next.
Display settings may be imported and exported to/from a file through the File menu. Following are the options:
• Import File. Import the settings from a file that was exported from a RiverWare session.
• Export File. Export all of the settings to a file.
• Save as User Defaults. Export the settings as user settings that are stored in the machine’s registry. These settings will be used for new models.
• Load User Defaults. Load the settings from the user settings defined in the machine registry. This allows you to override a model’s settings with your personal settings.
• Load RiverWare Default Colors. Load the RiverWare default colors. This allows you to get back to the base starting colors.
• Load RiverWare Default Line Breaks. Load the RiverWare default line breaks. This allows you to get back to the base line breaks.
There are three areas to this Display Settings dialog, Font, Colors, Line Breaks, Element Numbers, and highlighting of equivalent expressions, shown in Figure 2.28 and described in the following sections.
Figure 2.28 RPL Display Settings dialog
Font
The fonts used in RPL expressions can be changed by selecting the More button,  then select the desired font, style, size, and effects.
then select the desired font, style, size, and effects. Colors
The colors used in RPL set editors can be changed to fit your needs. You are able to specify the colors for items shown in Table 2.7. To change, select the More button,  , then select the desired color from the color chooser.
, then select the desired color from the color chooser.Item | Description |
|---|---|
Background | The background color for statements and other areas (except expressions) that are not contained within the current selection. |
Default Foreground | The color used to draw items in expressions or statements whose color is not governed by another color setting. For the current selection, this color is used for all items; outside of the current selection, this color is used to draw mathematical symbols, operators, and delimiters. Note: The selected expression’s foreground text is either white or black (dynamically computed) to contrast with the configured background color. |
Expressions | The color for key words in expressions. |
Expressions Background | The color used for the background of the bounding rectangle for expressions. |
Types, Names, & Values | The color of types (e.g., NUMERIC), names of variables, and literal values. |
Comments | The color of in-line comments. |
User-Defined Functions | The names of user-defined functions. |
Predefined Functions | The names of predefined functions. |
Disabled Functions | The names of user-defined functions which are disabled (i.e., functions for which the red X appears in the On column of the functions RPL Set and Group editors). |
Disabled Objects (Crosshatch) | The color of the crosshatching superimposed on disabled statements or expressions. |
Selection Background | The background color for statements and expressions that are contained within the current selection. |
Line Breaks
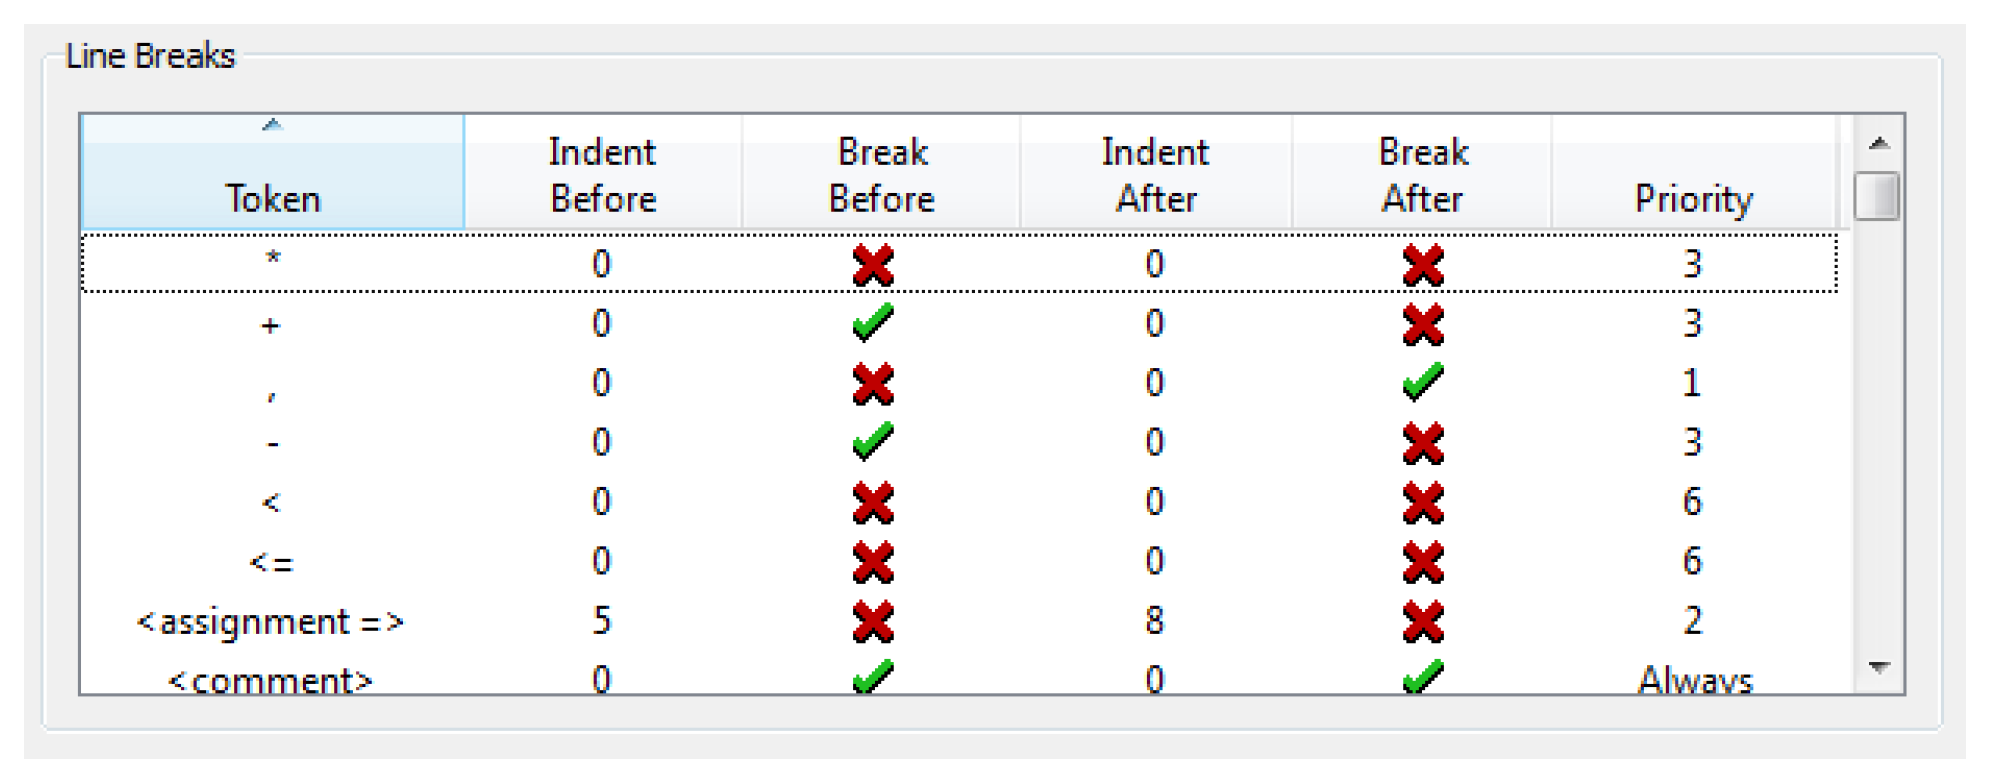
The formatting algorithm is designed to provide you with control over the formatting process. The formatting algorithm is a multi-pass algorithm. Each pass will attempt to find a position in the block where a line break can be placed to fit the block to the device width. The algorithm will cease, once the block can be rendered in the desired width, or no more positions where the block is allowed to be broken exist. You can define, through the RPL Display Settings dialog, the tokens (i.e., block positions) a line break can appear before or after, the indentation following the line break, and the priority (the pass) at which the line break should be inserted. Line breaks with a priority of zero will always be broken, while the maximum value will indicate that a line break at the token should never occur. Figure 2.29 illustrates.
Figure 2.29
A block is formatted using the following algorithm:
1. The formatting algorithm makes an initial pass, breaking the block at priority 0 tokens. All line break defined with priority 0 (i.e., Always) in the RPL Display Settings dialog will be formatted in this initial pass. This pass always occurs.
2. Next the formatting algorithm checks the length of block. If the block will fit in the width of device, the formatting terminates. If the block will not fit the width of the device, the priority is incremented, and line breaks are made at all tokens defined with priority 1.
3. Repeat step 2 through all priorities until the block fits in the device.
If the block exceeds the screen width after all line break positions have been exhausted, the window will be made scrollable. If the block exceeds the printer’s page width after all line break positions have been exhausted, the excess will be printed on adjacent pages.
To edit any number in the dialog, select the number and then type in a new value. You can enter either “Always” or “0” for very high priority values. Enter “Never” or a large number (greater than about 40) for those items with low priority.
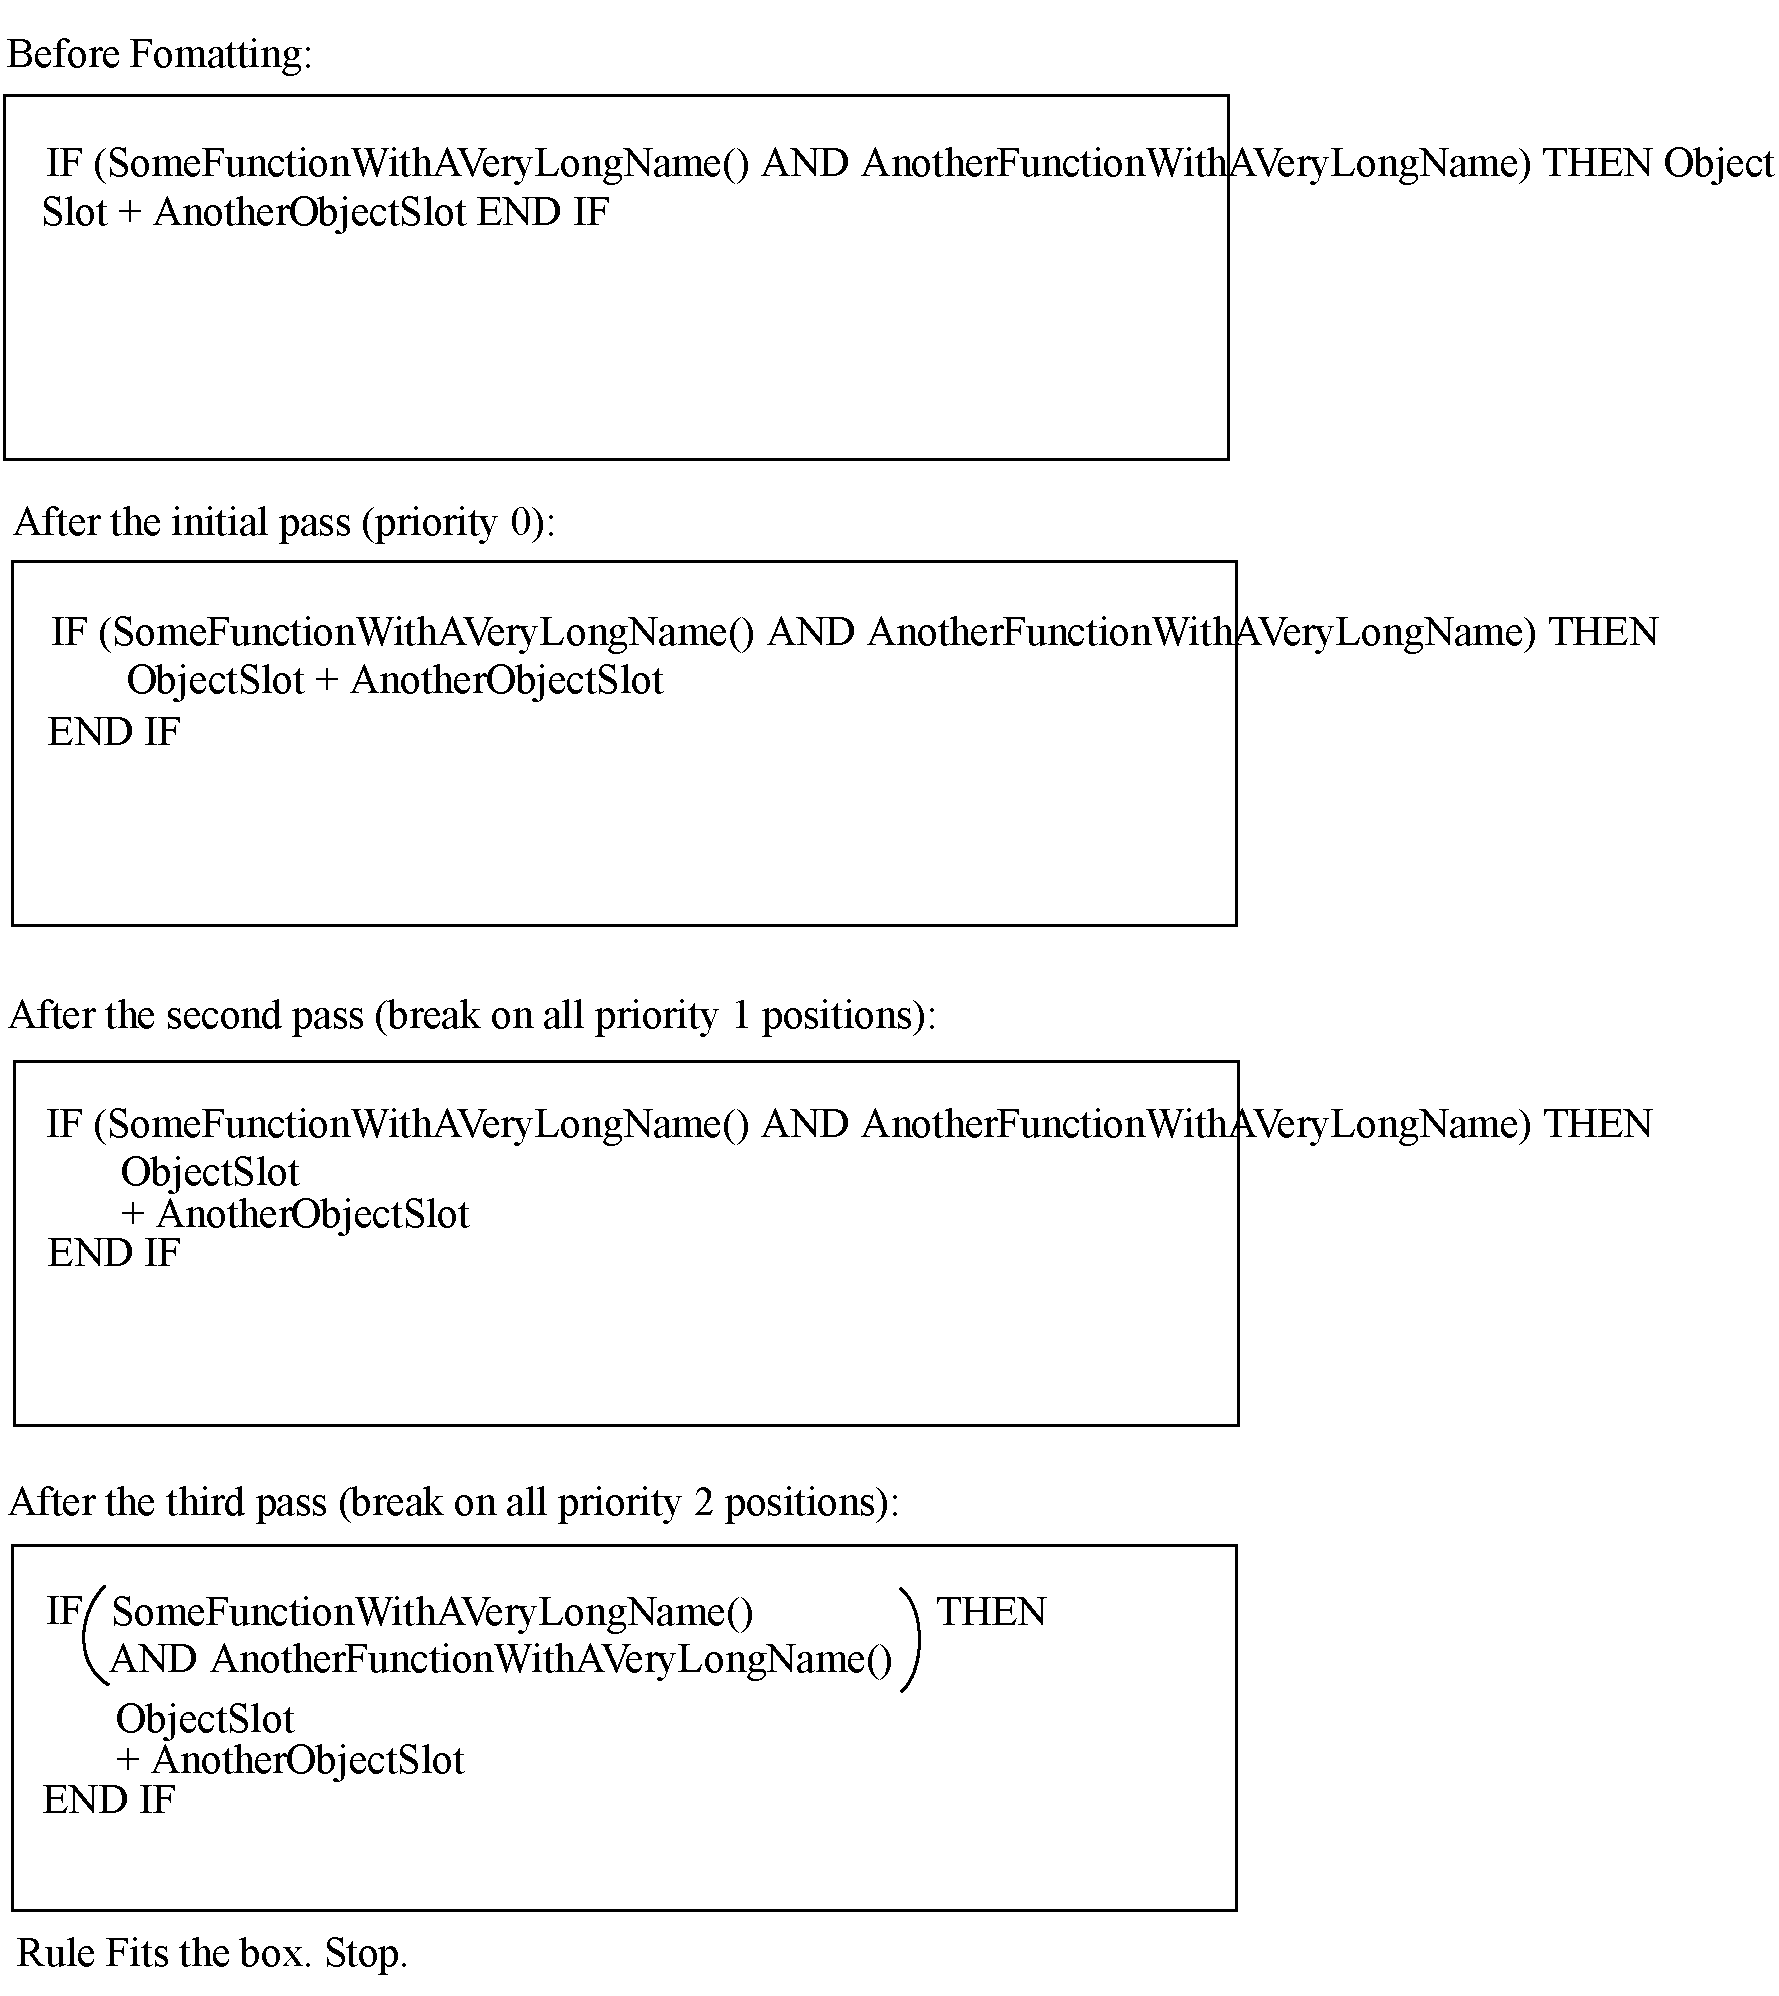
Example 2.1
Given the following line break settings
Token | Break Before | Break After | Priority |
|---|---|---|---|
THEN | no | yes | Always (0) |
END IF | yes | yes | Always (0) |
+ | yes | no | 1 |
AND | yes | no | 2 |
The block being fitted to the box
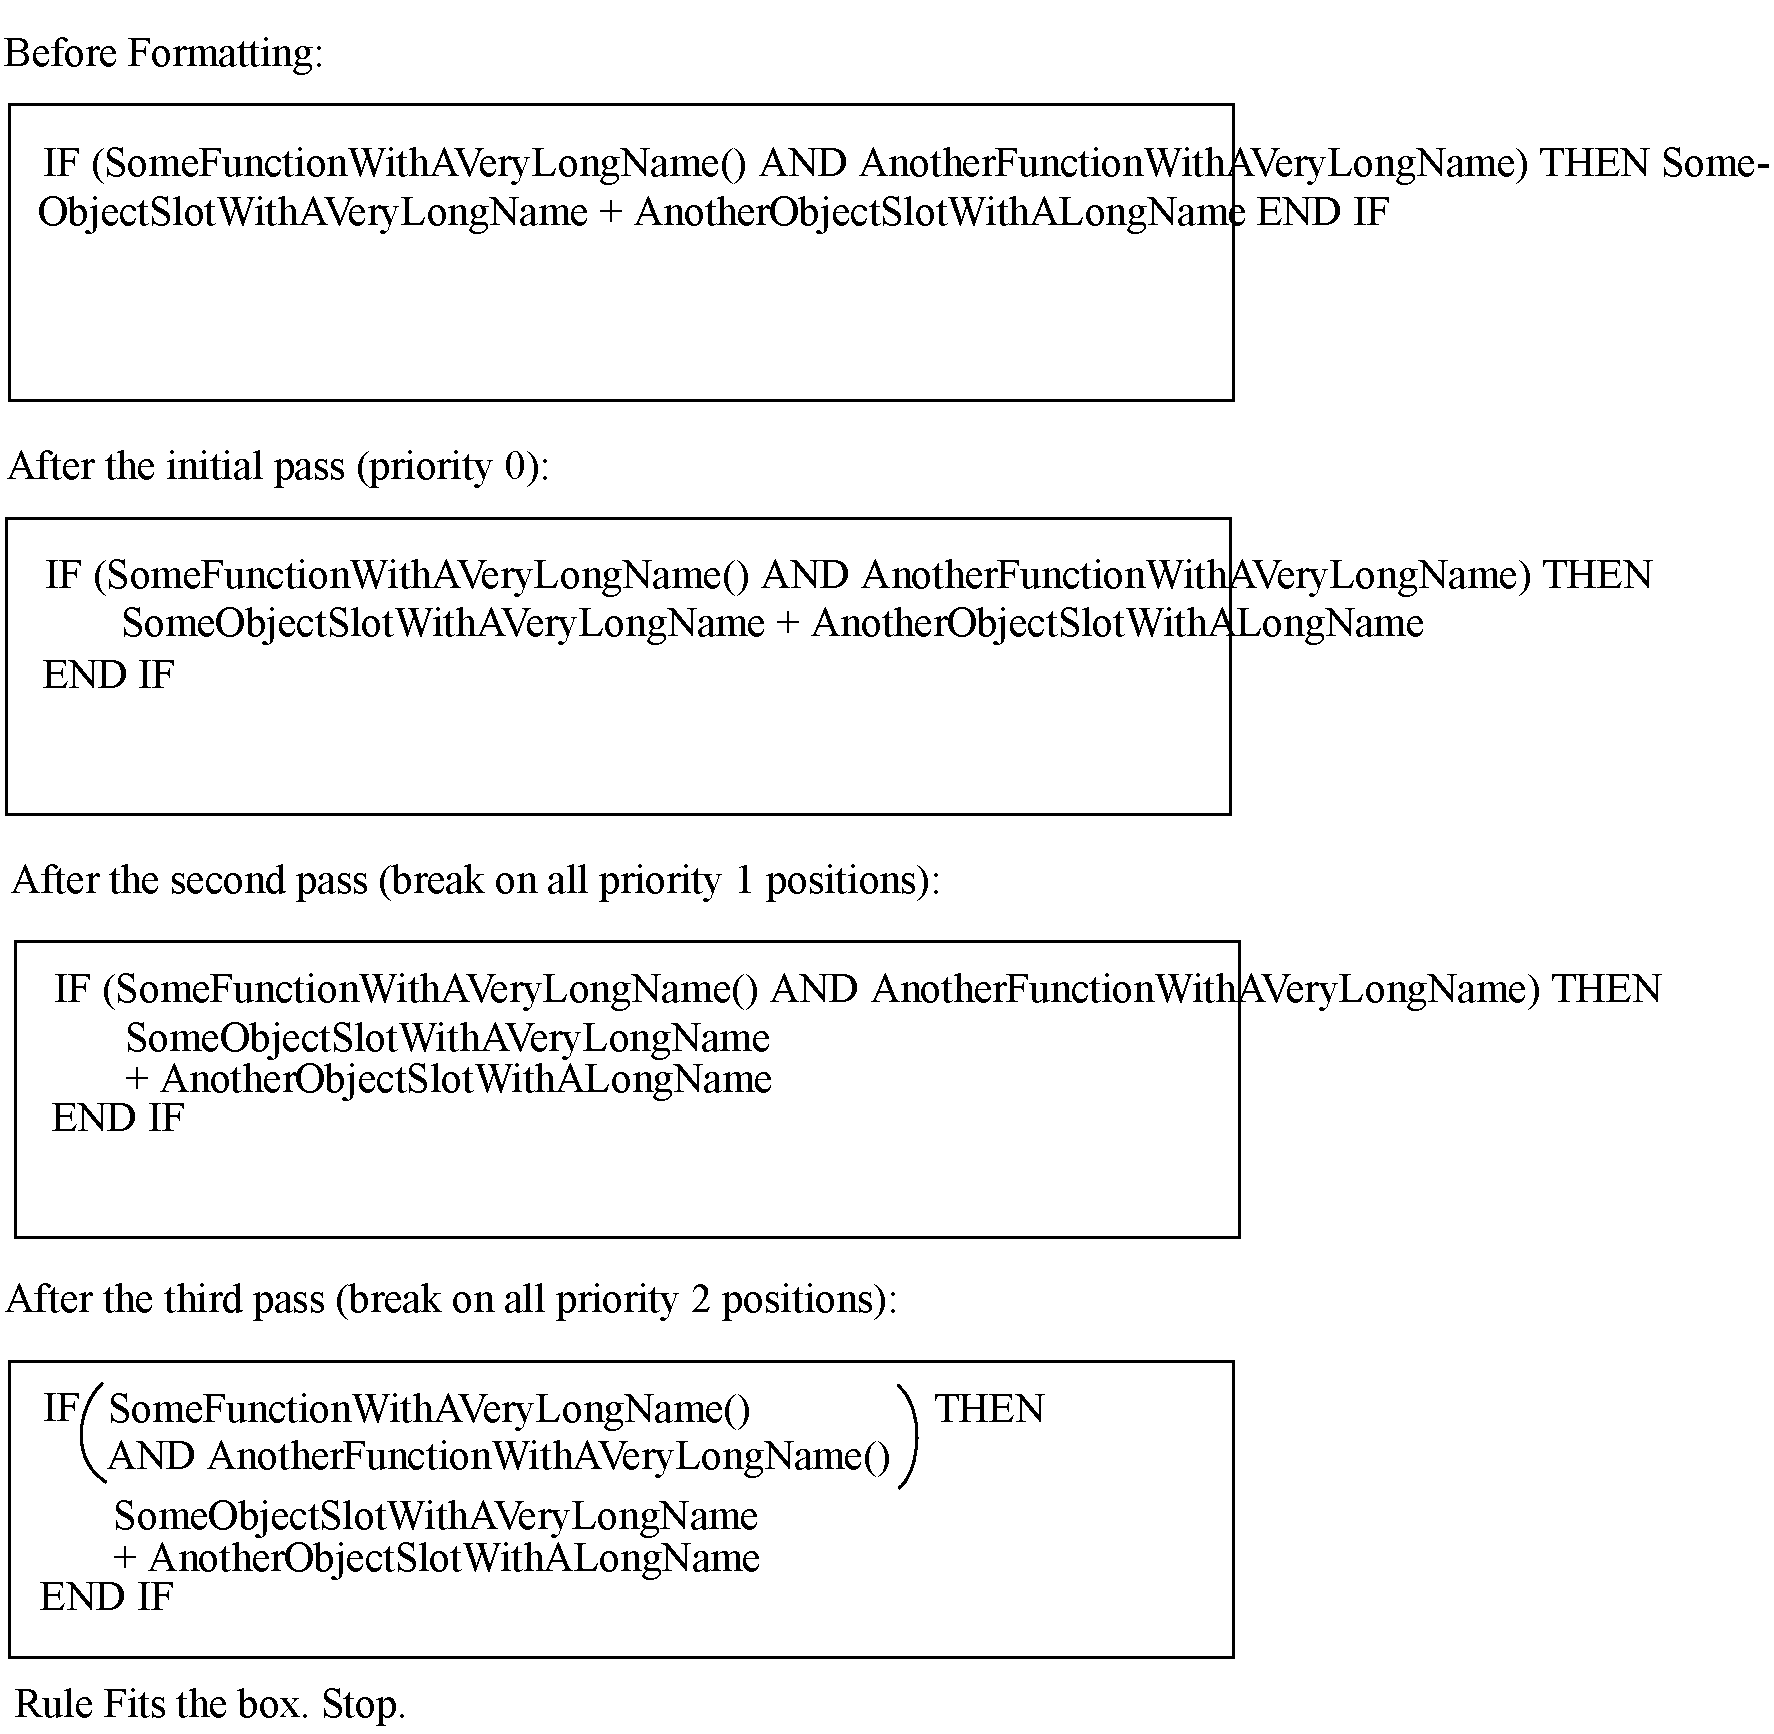
Notice that with this naive algorithm, had the object slot names been small, they would have still been broken at the “+” symbol, since, the “+” had a higher priority (1) than the AND and the block did not yet fit the box.
Element Numbers
RPL Expressions can be long and it is sometimes hard to tell where you are within the RPL expression. To help with this, you can show RPL Element Numbers along the left hand side of the RPL frame. Notice in Figure 2.30, the column of numbers from 1 to 33.
Figure 2.30
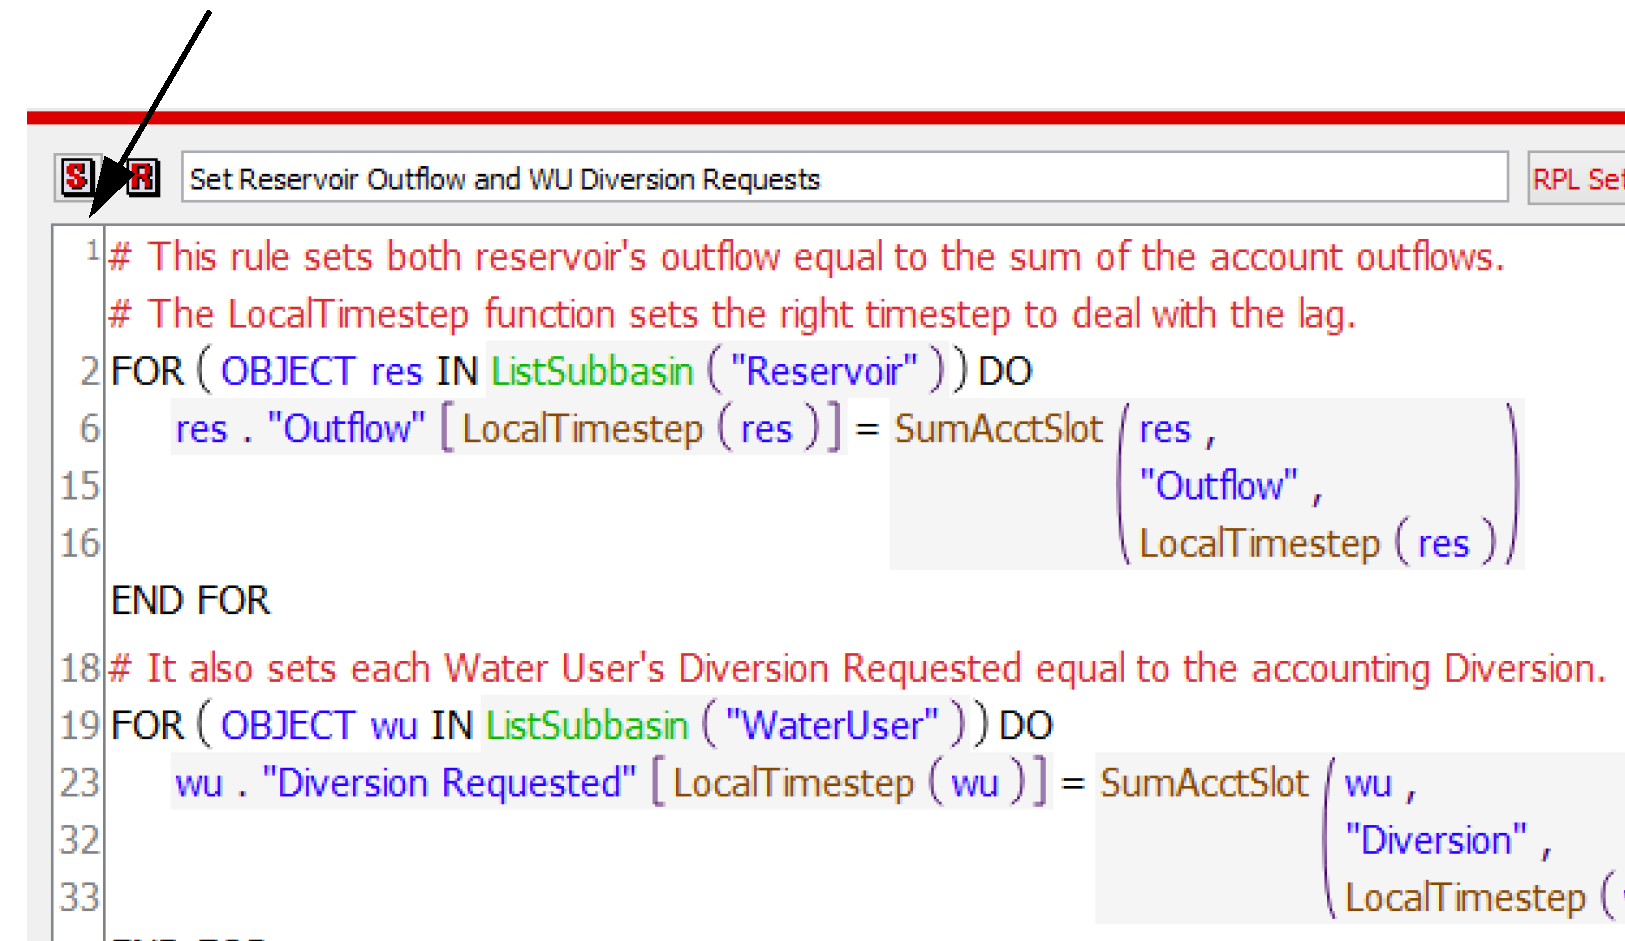
Element numbers are shown for the statements and expressions with which rules and functions are composed. As a result, they are neither continuous nor a constant increment, but are reflective of the number of elements on that line.
One can think of these like line numbers, but they are not line numbers as lines associated with a rule/goal/function vary with the formatting, which is adjusted to reflect the RPL display settings and the width of the display.
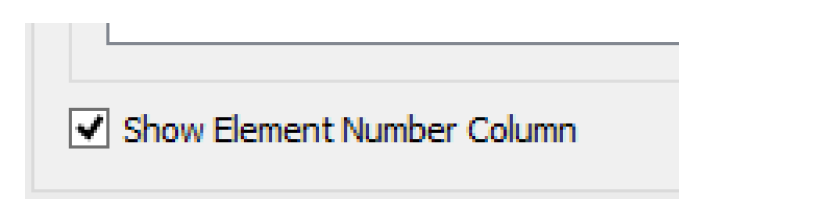
The display of Element Numbers is controlled by a check box in the Set/Rule/Function/Goal, then RPL Display Settings dialog. When display of the element numbers is enabled, a new column is shown along the left side of each RPL frame which displays, for each line, the number of the lowest numbered token beginning on that line.
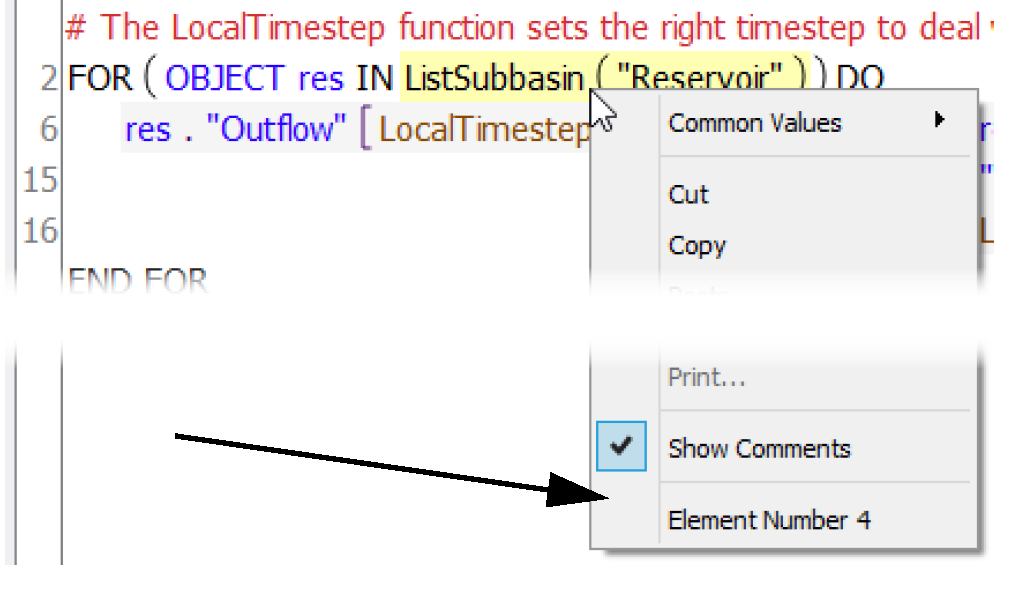
In addition, when this feature is enabled and there is a selection in a RPL frame, the right-click context menu displays the Element Number of the selected element.
Highlight Elements Equivalent to the Selection
At the bottom of the RPL Display Setting dialog is a check box to Highlight Elements Equivalent to the Selection as shown in Figure 2.31.
Figure 2.31 Display setting to Highlight Elements Equivalent to the Selection

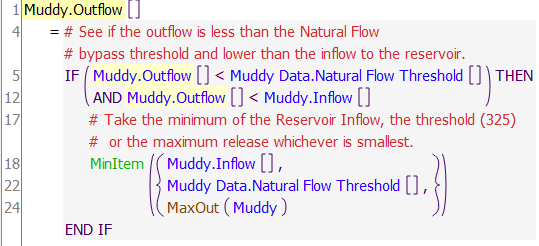
When this features is toggled on and a RPL element is selected, other elements in the same dialog which are semantically equivalent are highlighted in a paler shade of the selection color. See Figure 2.32 for an example. Muddy.Outflow, the first element, is selected. Then elements 5 and 12 are also highlighted in a paler shade of yellow.
Figure 2.32 RPL expression with highlighting
This functionality is particularly useful when searching for an expression, perhaps to refactor the expression into a more efficient WITH statement or expression. This highlighting provides a quick visual cue to indicate where there are identical or equivalent expressions.
Revised: 01/10/2022