
Window Layouts
When using RiverWare, you may need to open many windows or dialog boxes. For a repeating task or activity, it is common to open the same windows and place them in the same location and size each time. The Window Layout Manager assists with this task. This tool allows you to save and restore window layouts, where each window layout describes a set of windows and the appearance and content of each window. In this section, we refer to windows and content; for example the Object Viewer is a window while the specific objects that are shown in the viewer, such as Big Lake, is the content. Some windows have content that can change and some do not.
Note: This tool was first released in RiverWare 8.4 and is under development. Not all windows are supported by the tool yet, as described in Supported Window Types; more will be added in the future. Further limitations and some possible future enhancements are noted below. Please provide feedback and comments to RiverWare-Support@Colorado.edu.
Overview
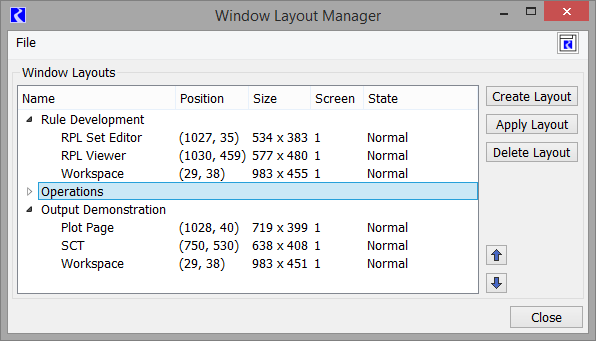
The Window Layout Manager is accessed from the workspace Windows and then Window Layout Manager menu. Figure 1.4 shows the layout manager for a sample model with three user defined layouts for various purposes.
Figure 1.4 Window Layout Manager shown with three layouts defined
Using the Window Layout Manager
Most operations involving layouts are performed from the Window Layout Manager including creating and applying layouts. All layouts are currently saved in the model file and can be exported to and imported from an external file to share between models. This section describes these operations in detail.
Creating Layouts
Layouts are based on the size and position of windows at the time the layout is created. Thus, the first step is to open the desired windows, move them to the desired location, and resize as necessary. For those windows with specific content, like the object or slot viewer, open the desired items.
Then, in the Window Layout Manager, select the Create Layout button to create a new layout that contains information about each supported open window. The following information is tracked for each window as shown in Figure 1.4:
• Name: The title of the window. Mouse over the name to see the full name and any specific information, such as the name of the SCT or Plot Page.
• Position: The pixel coordinates from the top-left corner of the screen to the top-left corner of the window.
• Size: The size, in pixels, of the window.
• Screen: The number of the screen on which the window resides. These numbers correspond to the main display, not necessarily the screen numbers used when identify the displays in the system settings.
• State: Normal, Minimized, or Maximized
Editing Layouts
Layouts can be renamed or deleted using the Rename Layout or Delete Layout options, respectively, in the File menu or the right-click context menu.
Layouts can be rearranged in the Window Layout Manager by using the Up and Down arrows next to the list. This order will be maintained on subsequent model load.
Note: Once a layout is created, there is currently no way to change content, size or position. You would need to apply the layout, modify the size, position, or content, and then create a new layout. In future development, the user may be able to edit a layout, add and/or remove windows or content from a layout.
Applying Layouts
Apply the currently selected layout by selecting the Apply Layout button to restore the specified windows to the state in which they were saved.
Tip: Layouts can also be applied by a script using the Apply Window Layout script action. See Apply Window Layout in Automation Tools for more information.
The following lists the limitations on applying layouts:
• Applying a layout does not close windows that are not part of a layout. Applying layouts only modifies or shows those windows that are part of the layout.
• Due to the wide range of possible monitor configurations (number of monitors, arrangement, orientation, resolution, etc.), windows may not be restored exactly as saved. Such problems may arise if a layout was created on a setup using multiple monitors with very high resolution and restored on a setup with fewer monitors or lower resolution. If the Window Layout Manager determines that a window would be positioned completely off-screen and not accessible, then it will instead open the window in a default state. A warning will then be displayed.
• The Window Layout Manager will attempt to populate windows with the specified contents, such as objects or slots. If the contents cannot be located in the current model, then warnings will be displayed.
Layout Persistence
All layouts are saved in the model file when the model is saved.
Note: In the future, layouts may be saved on a per-user basis or as a file that could be loaded when RiverWare or the model opens.
Additionally, all layouts in the Window Layout Manager may be exported to and imported from an external XML file.
• Export: Use the File and then Export Layouts menu. Specify a file name and select Save. Currently, all layouts are exported. This may be enhanced in the future.
• Import: Use the File and then Import Layouts menu. Locate the file containing the exported layouts and select Open. If there are any naming conflicts during import, imported layouts will be automatically renamed by appending a number on the end of the name.
Supported Window Types
The following windows are supported by the Window Layout Manager in its initial release (RiverWare 8.4); additional window types will be added in future releases.
• Accounting
– Edit Account
– Exchange Balance
– Object Account Summary
• Diagnostics Output Window
• Object Viewer
• Open Object
• Plot Page
• RPL. Note, the RPL set must be opened from a file or saved in the model. See Save Location in RiverWare Policy Language (RPL) for information on saving the set in the model.
– RPL Rule, Function, Goal, Method Editor
– RPL Function Editor
– RPL Viewer
– RPL Set Editor and Group Editor
• Run Control
• Scripts
– Script Dashboard
– Script Manager
• SCT
• Slot Dialogs
– Open Slot
– Slot Viewer (Series)
– Slot Viewer (Scalar)
• Workspace. Note, Compact mode is not yet supported.
Revised: 01/10/2022