Configuration and User Interface
The document structure is specified in the RPL set by supplying path names to a directory and then specifying file names within that directory. Further, because RPL objects are organized in a hierarchical organization (RPL sets contain policy and utility groups, policy groups contain rules and functions, utility groups contain functions) the hierarchical organization enables RPL objects to share information between objects. When configuration information is provided for an object, the containing objects inherit the configuration from their parent as their default configuration. The user can change the containing objects’ configuration as necessary. Thus to specify a single directory in which all the documentation for a RPL set is contained, the user need only specify that value as the directory associated with the set; all groups, functions, and rules in that set will inherit this as their documentation directory.
In addition to providing flexibility with respect to the organization of the documentation, this approach has the advantage that when documentation is moved (say from the modeler’s file system to a stakeholder’s file system), the ruleset will typically only need to be updated in one place to reflect this change. Environment variables can be used to further simplify moving RPL set documentation between machines. With the use of environment variables, the base directory of all RPL set documents within a users configuration can be set without any changes to the document link configuration within RiverWare. Any environment variable name (case sensitive with only alphanumeric characters and underscores) preceded with a dollar sign “$” is translated to the environment variable defined in the user session, outside of RiverWare. For example, an environment variable name ALLUVIAL_RPL_DOC is defined as C:\Projects\docs, then within the RPL external documentation link, $ALLUVIAL_RPL_DOC\forecastDraft\ will refer to C:\Projects\docs\forecastDraft. This is specifically designed for portability of external RPL documentation across machines and platforms. Slashes can be forward or back slashes and redundant slashes are condensed.
In this documentation and in the user interface, we refer to the two parts of the location specification as the Directory and the File name. There is nothing that requires that the two parts correspond to a directory and file name in the local file system. Another possibility is that the two parts together specify the location of a document as a URL. In this case, the first part could be something like http://www.WaterU.edu/Models, which is not, strictly speaking, a directory.
Note: The file name specification could be an absolute path specified relative to the directory specification; for example, “MyFunctions/FunctionA.htm”.
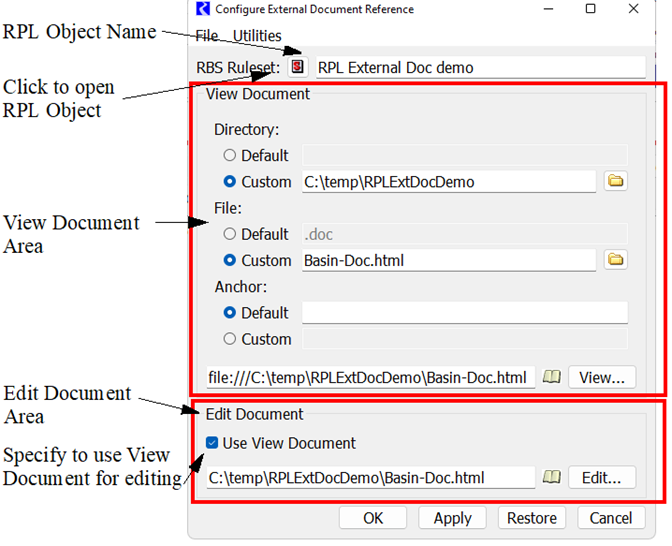
The configuration dialog is available from the RPL editor View, then External Documentation, then Configure menu. Figure 4.2 shows the dialog for the RPL Set.
Figure 4.2

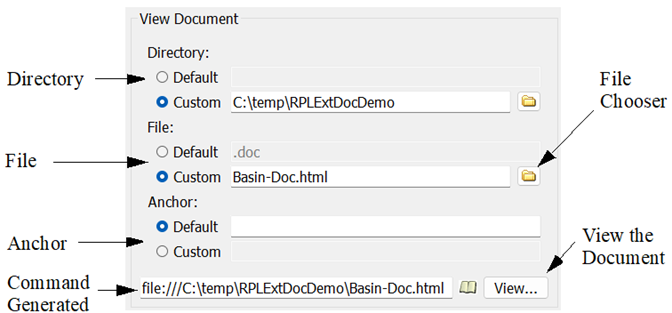
In this dialog, the RPL object is listed at the top and there is a button to take you to the that RPL object. Then, there are two areas, one for the View Document and one for the Edit Document. If the Use View Document check box in the Edit Document area is checked, the remainder of the Edit Document area is hidden. This toggle specifies that the View and Edit documents are the same. The process of specifying a View and Edit document is the same, so it is only described for the View Document. Figure 4.3 shows the View Document dialog.
Figure 4.3

For the Directory, File, and Anchor (when using HTML), the user can specify to use the listed Default or select to use a Custom configuration. When Custom is first selected, the Default value is copied down from the Default field. For the Custom configurations, the user can either type in a value or use the File Chooser button to specify. Anchors are currently only supported for HTML files; see HTML for details.
The default Directory is the directory containing the RPL set itself. The default File is the name of the RPL set with a modified filename extension. It is typically “.doc” or “.docx”, but will instead be “.html” if a file with the resulting name at the path actually exists.
For RPL objects (e.g. a group or rule) within a set, the default directory and file names are inherited from the containing RPL object, and the default anchor (when HTML is used) is based on the RPL object name.
Note: Spaces and most punctuation are removed.
Note: The default anchors for all the objects within a RPL set are reported in a table in the generated HTML template file; see HTML) for details.
At the bottom of the View area is the resulting command that is generated and will be passed to the operating system to start the application. This is the result of the configuration that has been defined. It is the chosen application followed by the command used by that application to open the specified file. Selecting the View (or Edit) button will execute the command.
As noted above, the Edit Document area is similar to the View Document area. At the bottom of the window are OK (apply and close), Apply, Restore to previously applied values, and Cancel buttons.
Once applied, the configuration settings are propagated to the default value of contained RPL Objects. Thus, the user only needs to specify as much information as necessary to fully configure the document. If the user is using the layout One Document that Describes the Entire Set, he/she only needs to configure the RPL set and all rules, groups and methods will be configured correctly; see One Document that Describes the Entire Set. If the user is using the layout One Document for Each RPL Object in the Set, he/she needs to make sure that each RPL object is configured correctly but using a consistent naming convention can be used to simplify the configuration; see One Document for Each RPL Object in the Set. If there are exceptions to the naming convention, the user would need to configure the RPL objects that have the exception.
Revised: 01/05/2024