Using Object Dialogs
Regardless of whether you use the Object Viewer or individual Open Object dialog, the content is the same. All objects use the same format.
Figure 5.2

The dialog is organized by the following tabs:
• Slots: numerical model data
• Methods: user-selectable algorithms that represent physical and other processes
• Accounts (when enabled): containers to track water type or ownership
• Accounting Methods (when enabled): methods that correspond to water type or ownership
• Attributes: optional user defined attributes and values representing meta data for the object
• Description: optional text description of the object.
Naming an Object
You can change the name of any object by selecting the Object Name text field.
• User defined names may be any combination of letters, numbers, spaces and underscores, but no other characters. Names are case-sensitive and are not limited in length, but excessively long names will be displayed in their entirety, making the workspace visually cluttered.
Note: If you are renaming an object whose old name appears in RPL sets, a dialog asks if you want to search RPL sets for the old name and optionally replace occurrences with the new name. Entering Yes will bring up the RPL Search and Replace dialog with the results of a search for the old name in all RPL sets and with the new name filled into the Replace with field. You can examine the occurrences and choose to replace some or all of them with the new name.
Slots Tab
The Slots tab contains information about each of the object’s slots. This information may include the slot Type, Value, and Status information.
The order of the slots is user configurable and can be saved with the model file; see Sorting Slots for details.
Figure 5.3
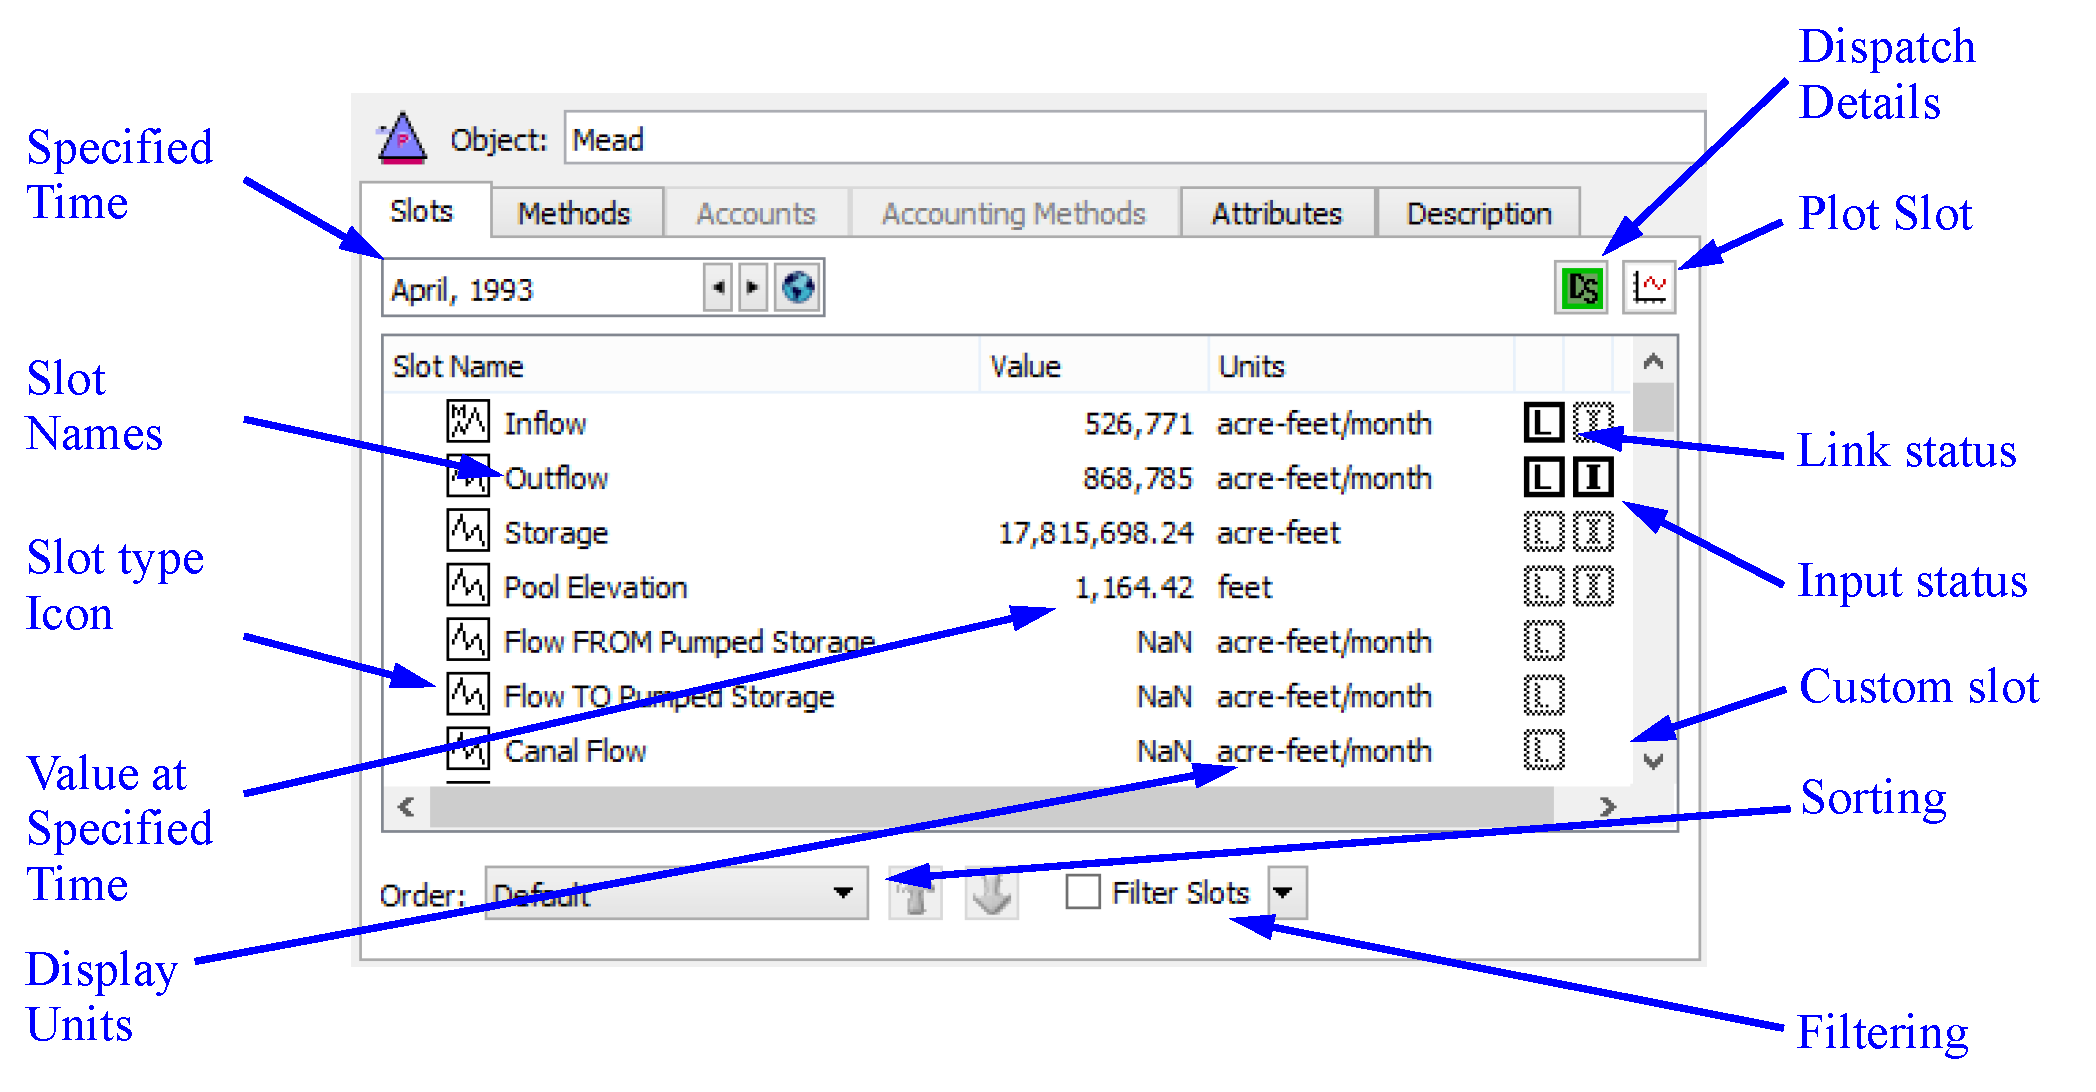
Slots Tab Tour
Following is a description of all of the pieces of the Slots tab.
Specified Time
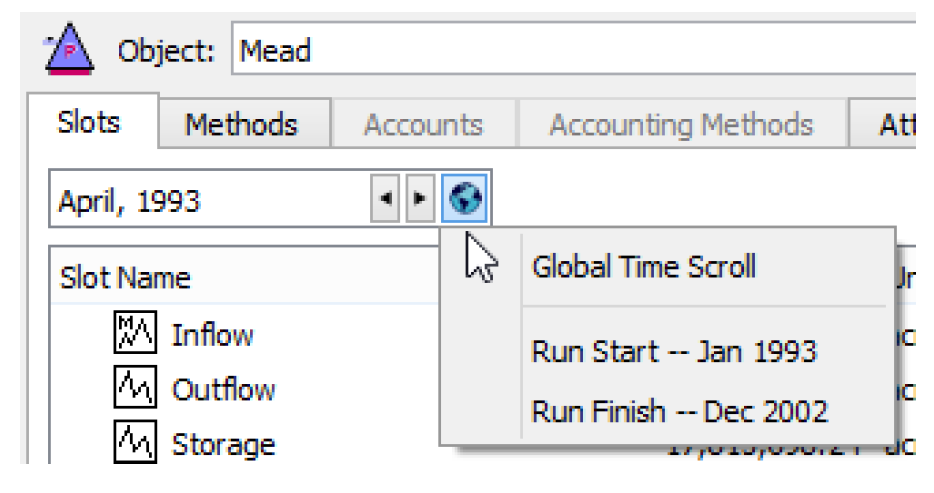
The DateTime spinner allows you to choose the date at which values are displayed in the slot list. The right arrow advances forward in time while the left arrow goes backward in time. Select the Globe icon and select Global Time Scroll to scroll all dialogs that reference a model timestep (E.g. slots, objects, plots, and model run analysis) to that date.
Slot Names
The names of simulations slots are predetermined and cannot be changed. Custom slots, which you can create on any object can be named as desired.
Slot Type Icons
Different types of slots are used for representing different types of data. The icons in the type column indicate the type of the slot. See Types of Slots for descriptions of the types of slots.
Slot Value
The Value field of the Slot List displays the value at the specified time in the slot. The value is displayed with the format selected by the user. When an object is first created, its values are all NaN (not-a-number).
Slot Units
The units shown are defined in the active Unit Scheme for that slot.
Dispatch Details
The Dispatch Details icon and button  displays the status of dispatching for the given object at the specified timestep (not including rule effects). Hover over the button to see a tooltip that summarizes the dispatch behavior. Select the button to open the model run analysis Dispatch Behavior Details for the given object; see Dispatch Behavior Details Dialogs in Debugging and Analysis for details. Shift-Click the button to show the Special Results Details; see Model Run Analysis—Special Results Details Dialog in USACE‑SWD Modeling Techniques for details.
 displays the status of dispatching for the given object at the specified timestep (not including rule effects). Hover over the button to see a tooltip that summarizes the dispatch behavior. Select the button to open the model run analysis Dispatch Behavior Details for the given object; see Dispatch Behavior Details Dialogs in Debugging and Analysis for details. Shift-Click the button to show the Special Results Details; see Model Run Analysis—Special Results Details Dialog in USACE‑SWD Modeling Techniques for details.
 Plot Button
The Plot button  opens a plot dialog to display the values in the selected slots.
 opens a plot dialog to display the values in the selected slots.
 Link Status
The Link Status indicator is bold when the slot is linked to another slot. Only timeseries slots may be linked; therefore, only timeseries slots display the Link Status.
Input Status
The Input Status indicator is bold when at the value at that timestep is flagged as an input. Only timeseries slots may have input flag; therefore, only timeseries slots display the Input Status.
Custom Slot indicator
The custom slot icon  is shown when the slot is custom (i.e. created by a user). Simulation slots do not have any icon in this column. In addition, custom slot icons have a pale yellow background.
 is shown when the slot is custom (i.e. created by a user). Simulation slots do not have any icon in this column. In addition, custom slot icons have a pale yellow background.
Sorting Slots
Following are the options for sorting and filtering slots.
Sorting Options
In the Slots tab, the following sorting orders are supported as shown in the Order menu at the bottom of the tab.
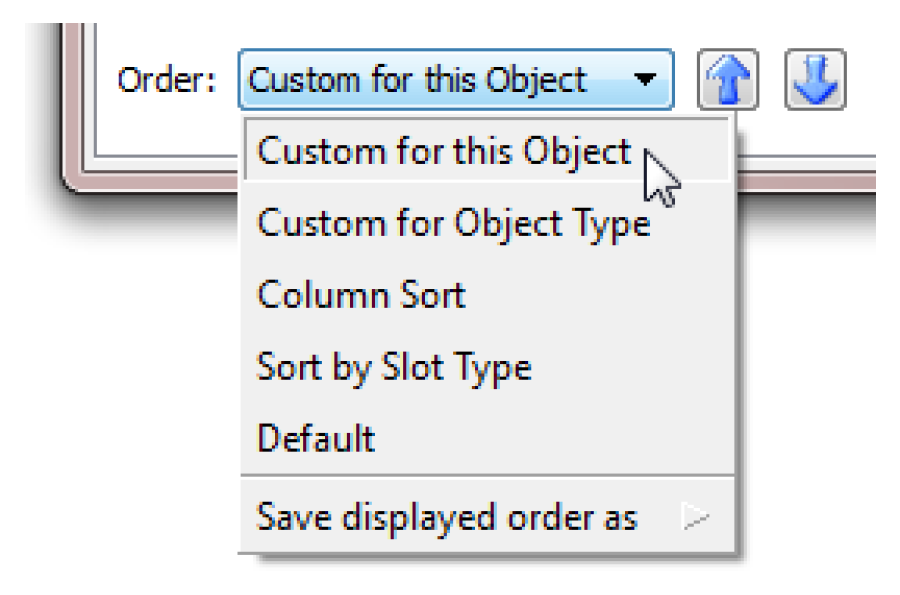
• Custom for this Object. Show a custom order for this object only. In this mode, the up and down arrows  are enabled and you can re-arrange slots. Select one or more slots, then select the arrows to move them up or down.
 are enabled and you can re-arrange slots. Select one or more slots, then select the arrows to move them up or down.
• Custom for this Object Type. Show the custom order defined for objects of this type, i.e. Storage Reservoir, Reach, Water User.
• Column Sort. Sort the slots alphabetically/numerically by column. In this mode, the column headers are enabled. Select any header to rearrange by that parameter. If you select a column header in any other mode, it will automatically switch to Column Sort order and then sort by that column.
• Sort by Slot Type. Group slots of the same type together and show Slot Groups together.
• Default. Use the internally defined slot order.
Saving the Order as Custom
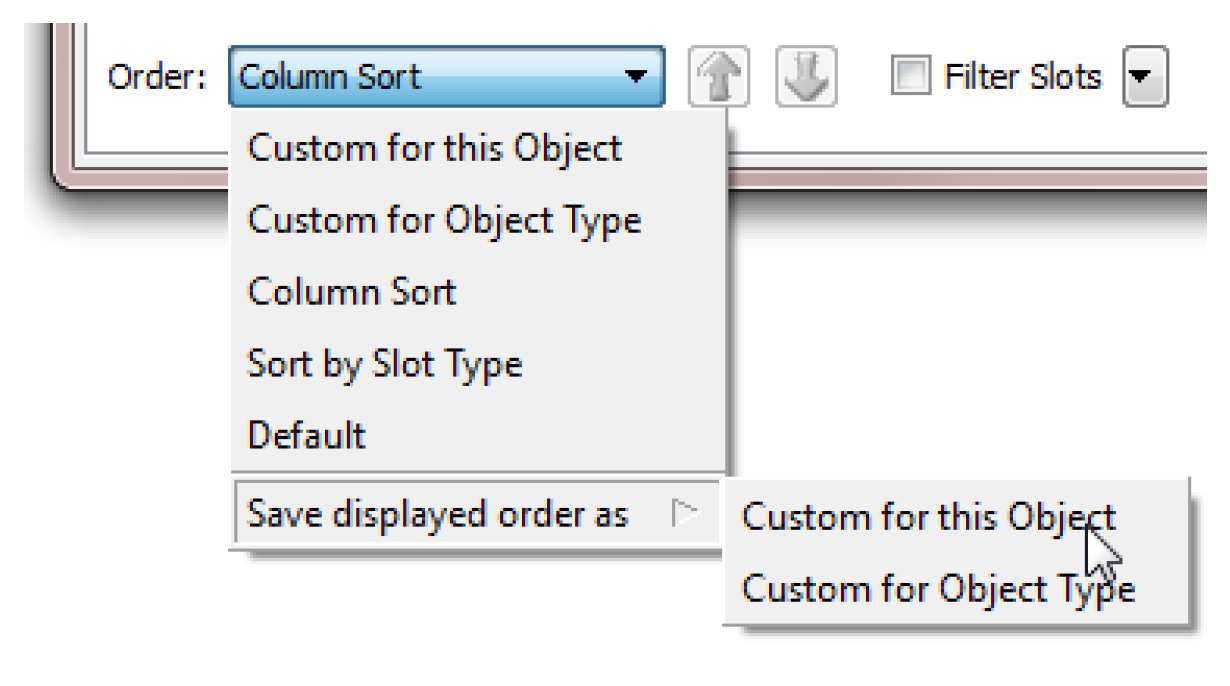
There are two custom orders you can define and use, one for this object and one for objects of this type. You can only rearrange slots in the Custom for this Object mode. But you can save any order to either of these custom orders. At the bottom of the Order menu is a sub menu Save displayed order as. The options are as follows:
• Custom for this Object
• Custom for Object Type
When an object opens, it first tries to use the Custom for this Object order if defined, then the Custom for Object Type order if defined, and finally, it uses the Default order if neither of the other two are defined.
Filtering Slots
Like the sorting mechanism, filtering allows you to create a more meaningful view of the slots on the object. Filtering allows you to hide the slots you do not wish to see, perhaps because you are not using them. Filtering is controlled by two controls on the lower right part of the Slots tab, the check box and the menu.
The Filter Slots check box enables and disables the filtering. This immediately conveys whether some slots are hidden, and provides an easy way to temporarily show all slots without losing the configured show/hide states for the slots.
The Filter Slots menu defines how you wish to filter, as follows:
• Hide Selected Slots operation can be applied to the selected set of slots.
• Hide empty un-linked series slots will hide all series slots that do not have any values (i.e. NaNs only).
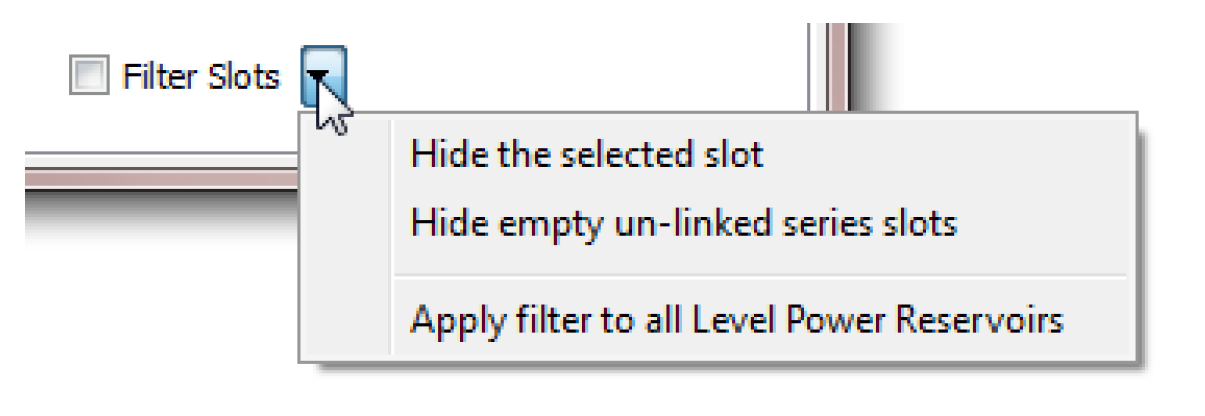
Once either of these options is chosen, the menu will say what is hidden and allow you to reveal all or some of the slots.
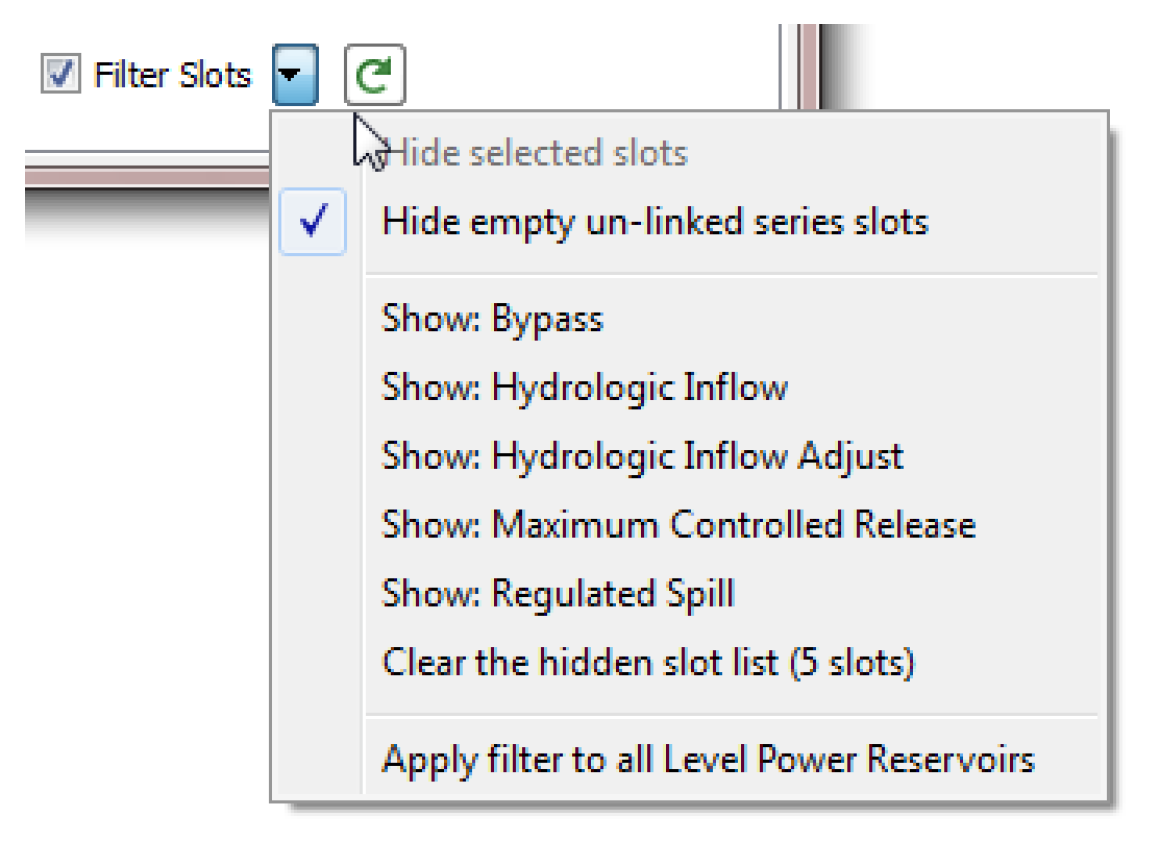
Use the Show: <slot> menu to reveal the slot. Use the Clear the hidden slot list menu to reveal all of these slots.
Select the Hide empty un-linked series slots to show these hidden slots.
Since this option depends on the values in the slots, there is a Refresh button to update the dialog. 

Finally, the Apply filter to All <objects> operation applies the filter settings to all objects of that type. This, along with the custom sort order described above, is a convenient way to make all objects of the same type appear the same.
Creating Custom Slots
The Slot menu and the right-click Add Slot menu has the following options to create custom slots:
• Add Series Slot
• Add Series Slot with Expression
• Add Integer Indexed Series Slots
• Add AggSeries Slot
• Add Integer Indexed AggSeries Slot
• Add Series Slot with Periodic Input
• Add Table Slot
• Add Statistical Table Slot
• Add Periodic Slot, Text Headers
• Add Periodic Slot, Numeric Headers
• Add Scalar Slot
• Add Scalar Slot with Expression
• Add Mass Balance Summary
• Add Time Aggregation Series Slot
Creating and Configuring Series Slots
Series slots are created through the Slot, then Add Series Slot menu. Custom Series slots on a Object can be linked to any linkable slot on the workspace. See Series Slots for details.
Creating and Configuring Table Slots
You can add a table slot of any dimension and units. See Table Slots for details.
Creating and Configuring Statistical Table Slots
Statistical table slots allow you to specify a statistical function, such as a flow duration curve, which is computed at the end of a run using the data in the slot(s). This statistical analysis data can then be plotted or exported to another application.
See Statistical Table Slots for details.
Creating and Configuring Periodic Slots
Periodic slots are used to represent data which repeats at regular time intervals. An example might be a set of evaporation coefficients for a reservoir. The rate of evaporation varies with such factors as temperature and wind speed, factors which vary seasonally. It is natural to assume that this variation is the same for each year. If this sort of data were entered into a series slot, then the same data would need to be repeated every year. This would be impractical and inconvenient for the user. On the other hand, if this data were entered in to a table slot, then the data would lose the time element associated with each value. This would make it difficult to look up or interpolate values with respect to time. The periodic slot meets the needs not met by these other slots.
You can create two different types of periodic slots, slots with text headers for the columns and slots with numeric headers for the columns.Select View, then Configure to configure the periodic slot. See Periodic Slots for details.
Creating Expression Slots
Expression slots are computational expressions that contain other slot names as variables. They are used to calculate quantities such as “combined Storage of all Reservoirs”, “weekly average Outflow of Hoover Dam”, or “the ratio of Hydrologic Inflow to Reach Inflow at selected structures”. To add a Series slot with expression, select Slot, then Add Series Slot with Expression. To add a Scalar slot with expression, select Slot, then Add Scalar Slot with Expression. See Series Slots With Expression for details.
Creating Mass Balance Summaries
The Mass Balance Summary slot is a user-defined hierarchy of series slot collections used to check (i.e. sum) mass balance across many objects. The collections are themselves series slots representing the sum of the contained slots. These slots can be used within RPL expressions and any other place where series slots are used. See Mass Balance Summary Slots for details.
Creating Time Aggregation Series Slots
Time Aggregation Series Slots temporally aggregate other series slot. See Time Aggregation Series Slots for details.
Slot Groups
Slots (on non aggregate objects) can be grouped together within the Open Object dialog in named Slot Groups. Slot group items are indicated with a boxed [G] icon. Any slot can be in at most one slot group.
Figure 5.4
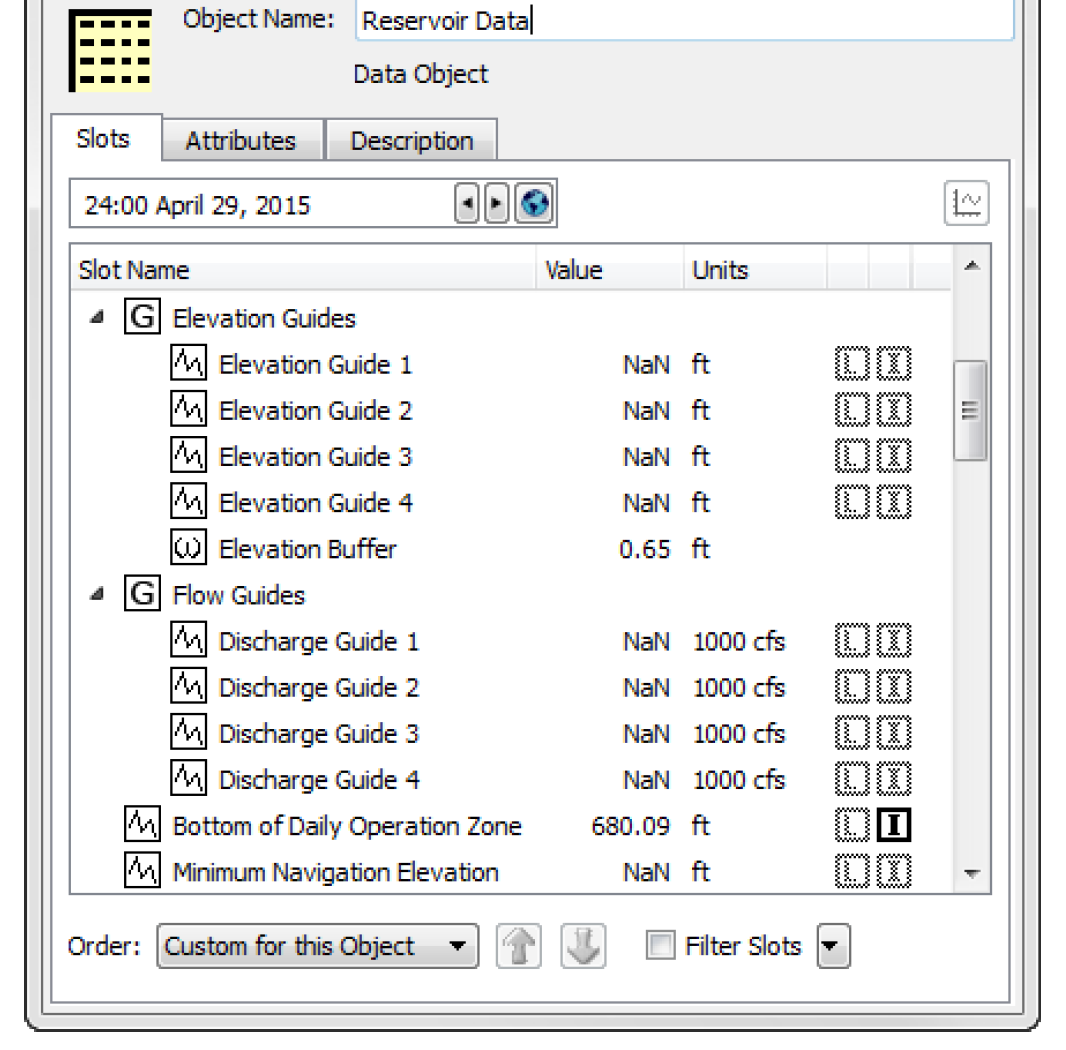
Slot groups do not change the relationship between a slot and its containing object -- the slot is still functionally, and internally, contained directly within the object. The complete name of the slot does not change when moving the slot into and out from a slot group. Slot names and slot group names on any particular object are unique. That is, no slot and slot group on a particular object can have the same name. Also, it is not possible for slots in distinct groups on the same object to have the same name.
Showing Slot Groups
Slot Groups can be shown or hidden as follows:
• Select Group, then Show Slot Groups.
• Right-click Show Slot Groups.
When the Show Slot Groups checkbox is cleared, slots are presented in the traditional way, as a single-level list of slot items.
Note: The state of this toggle is Global within the RiverWare session. Turning the Show Slot Groups checkbox on or off changes all Open Object dialogs for objects. This setting is saved in the RiverWare model file.
When Slot Groups are not shown, The tree ornamentation is hidden. Sorting of slots by name (e.g. after selecting the Slot Name column header) is done without regard to placement of slots within slot groups. Other operations in the Group menu are disabled.
Figure 5.5
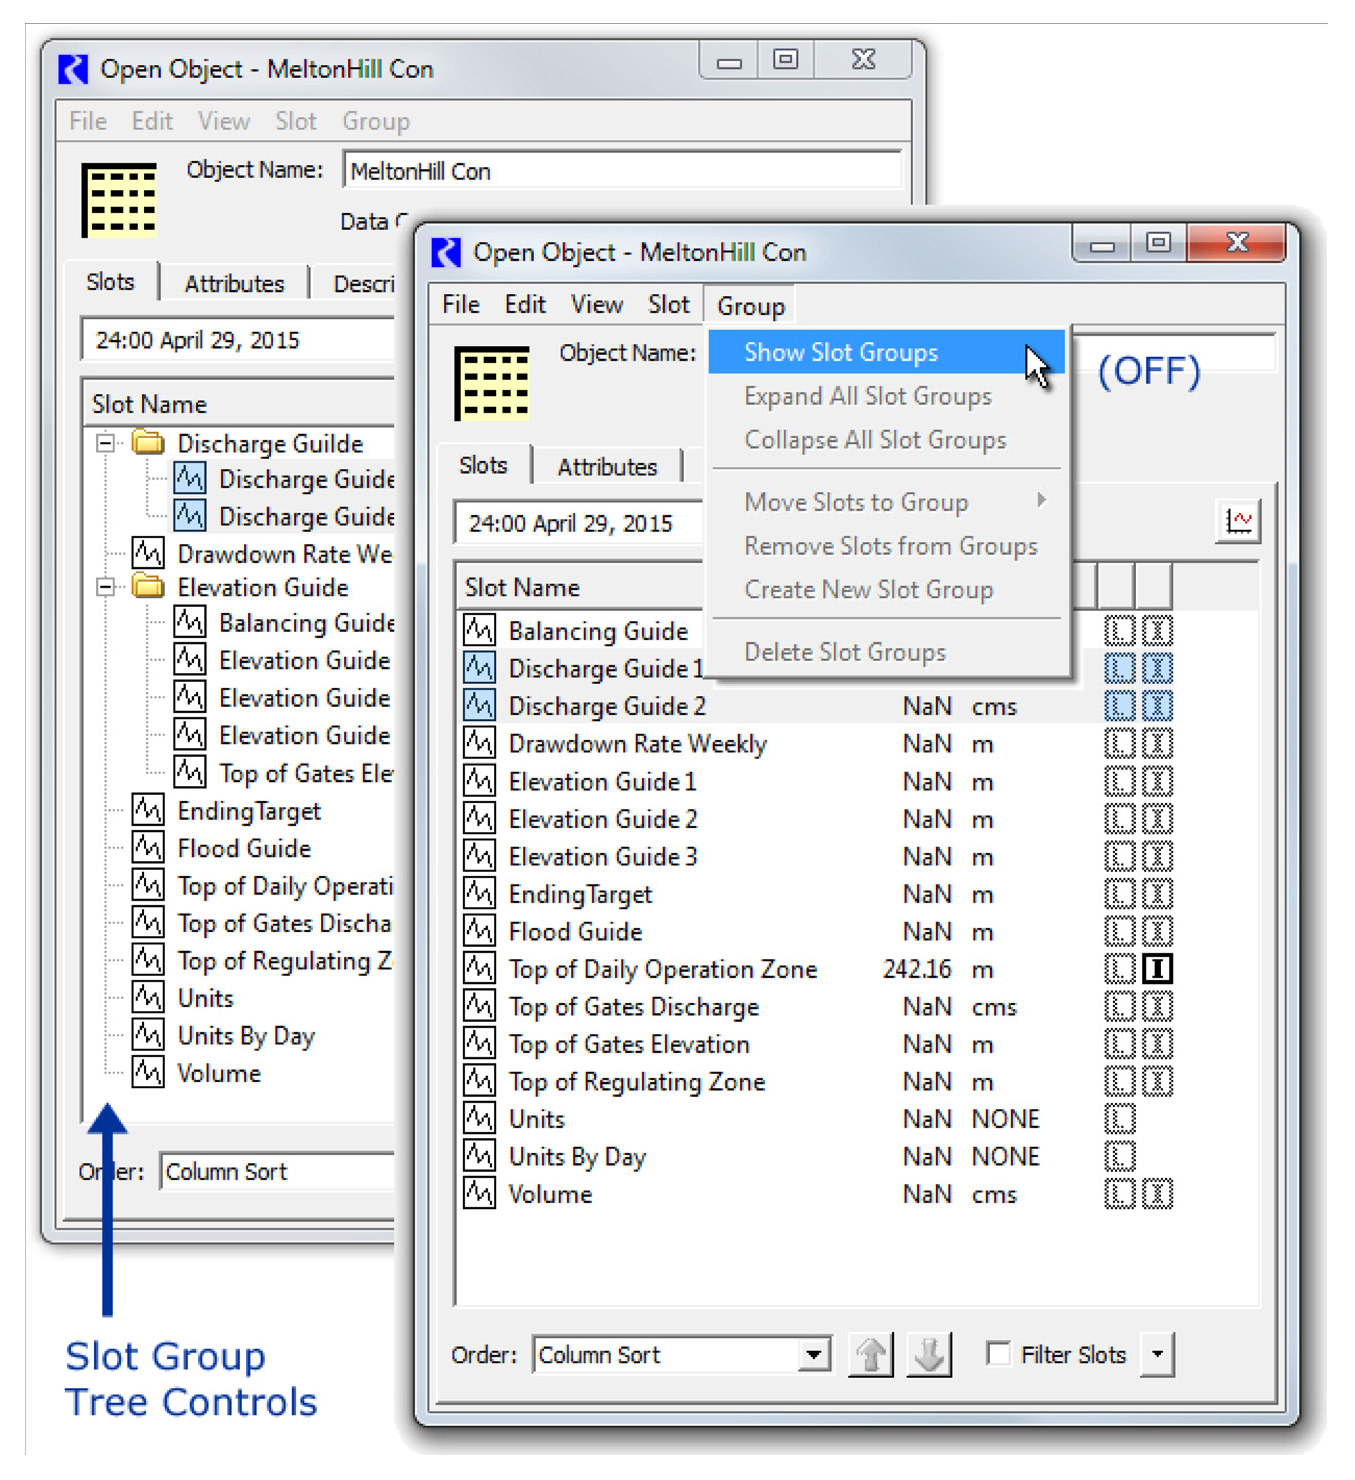
When Slot Groups are shown, the Group, then Expand All Slot Groups and Group, then Collapse All Slot Groups menu items open or close all slot group tree items, respectively.
Note: When shown, Slot Groups are shown in the Slots tab according to the selected sorting Order presented at the bottom of the dialog. You can sort them alphabetically, by slot type and group, or through the custom sorting. See Sorting Slots for descriptions of these options.
Creating Slot Groups and Adding Slots
There are two ways to create a slot group:
1. Select one or more slots, then use the right-click context menu or the Group menu and choose Move Slots to Group, then New Slot Group. Then change the name of the new group as desired.
Figure 5.6
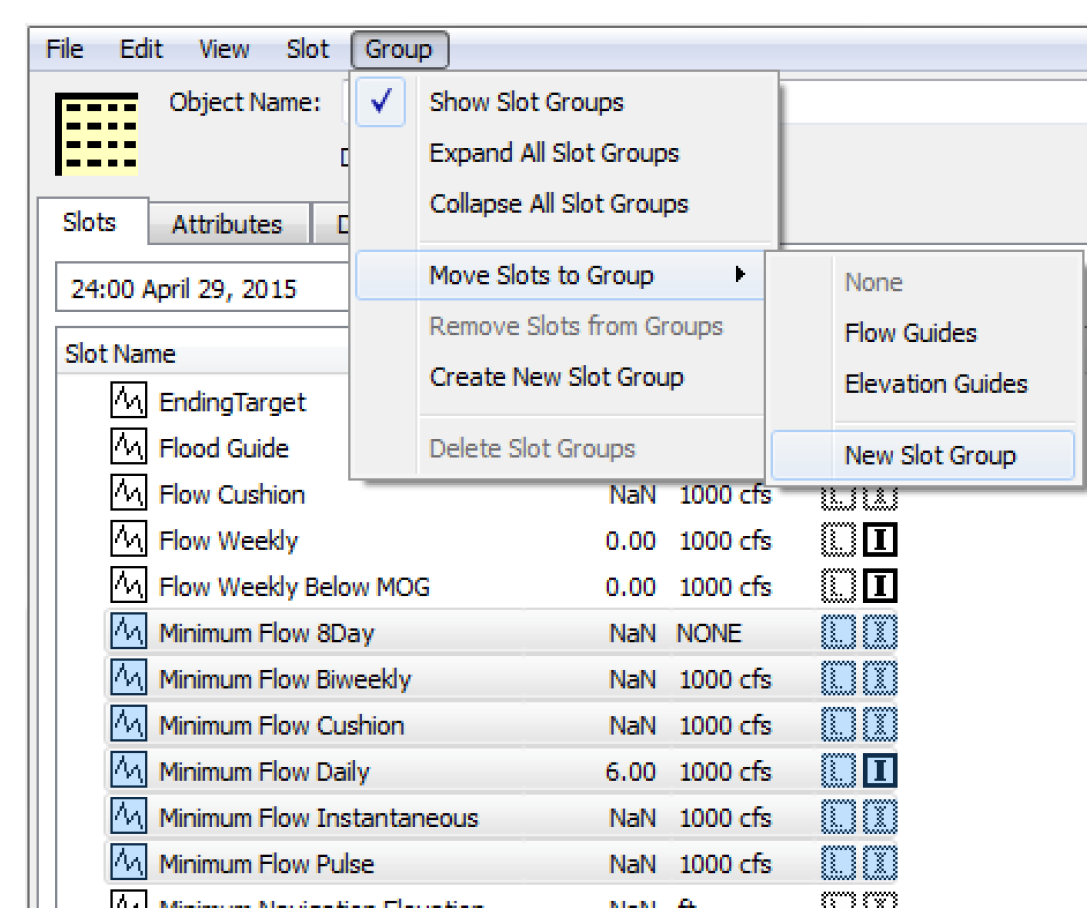
2. Use the Group, then Create New Slot Group menu. Then change the name of the new group as desired. Then select some slots and choose Move Slots to Group and choose the new group.
The new group name must be distinct from the names of all slots and other slot groups on the object, and cannot be None.
Removing Slots from a Group
There are two ways to remove a slot from a group:
1. Select the slot(s) to remove and use the right-click context menu or Group menu and select Remove Slots from Groups.
2. Select the slot(s) to remove and select Move Slots to Group, then None.
In both cases, the slot is removed from the group but continues to exist on the object.
Deleting Slot Groups and Slots
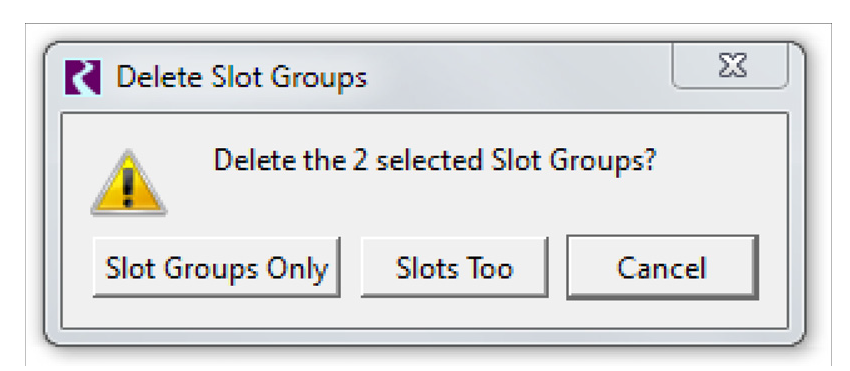
To remove or delete a Slot Group, select the group and choose Delete Slot Groups from either the right-click context menu or the Group menu. A confirmation dialog opens with the following choices:
• Slot Groups Only. Deletes only the group but not any slots.
• Slots Too. Delete the group and all slots within the selected groups.
• Cancel. Cancel the deletion operation.
Figure 5.7
Using Slot Groups
The following Slot menu operations also operate on slot groups, when selected.
Copy Slot Groups
The Copy Slot Groups operation copies the currently selected slot groups and containing slots to the system clipboard. Those slot groups them become available to be pasted within the same object, or in the Open Object dialog for a different object.
Paste Slot Groups
The Paste Slot Groups operation pastes the Slot Clipboard's slot groups into the object. If the object already has a slot group with the name of a slot group in the clipboard, then that existing slot group instance is used as the target for the paste operation -- i.e. that existing slot group will receive the slots from the analogous slot group in the clipboard. When pasting slots from a copied slot group, if slots having the same name already exist on the destination object, slightly differently named slots (copies) will be created from the copied slot group -- a distinct four-digit numeric number will be added to slot names, after having removed trailing digits, spaces, and underscore characters. After the paste operation, only the newly created slot groups and slots will be selected within the Open Object Dialog's slot list.
Duplicate Slot Groups
Whereas the Paste Slot Group operation always uses an existing slot group having the copied group's name, the Duplicate Slot Groups operation always creates new, slightly differently named, slot groups from the currently selected slot groups. It also copies the groups' slots, which are also given modified names.
Copy Slot Groups to Objects
This operation is a high-level copy operation; see Copy Slots to Objects for details.
Move Slot Groups to Object
See Move Slots to Object for a description of this option.
Copy and Paste Slots
Slots on any object (and slot groups) can be copied and then pasted to another object. With one or more slots selected, use the Slot, then Copy Slots (Ctrl-C) and Slot, then Paste Slots (Ctrl-V) menu to do this copy and paste action.
In addition, for a single object, you can use the Slot, then Duplicate Slots menu to create a duplicate of the slots, with slightly different names. The pasted custom slot name change consists of a different set of four digits at the end of the slot name. When modifying a slot name to insure uniqueness, all trailing digits, spaces, and underscores are first removed from the slot name, and an underscore and four digits are then appended.
Copy Slots to Objects
This section describes a high level utility that allows you to copy selected slots (and Slot Groups; see Slot Groups) and paste copies to multiple specified objects. This is particularly useful if you have consistent custom slots on simulation objects or data objects. For example, you may have 20 reservoirs and each has custom slots that contain policy or summary data. This utility allows you to configure or update one set of slots and then copy and paste the slots to all 20 reservoirs. Options are provided to specify to overwrite existing slots or add new slots.
To use the tool, select Slots (or Slot Groups) on the Open Object dialog Slots tab. Then, use the Slot, then Copy Slots to Objects menu. The Copy Slots to Objects dialog appears.
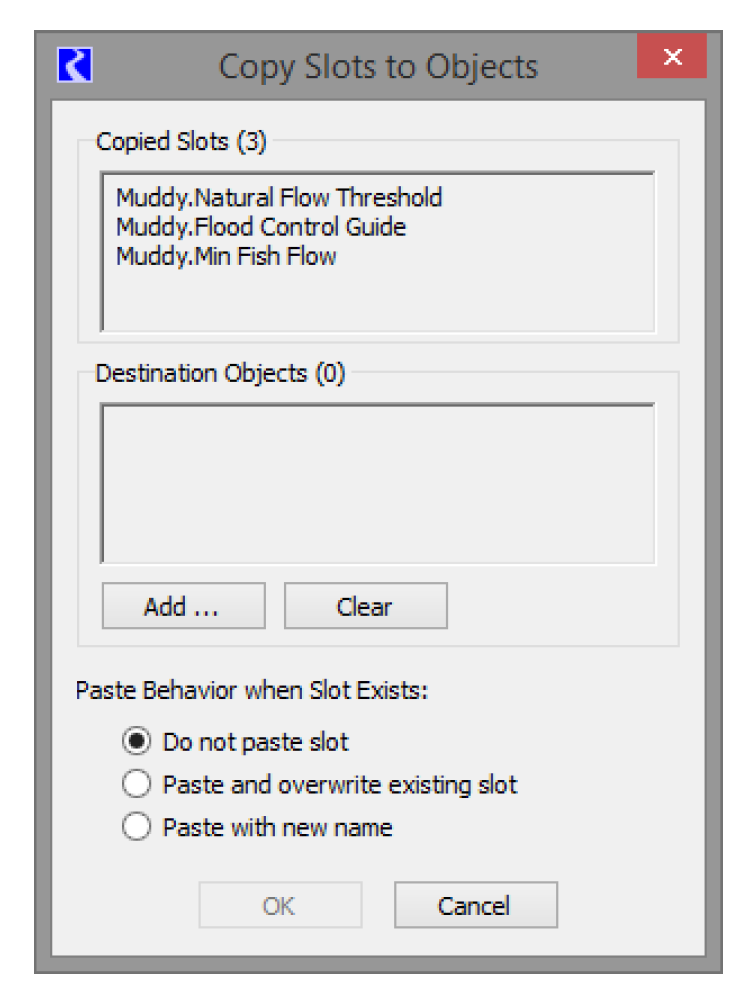
The upper portion shows the slots that will be copied. The middle box shows the Destination Objects.
Select the Add button to choose a set of Destination Objects, as shown in Figure 5.8.
Figure 5.8
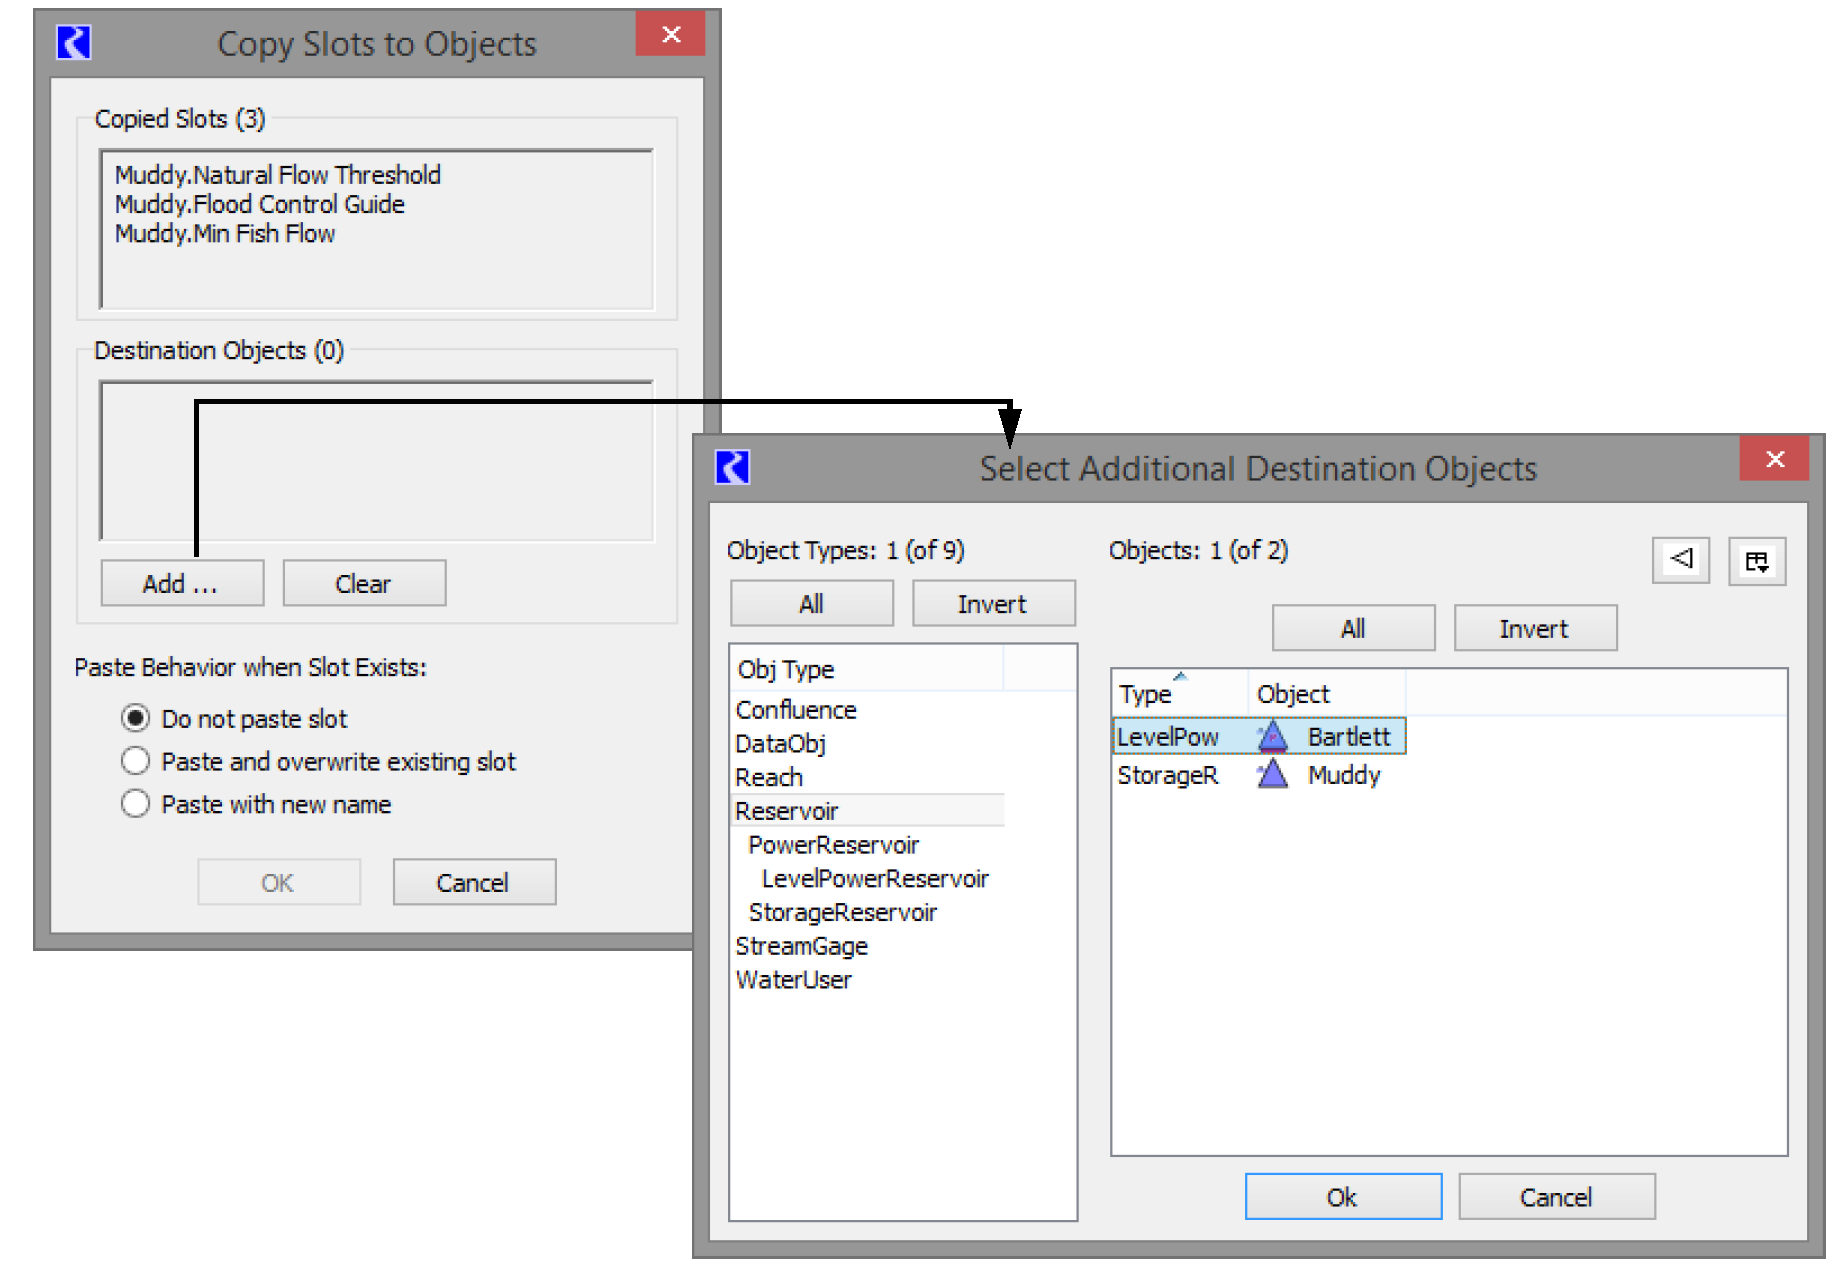
Select Clear to erase that list and start over. The Include object name check box is shown only when copying slots from a simulation object (e.g. a from a Reservoir). For the conventional Paste Slots operation, slots which were copied from a simulation object, the newly created (pasted) slots have names starting with the original simulation object's name. But when slots had been instead copied from a Data Object, the name of that data object is not pre-pended to the new slots' names. Selecting Include Object Name allows modification of the behavior of the Paste Slots operation.
Figure 5.9
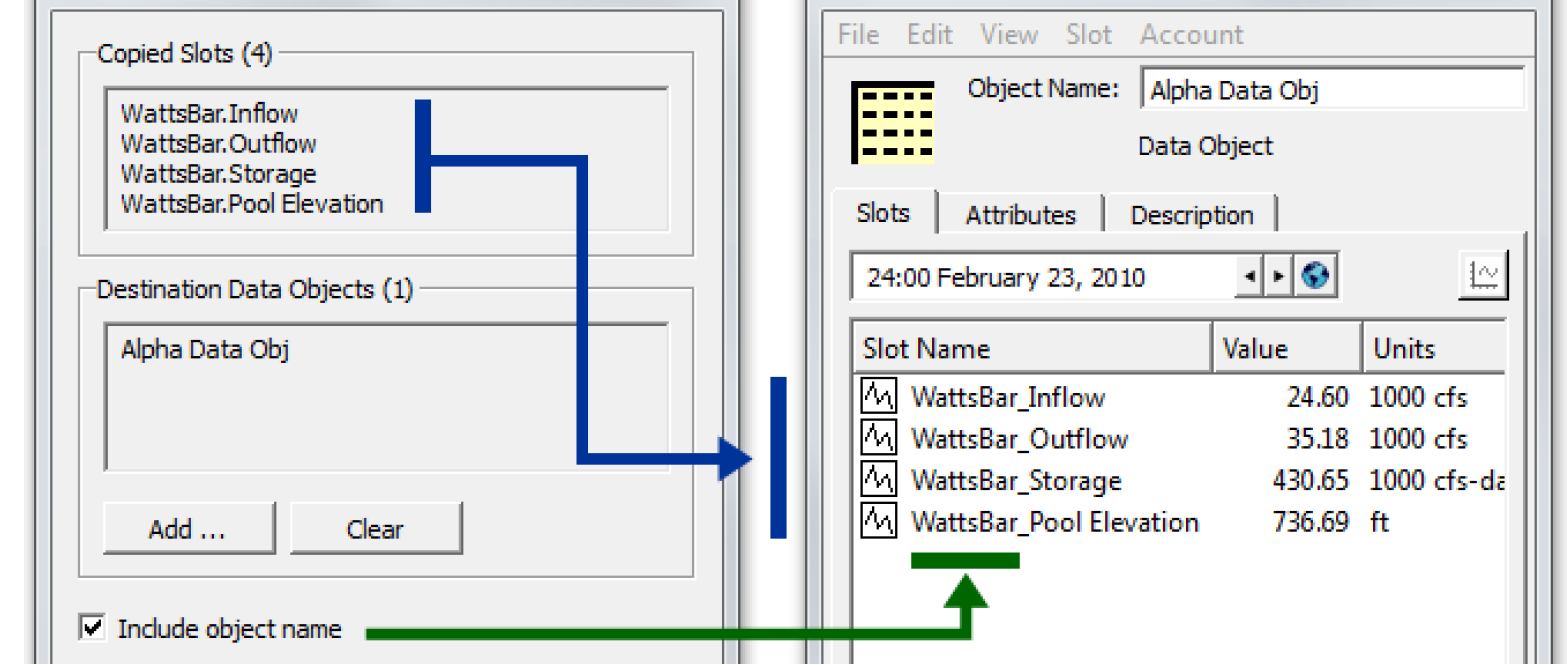
Figure 5.10
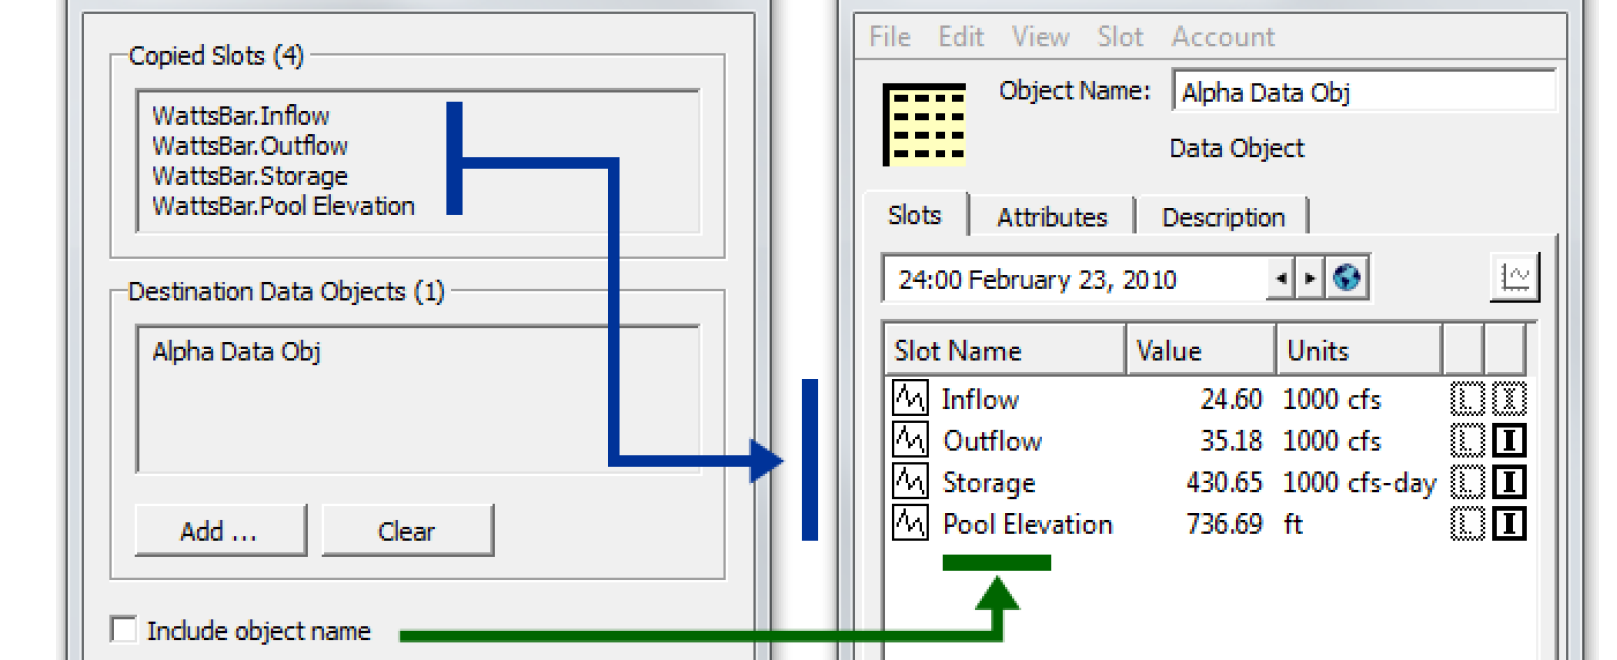
The lower part of the dialog lets you choose what to do when a slot of the same name exists on the destination object. The Paste Behavior when Slot Exists buttons control the behavior when a destination object already has a slot with the name of the copied slot (taking into account the Include Object Name option described above). It supports the following options:
• Do not paste slot. Leave existing matching slot on destination object intact.
• Paste and overwrite existing slot. Replace existing matching slot on destination object with copied slot.
• Paste with new name. Add a new copy of slot to the destination object with a new slot name.
Selecting OK performs the Copy Slots to Objects operation, as configured within the dialog. This shows a popup dialog indicating the result of the operation.
Note: Simulation slots cannot be overwritten.
Move Slots to Object
This section describes a utility that allows you to move selected custom slots (and Slot Groups; see Slot Groups) to a specified object. The move operation will cut the original slots and paste it to the new object.This is particularly useful to move custom slots from a data object to a simulation object.
Figure 5.11
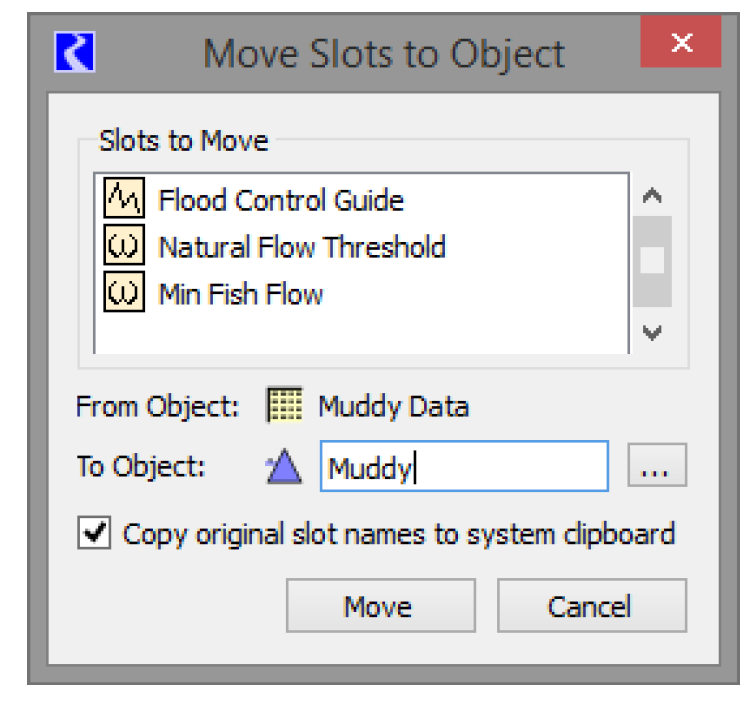
To use the tool, select one or more custom slots (or Slot Groups) on the Open Object dialog Slots tab. Then, use the Slot, then Move Slots to Object menu. The dialog to the right opens.
The upper portion shows a list of the slots that will be moved. The middle area shows the From Object and the To Object.
Select the Chooser button  to choose a single destination object.
 to choose a single destination object.
The Copy original slot names to system clipboard checkbox indicates whether the list of slot names (i.e. Object.Slot) is copied to the System Clipboard.
When ready, select the Move button. A confirmation dialog is presented. Once confirmed, the cut and paste sequence is performed and then the destination object’s dialog is shown with the slots selected.
If the slot name already exists on the destination object, the move operation is aborted and no slots are moved (none are created and none are deleted).
Note: When you move slots from one object to another, references to the slot on the original object may be broken. For example, RPL sets, DMIs, Scripts, and Model Reports may need to be modified. There is currently no automatic support to update the slot reference but the slot names can be copied to the system clipboard and you can use that as a guide. Search for each of the slots in the respective utilities and update accordingly.
Methods Tab
User Methods allow each object’s physical process calculations to be customized. User Method Categories are defined for calculations such as evaporation, bank storage, power generation, spill, routing, tailwater and canal flow. Each Method Category contains one or more User Methods. For example, the Power Calculation Category contains many different methods for calculating Power. Some of these are general methods, designed for a variety of users. Others have been developed using custom calculations to meet the needs of particular groups, such as the LCR Power method which is used on the Lower Colorado Daily model.
The Methods display contains a scrollable list of Method Categories on the left and the corresponding selected User Method for each category on the right.
Figure 5.12
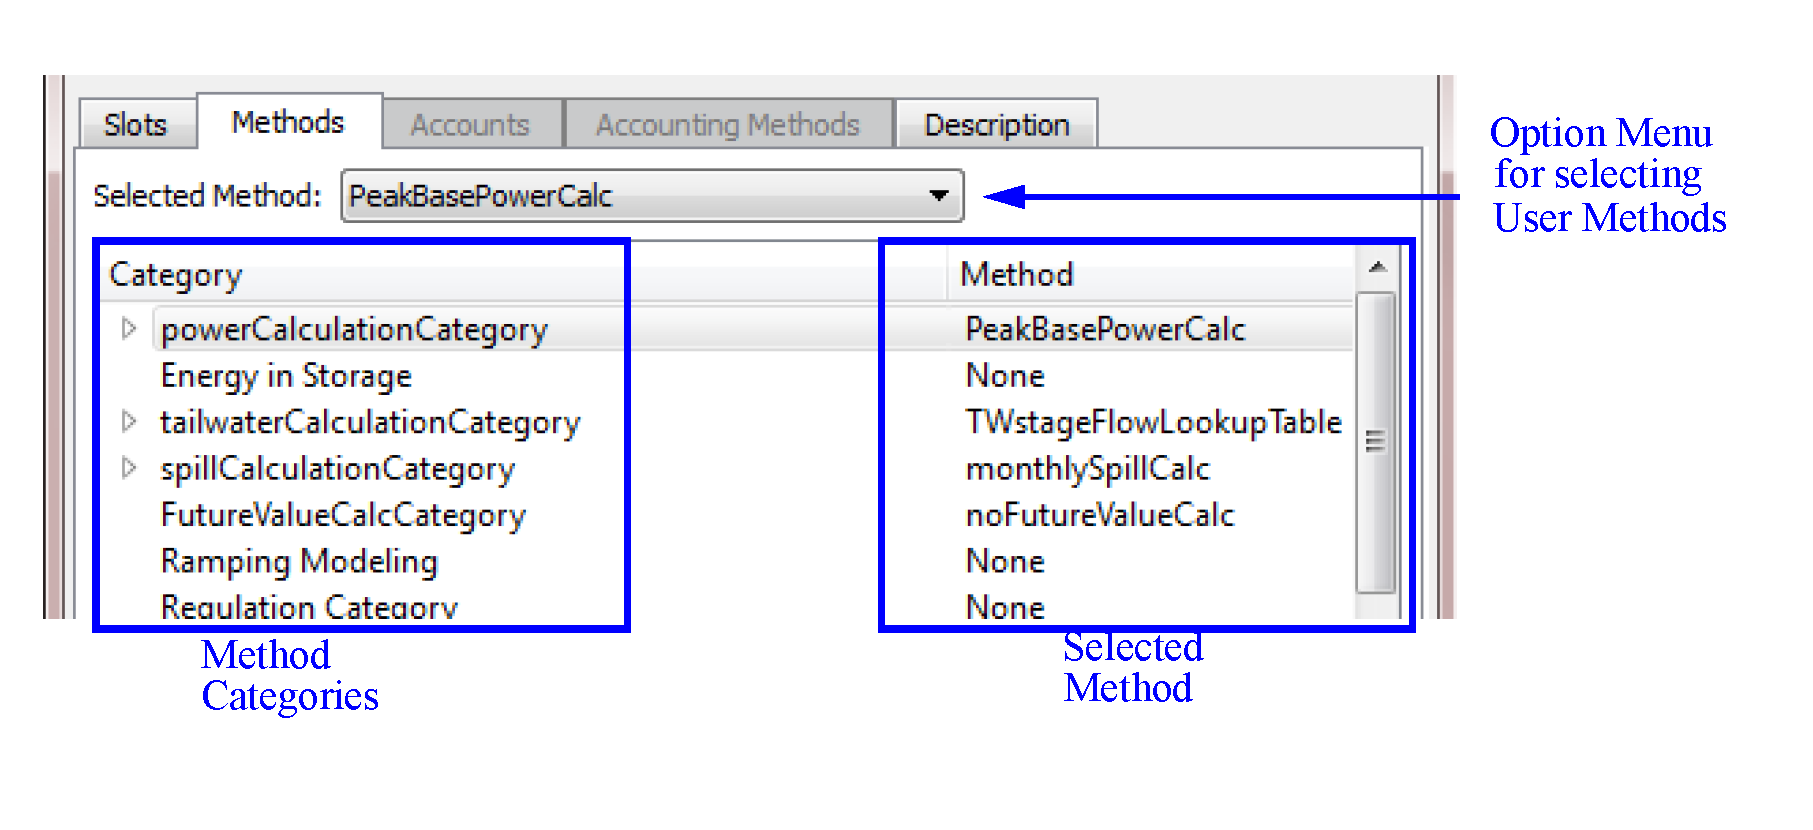
Selecting Methods
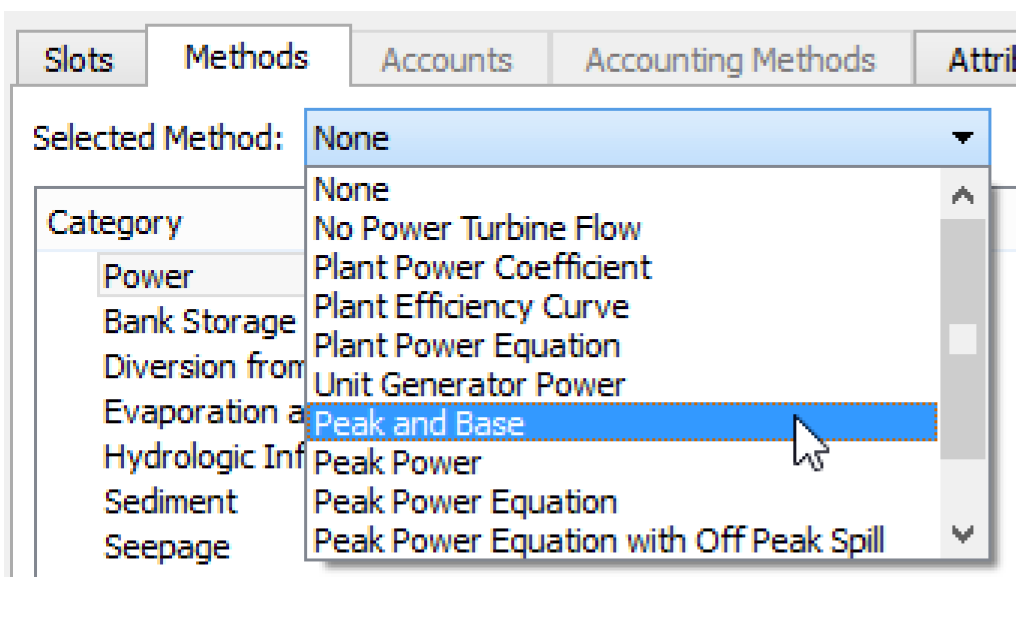
Objects are configured to represent the features in your basin using methods. These are selected from the Methods tab of the Open Object dialog. All of the user methods available within a Category can be viewed by selecting the Category and selecting the Selected Method pull down menu.
Figure 5.13
Memory Allocation for Method-specific Slots
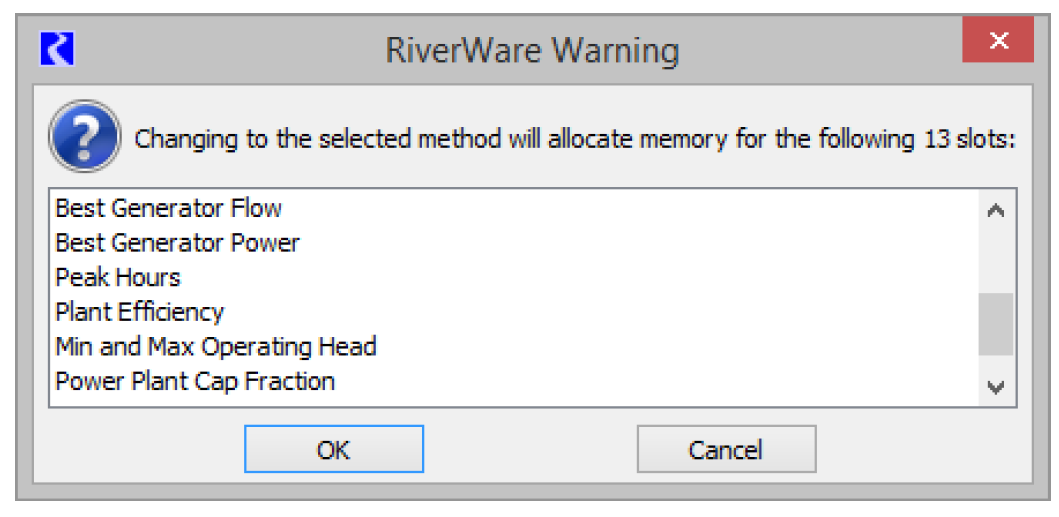
Many user methods have special data needs beyond the general data needs of the object. In order to keep the size of the model in memory to a minimum, memory is allocated only for slots which are needed; i.e., general slots required by the object or slots associated with the Methods which have been selected. For example, all reservoirs need Inflow, Outflow and Storage slots. However, the list of slots associated with hydropower generation depends on which User Method is selected in the Power category.
To avoid allocating memory unnecessarily, the default User Method for all categories is an default method which has no slots and performs no calculations. Sometimes the empty default method is not a valid choice; you must select another method for simulation to proceed normally. For some categories, the empty method is a valid choice.
Figure 5.14
Method Dependencies
Some categories and user methods are not always available, as their availability depends on the other user methods that have been selected. For example, available user methods in the Power Release category depend on which method is selected in the Power category.
Selecting Methods on Multiple Objects
To select the same method on multiple objects, use the Multiple Object Method Selector by right-clicking a category and selecting Show in the Multiple Object Method Selector. See Multiple Object Method Selector for details on using the selector.
Accounts Tab
When Accounting is enabled, the Accounts display contains a scrollable list of Accounts that reside on the object. To switch to the Accounts view, select the Accounts tab or select View, then Accounts. The display of the main portion of the dialog changes to the Accounts view. See Accounting Network in Accounting for a description of the Accounts view.
Accounting Methods Tab
When accounting is enabled and an accounting controller is selected, the Accounting Methods tab is added to the Open Object dialog. It displays the following which can then be changed by the user:
• Available categories
• Selected method for each category
• Execution time
See Selecting OLAMs and Execution Time in Accounting for details on this tab.
Attributes Tab
The Open Object dialog displays attributes and values on the Attributes tab. The tab has one row per Attribute defined for that type of object.
Figure 5.15
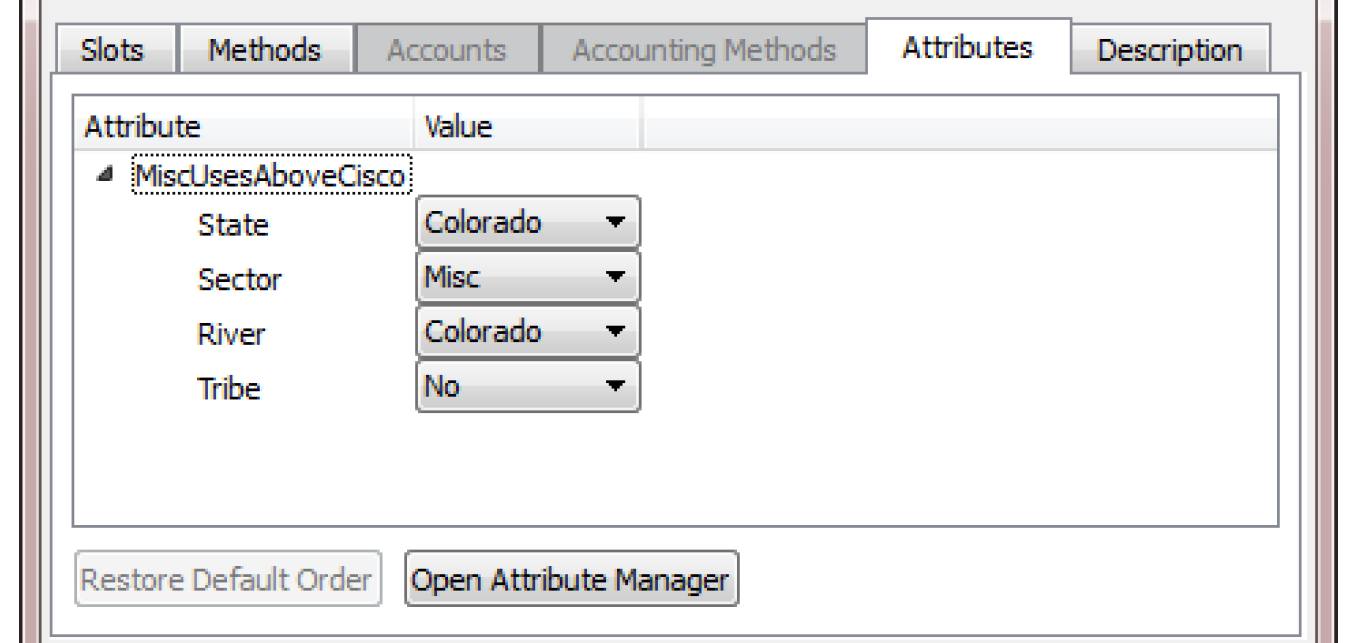
Attributes are defined in the Object Attribute Manager; see Object Attributes Manager for details.
Use one of the following methods to open the Object Attribute Manager:
• The Open Attribute Manager button,
• View, then Object Attributes Manager menu, or
• Right-click context menu to open the Object Attributes Manager.
The row lists the Attribute name and the value. A menu on the row allows you to select a different value for that attribute. No apply is necessary. To modify or view attributes on many objects, use the Edit Attributes on Objects menu; see Edit Attributes on Objects for details. Use the View, then Edit Attributes on Objects menu (or right-click context menu) to open that dialog.
Description Tab
The Description tab allows you to enter a description of the object. Select the Description tab to open the description area.
Figure 5.16
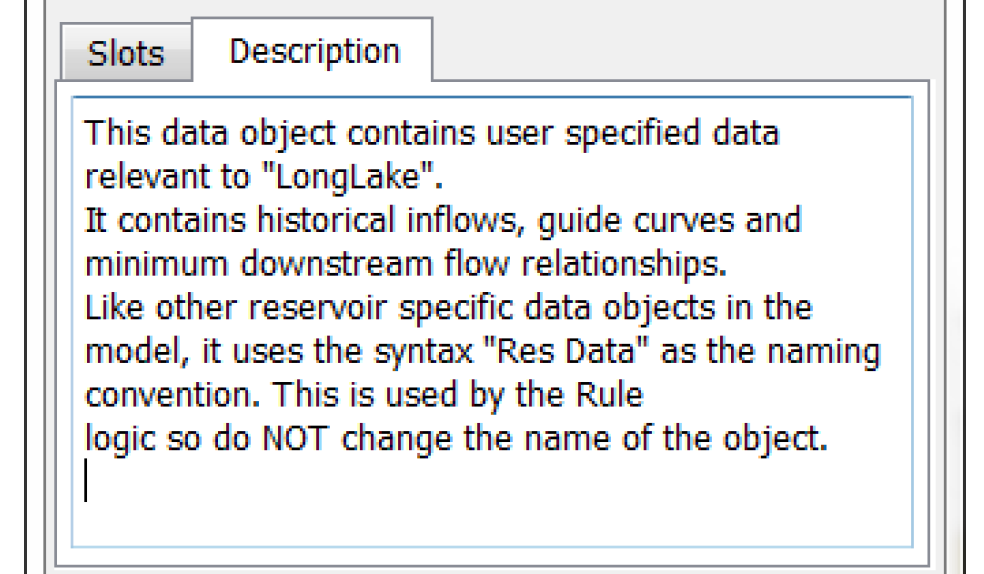
The normal cut, copy, paste (to the system clipboard) are available.
You can also enter a description of each slot on the object. See Slot Descriptions for details.
Revised: 01/05/2024