Excel Datasets
Excel datasets provide user configuration options to specify how you wish the Database DMI to work with Microsoft Excel. Excel should be available on the system as RiverWare may start a non-visible copy of Excel in the background and access the specified workbook during DMI execution. There are two important things to remember:
Note: You should not have the specified workbook open in a different session of Excel as this may lock out RiverWare from accessing the workbook.
Note: RiverWare is operating on the Excel file, so you will not see any unsaved changes to the file that may be made in a different Excel session.
See Example 2: Excel DMI to Export Data Using Headers for a use case of creating a DMI to Excel.
General Tab
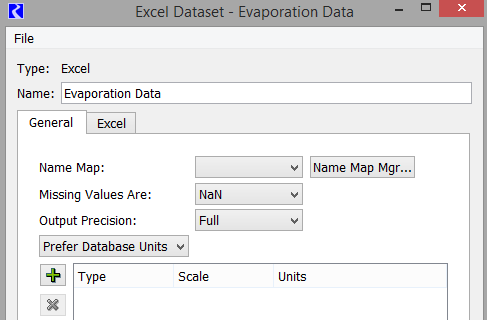
Double-clicking an Excel dataset in the Dataset Manager opens the Excel Dataset editor. In this dialog, the dataset can be renamed and configured. It has two tabs, one for general configuration and one specific to the Excel implementation. Following is a description of the configuration options.
Name Map
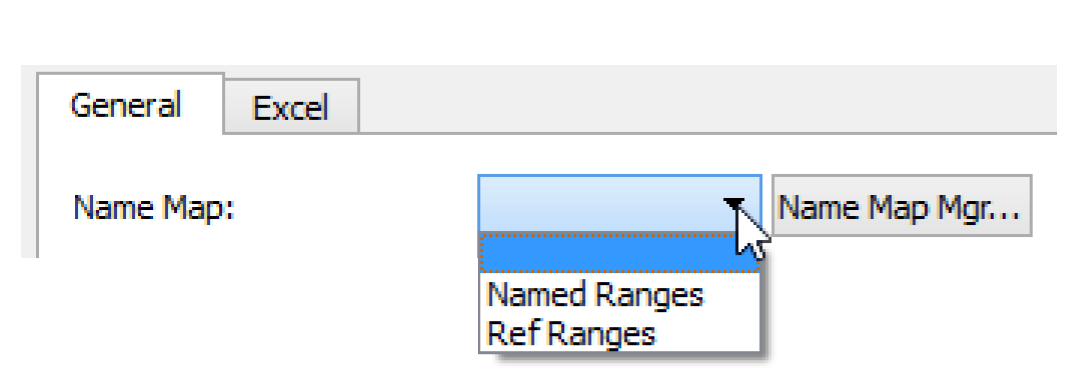
Select the desired Name Map from the Name Map menu. The selections are populated based on the Name Maps configured in the Name Map Manager. See Name Mapping for details on creating Name Maps. Name maps have special relevance for moving data using range specifications and header specification. See Slot Mapping—Spreadsheet Ranges Approach and Using Name Maps for details.
Missing Values
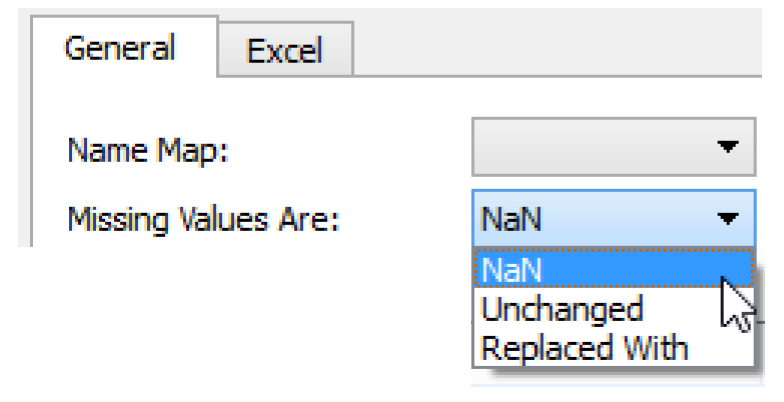
The user specifies how missing values are handled with Excel. The current choices are
• NaN. NaN value in RiverWare is written as NaN to Excel, NaN or blank value in Excel is read as NaN into RiverWare
• Unchanged. The DMI will not change missing values on import, uses NaNs on export
• Replaced With. Provides a user input value that is substituted on import and export
Output Precision
For Output DMIs, specify the precision of values that are sent to the database, that is, the number of digits to the right of the decimal point. The options are:
• Full. Output all available digits of precision. This is the default.
• Slot. Use the slot's display precision from the active unit scheme. Note, changing the active unit scheme could affect values sent out via the DMI.
• Specified. Use the specified precision.

Values are converted to the specified units, as described in Units, before rounding.
The rounding algorithm is: round(value * 10^N) / 10^N where value is after unit conversion, N is the number of digits of precision, and round() is a standard function which rounds its argument to the nearest integer value, rounding halfway cases away from zero.
Caution: With this approach you could potentially see misleading results. For example, if a slot shows 1.23cfs, you export it using specified dataset units of cms, it becomes 0.0348cms. If you then reduce the precision to 2 digits, it will send 0.03cms as the output. If you then show the value in your database viewer using cfs and 2 digits of precision, it shows it as 1.06cfs. The value in the database does not match the value in RiverWare due to conversions and rounding. Be careful!
Also, to be clear, all values exported from a Database DMI are floating point numbers regardless of precision. For example, an expression slot might compute a value of 7538.21. Exported with 0 digits of precision, this would appear to be 7538, but technically, it was exported as a floating point number, 7537.9999999974 to 15 significant digits. This fact is really only important if you database displays 15-17 digits.
Units
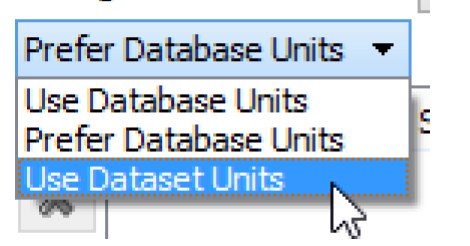
The units that are used in interacting with Excel are specified in the Dataset dialog. A pull-down menu allows the user to specify that the Database DMI should Use Database Units, Prefer Database Units, or Use Dataset Units.
• Use Database Units. Since Excel contains no units associated with a value in a cell, the slots’ units (i.e. from the Unit Scheme) as displayed in RiverWare are substituted for Database Units and will be used for import and export under this option
• Prefer Database Units. For Excel, this option uses the slots’ units (i.e. from the Unit Scheme) in RiverWare unless a unit is specified in the Dataset, then the specified unit is used
• Use Dataset Units: Uses the units specified in the dataset only
See Units for instructions on specifying the units to use.
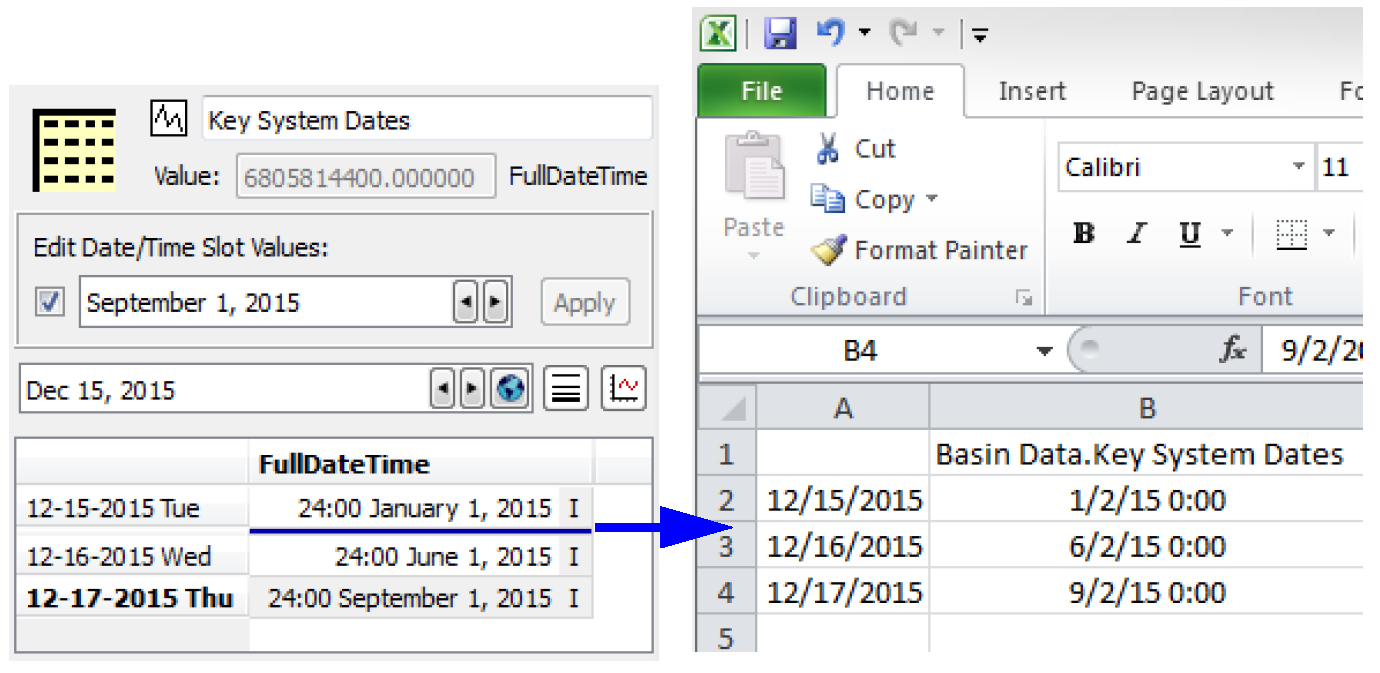
Note: For import and export of series slots that have the DateTime unit type, the DMIs translate to and from the Excel date representation. This allows dates to display correctly in both RiverWare and in Excel. But, Days/months/years in RiverWare are at the end of the timestep, which would be represented in Excel at the beginning of the next timestep. For example 24:00 June 1, 2015 in RiverWare would translate to 00:00 June 2, 2015 in Excel. Also, partial datetimes and dates before 1900 are negative values in Excel, so are just displayed with # signs as out of range. However the representation is still consistent and these date values will round trip correctly when exported to Excel and imported back into RiverWare.
.

Note: Text Series Slot values can be imported or exported using Excel Datasets and Database DMIs. These behave just like series slots but import or export the text strings. Be aware that a NaN in Excel will be interpreted as a string, not as an invalid value. Use blank cells in Excel to prevent importing NaN text strings. See Text Series Slots in User Interface for details.
Excel Tab
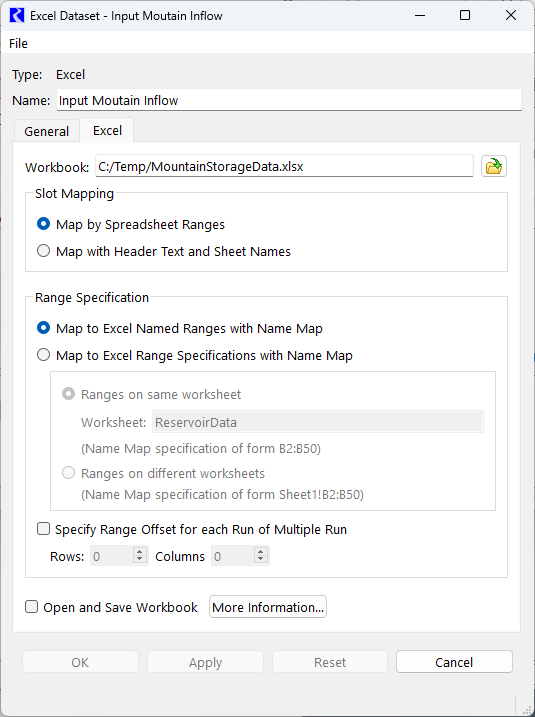
Configuration specific to Excel is specified in the Excel tab of the Excel Dataset editor.
Workbook
In all cases, specify the Workbook that the dataset will read data from or write data to. The path and workbook name can be typed into the Workbook text box, or you can select the adjacent button to select the file. When executing an input DMI, this workbook must already exist. For an output DMI, the workbook will be created if it does not already exist.
Slot Mapping
Two approaches are provided for mapping data between RiverWare and Excel.
• Ranges: Specify the Excel range for each RiverWare slot. Choose the Map by Spreadsheet Ranges approach,
• Headers: Use a row header, a column header, and a worksheet name to map the Excel data with a RiverWare slot. The Map by Header Text and Sheet Name approach.
Table 4.4 compares these approaches. Then more information is presented on the configuration options for both the Range and Header approach.
Question | Ranges Approach | Headers Approach |
|---|---|---|
What is the format of the Excel data? | Your data is in any format in Excel, but you must then specify how the data maps to RiverWare slots. | Your data in Excel has row header names, column header names, and sheet names that identify the data in a way that matches one of the orientations in the dataset. |
How is the data mapped? | A DMI Name Nap specifies how the data in RiverWare slots “maps” to data in an Excel sheet. Name Maps can specify an Excel absolute cell reference (A1:A23) or a named range. | The text in header cells in Excel and the name of the sheet “map” the data to RiverWare slots. |
Can I have more timesteps of data in Excel than I want to import/export? | Yes, but the mapped Excel range must match the number of timesteps specified in the DMI. That is, the size of the range you specify must exactly match the number of values in the DMI. | Because this approach includes timestep information, the Excel sheet can have more data in it than you are processing via the DMI |
Can I import and export table, periodic, or scalar slots? | Yes, your named ranges or cell references can map to non-series data. | Yes, a dataset using the Header approach can either deal with Series slots OR Table, Periodic or Scalar slots, but not both at the same time. |
Can or do I use Name Maps? | You must use name maps to specify where the data will import from/export to in Excel. | Name Maps can optionally allow you to have different names of objects or slots in RiverWare than the header text in Excel. |
How are MRM runs handled? | Data for each MRM run is offset from the previous run by a certain number of rows and columns, starting with the mapped range. | MRM runs is one of the variables you specify in the Excel orientation. MRM runs can be on sheets, columns or rows. Their names can optionally be Run0, Run1, Run2, etc. or trace number as set up in the MRM configuration (i.e. Trace5, Trace6, Trace 7, etc.) |
How do I specify the Excel sheet? | Either specify a single sheet name or include the sheet name in the Name Map. | Sheet names depend on the selected orientation and can be run, slot, or timestep names. |
What is the format of the timestep in Excel? | No timestep information is read or written. | You specify to either use the end of timestep (E.g. Jan, 1, 2011 23:59) or the beginning of timestep format (E.g. Jan 1, 2011 0:00). |
How do I specify the units for Excel? | No unit information is read or written. Units in Excel are assumed to be the slot’s units in RiverWare (i.e. from the active Unit Scheme). The General tab of the dataset can be used to specify a mapped unit by type if the units in Excel are different than the RiverWare slot units. | You can optionally write the unit name with the slot name to Excel or can read a slot name from Excel if it has a unit name with it. However the assumed units for values and the possibility for mapped units work the same as in the Range approach. |
In general, why would I use this approach? | This approach is more work because a map entry must be created in a name map for every slot. Use this format if you are taking the data out of or inserting it into a spreadsheet that does not have the header information and if the amount of data is constant. Perhaps you have an existing spreadsheet that cannot be changed. | This approach is recommended for series data, particularly if you want to import or export data that will change length over time. For example, you have an Excel sheet with 100 years of daily data, but your model is for the current year and is updated every year. This approach is also very useful for Table, Periodic and Scalar slots that can be represented in the spreadsheet in the required format. |
Where can I find more information |
Slot Mapping—Spreadsheet Ranges Approach
The Map by Spreadsheet Ranges approach presents several options for specifying ranges associated with slots. In all cases, the Name Map functionality of Database DMIs is used to map individual slots to their range specifications. You can map Series, Table, Periodic, or Scalar slots using this approach.

Note: The size of the range specified must match the number of values to be read or written with the DMI. No header or other cells should be included in the range.
Note: Object name maps are not applicable to the range approach and are ignored. In this approach, the Excel range must be specified for each slot using a slot name map.
Discussions of the range specification options along with example Name Maps follow.
Map to Excel Named Ranges
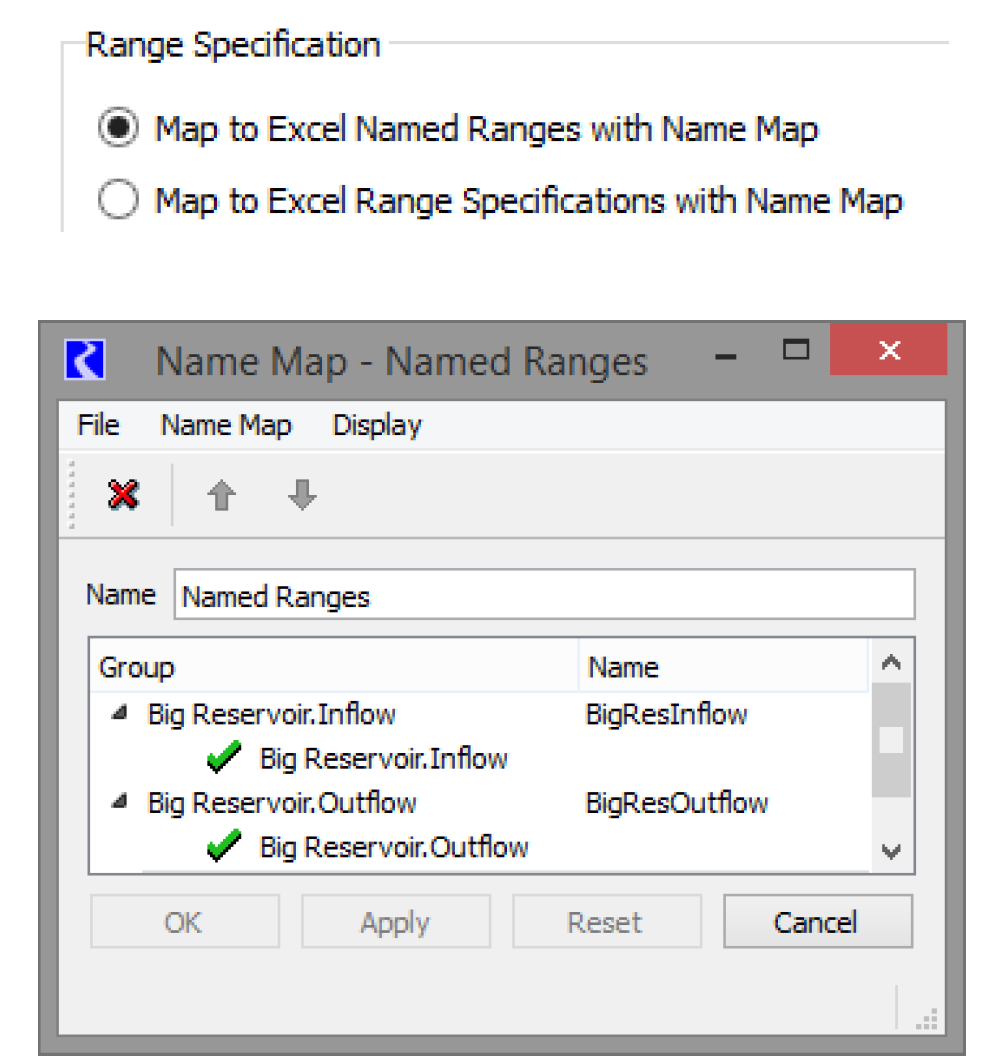
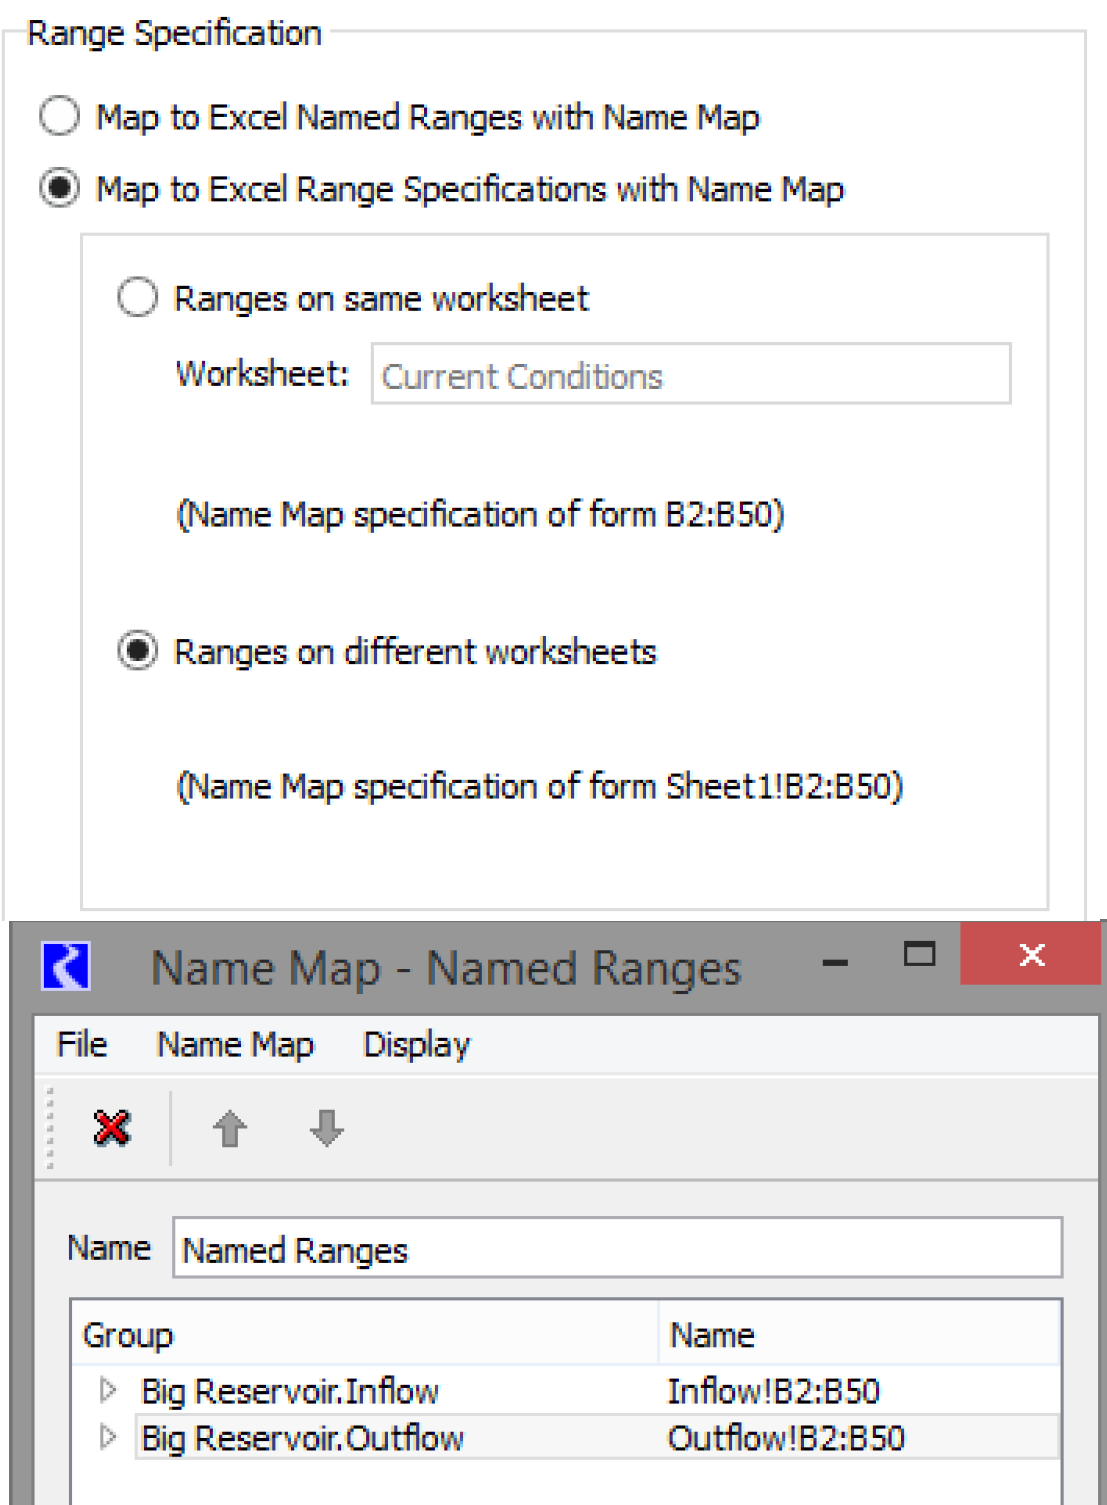
Under the Map to Excel Named Ranges with Name Map option, the user would set up named ranges in their Excel workbook. Named ranges are a feature of Excel where a number of cells can be selected and assigned a name by the user to identify these cells. The Name Map created in RiverWare and selected in the General tab of the dataset dialog then will associate the RiverWare slot with the named range as seen in the following example name map. In this case, BigResInflow and BigResOutflow are named ranges in the Excel sheet.
Map to Excel Range Specifications
In the Map to Excel Range Specifications with Name Map option, there are two ways to specify ranges for slots. If all the ranges for the slots are on the same worksheet, then the Ranges on same worksheet option can be used. Here the worksheet name is specified in the Worksheet text box. Ranges specified in the name map can be of the form B2:B50, meaning the range will be from cell B2 to cell B50 of the specified worksheet. Figure 4.22 shows an example of the type of Name Map created and selected on the General tab of the dataset dialog for this approach.
Figure 4.22
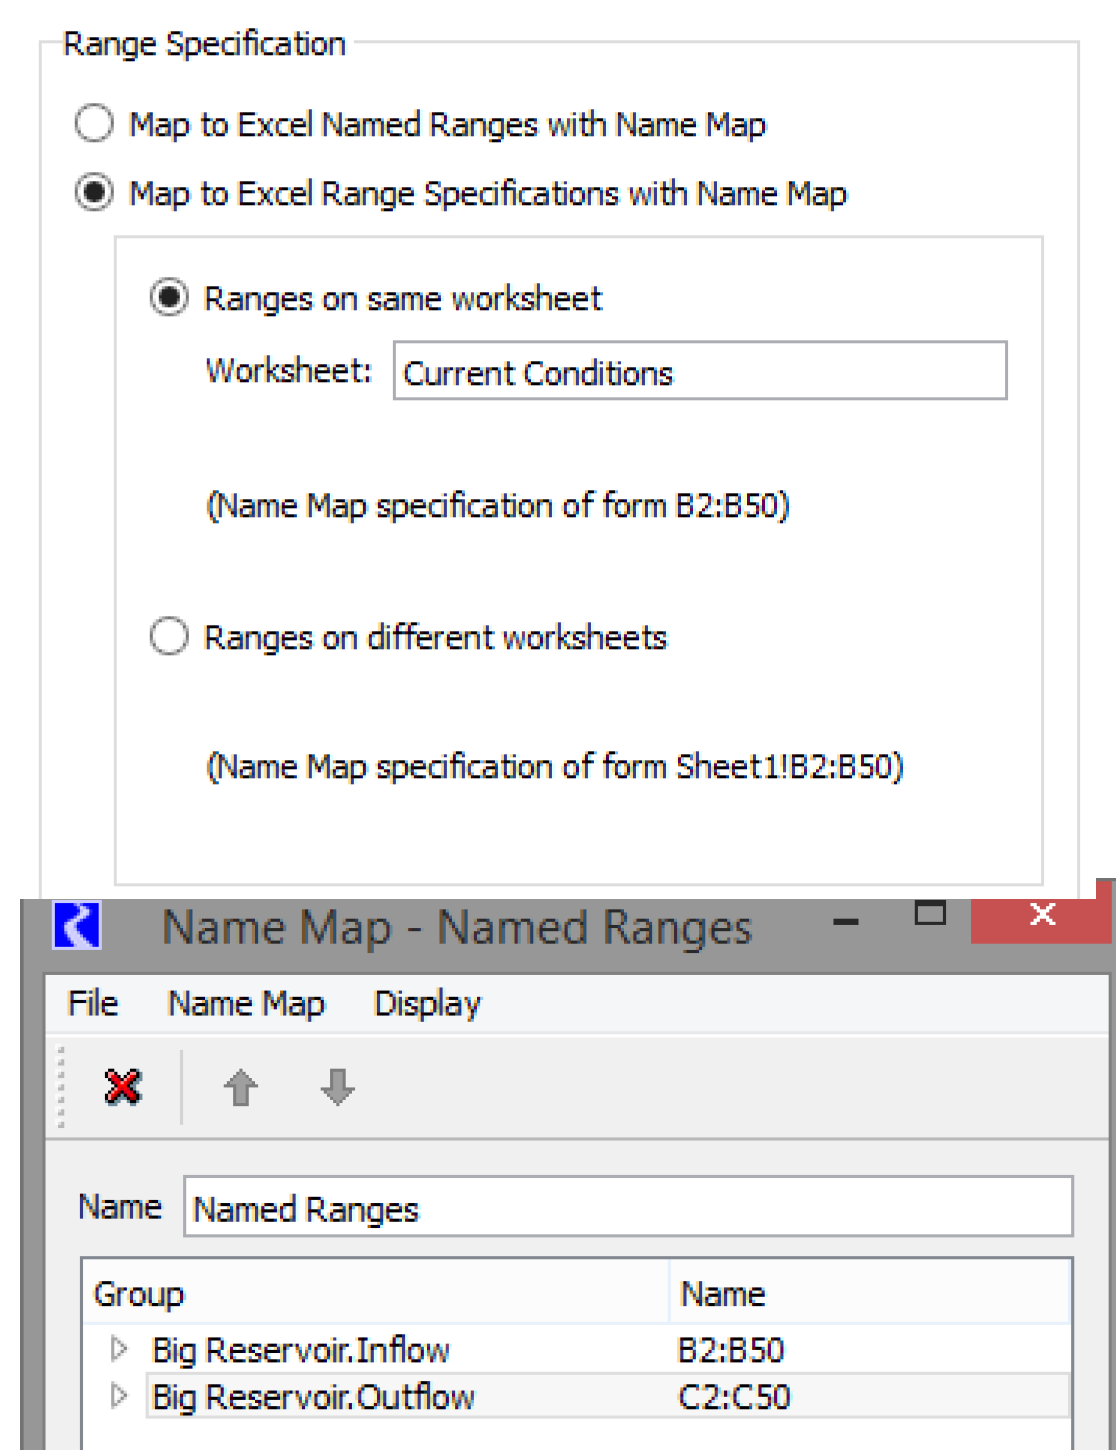
If ranges for the slots are on different worksheets then the Ranges on different worksheets option must be used. Under this option, ranges specified in the name map must include the worksheet name as part of the range specification in the form Sheet1!B2:B50. In this way, ranges referring to different worksheets can be included in the same name map. Figure 4.23 shows an example of this type of Name Map.
Figure 4.23
Specify Range Offset
Under all variations of the Map by Spreadsheet Ranges approach, there is an option available to Specify Range Offset for each Run of Multiple Run. In a multiple run, the user may want to read different data into a slot for each run or write out the results for the slot under each run. If the option is checked, the mapped range for the slot is used for the first run, and the specified row and column offset is applied for each run thereafter. For example, the range for a slot specified in the dataset name map could be Sheet1!B2:B50 and the offset specified here could be 0 rows and 1 column. For an input DMI in a multiple run, the first run will read range B2:B50 on Sheet1 into the slot, the second run will offset one column and read range C2:C50 on Sheet1, the third range D2:D50, etc. For an output DMI, the slot’s results from the first run will be written to range B2:B50 on Sheet1, results from the second run will offset one column and be written to range C2:C50 on Sheet1, the third to range D2:D50, etc.

Slot Mapping—Header Text and Sheet Names Approach
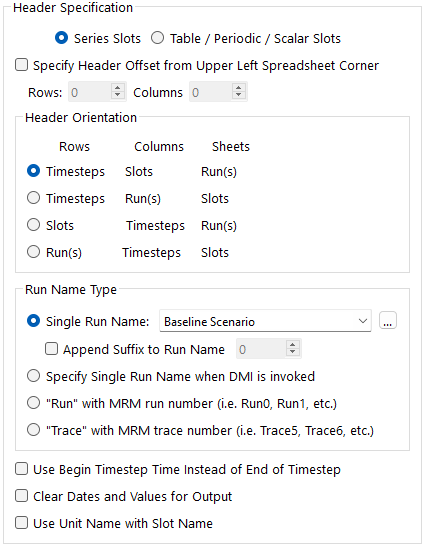
The Map by Header Text and Sheet Name approach is the alternative to using ranges to move RiverWare slot data to or from Excel. The approach uses a row header, a column header, and a worksheet name to map Excel data with a RiverWare slot. Figure 4.24 shows an example of the dataset dialog with this configuration selected.
Tip: When setting up an input DMI using this Excel dataset approach (especially the first time), it is often easiest to configure the DMI as an Output DMI first, run the DMI to create an Excel spreadsheet with the right formatting and desired structure. Edit that spreadsheet or use it as a guide for setting up your data in that format. Then, configure the DMI to be an Input DMI that will bring your data into RiverWare.
Using Name Maps
Name maps are not needed in the header approach. However they can be used to map to a different name in Excel. The following is performed for each slot:
• If there is no name map, the RiverWare object and slot name is used in Excel.
• If there is a slot mapping only, the specified mapped name is used in Excel.
• If there is an object mapping only, the mapped object is used for the object name followed by a period and the RiverWare slot name. This combined string is used in Excel.
• If there is a slot and object mapping, the mapped object name is used followed by a period and then the mapped slot name. This combined string is used in Excel.
Slot Types
An Excel dataset using the header approach can either import/export Series Slot data or Table / Periodic / Scalar Slot data, but not both. Choose the desired slots that will be accessed by this dataset.

Figure 4.24 Header Specification options
Series Slots Configuration Options
When the Series Slots option is chosen, you can specify the format of the series slots in the spreadsheet.
The Header Orientation frame provides four orientation choices for how timesteps, slots, and runs will map to rows, columns, and sheets in Excel. For example, the first orientation as selected in the adjacent screenshot indicates that rows are timesteps, columns are slots, and worksheets are runs.
Note: Orientations for putting each timestep on a separate sheet are not supported.
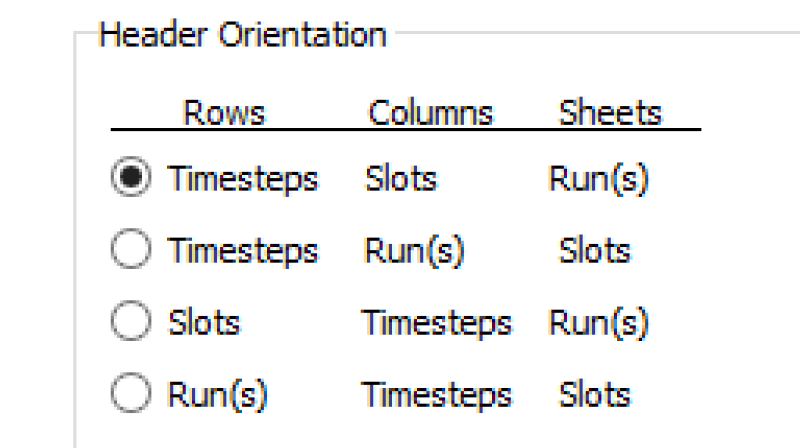
Figure 4.25 shows an Excel spreadsheet with the first orientation. In this orientation, timesteps are rows, so the timestep header is the first column with a time label for each row. Similarly, the slot header is the first row with each column labeled with the slot name. Sheets are runs, so the sheet is named with the single run name specified. With the orientation specified, the data in Excel associated with a slot over a time range can be found for reading via an input DMI, or can be found and overwritten, if existing, or be newly created by writing via an output DMI.
Figure 4.25
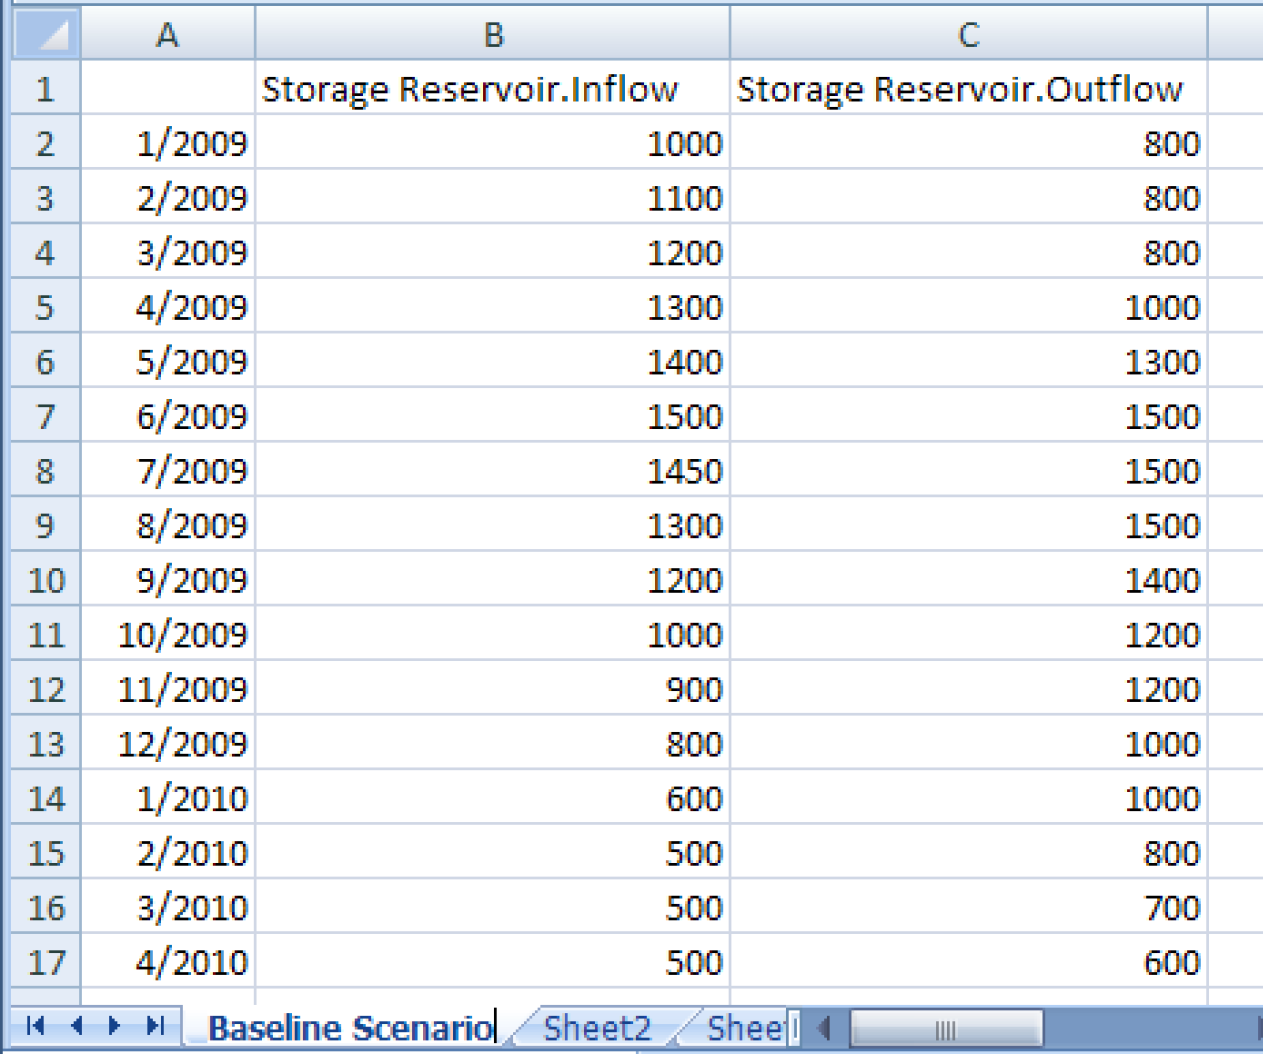
Note: On subsequent executions of an output DMI using the header approach, if there is already a matching header, data will be overwritten. If there is not already a matching header, the new header and data will be appended to any existing data. So in the example spreadsheet above, if you change the output slot from StorageResevoir.Outflow to Storage Reservoir.Storage and rerun the DMI (without deleting the.xlsx file), it will replace the inflow column with any new data and will append a StorageReservoir.Storage column after the Outflow column (i.e. it won’t replace the outflow column with storage, but will instead append it).
The headers may not always be the first row and the first column. To accommodate these cases, an option is provided to specify how the headers are offset from the corner of the spreadsheet. By indicating how many rows and how many columns the header is offset from the upper left corner of the spreadsheet, the user can match how data resides in an existing spreadsheet or indicate where the headers and data should be written to a new sheet.

Table / Periodic / Scalar Slots Configuration Options
When the Table / Periodic / Scalar Slots option is chosen, you are not allowed to specify the format of the slots in the spreadsheet. Instead, there is a very specific format that is used. Figure 4.26 shows a sample workbook. Table slots have a header merged cell for the slot name, cells for column headers, and the columns that contain row headers and data columns. Periodic slots include a column of dates, one or more columns of data, and a header cell. Scalar slots are represented by a header cell and a value cell.
Note: The associated slots in RiverWare are also shown. The sheet name is Run0 because that option (described below) is used.
Figure 4.26
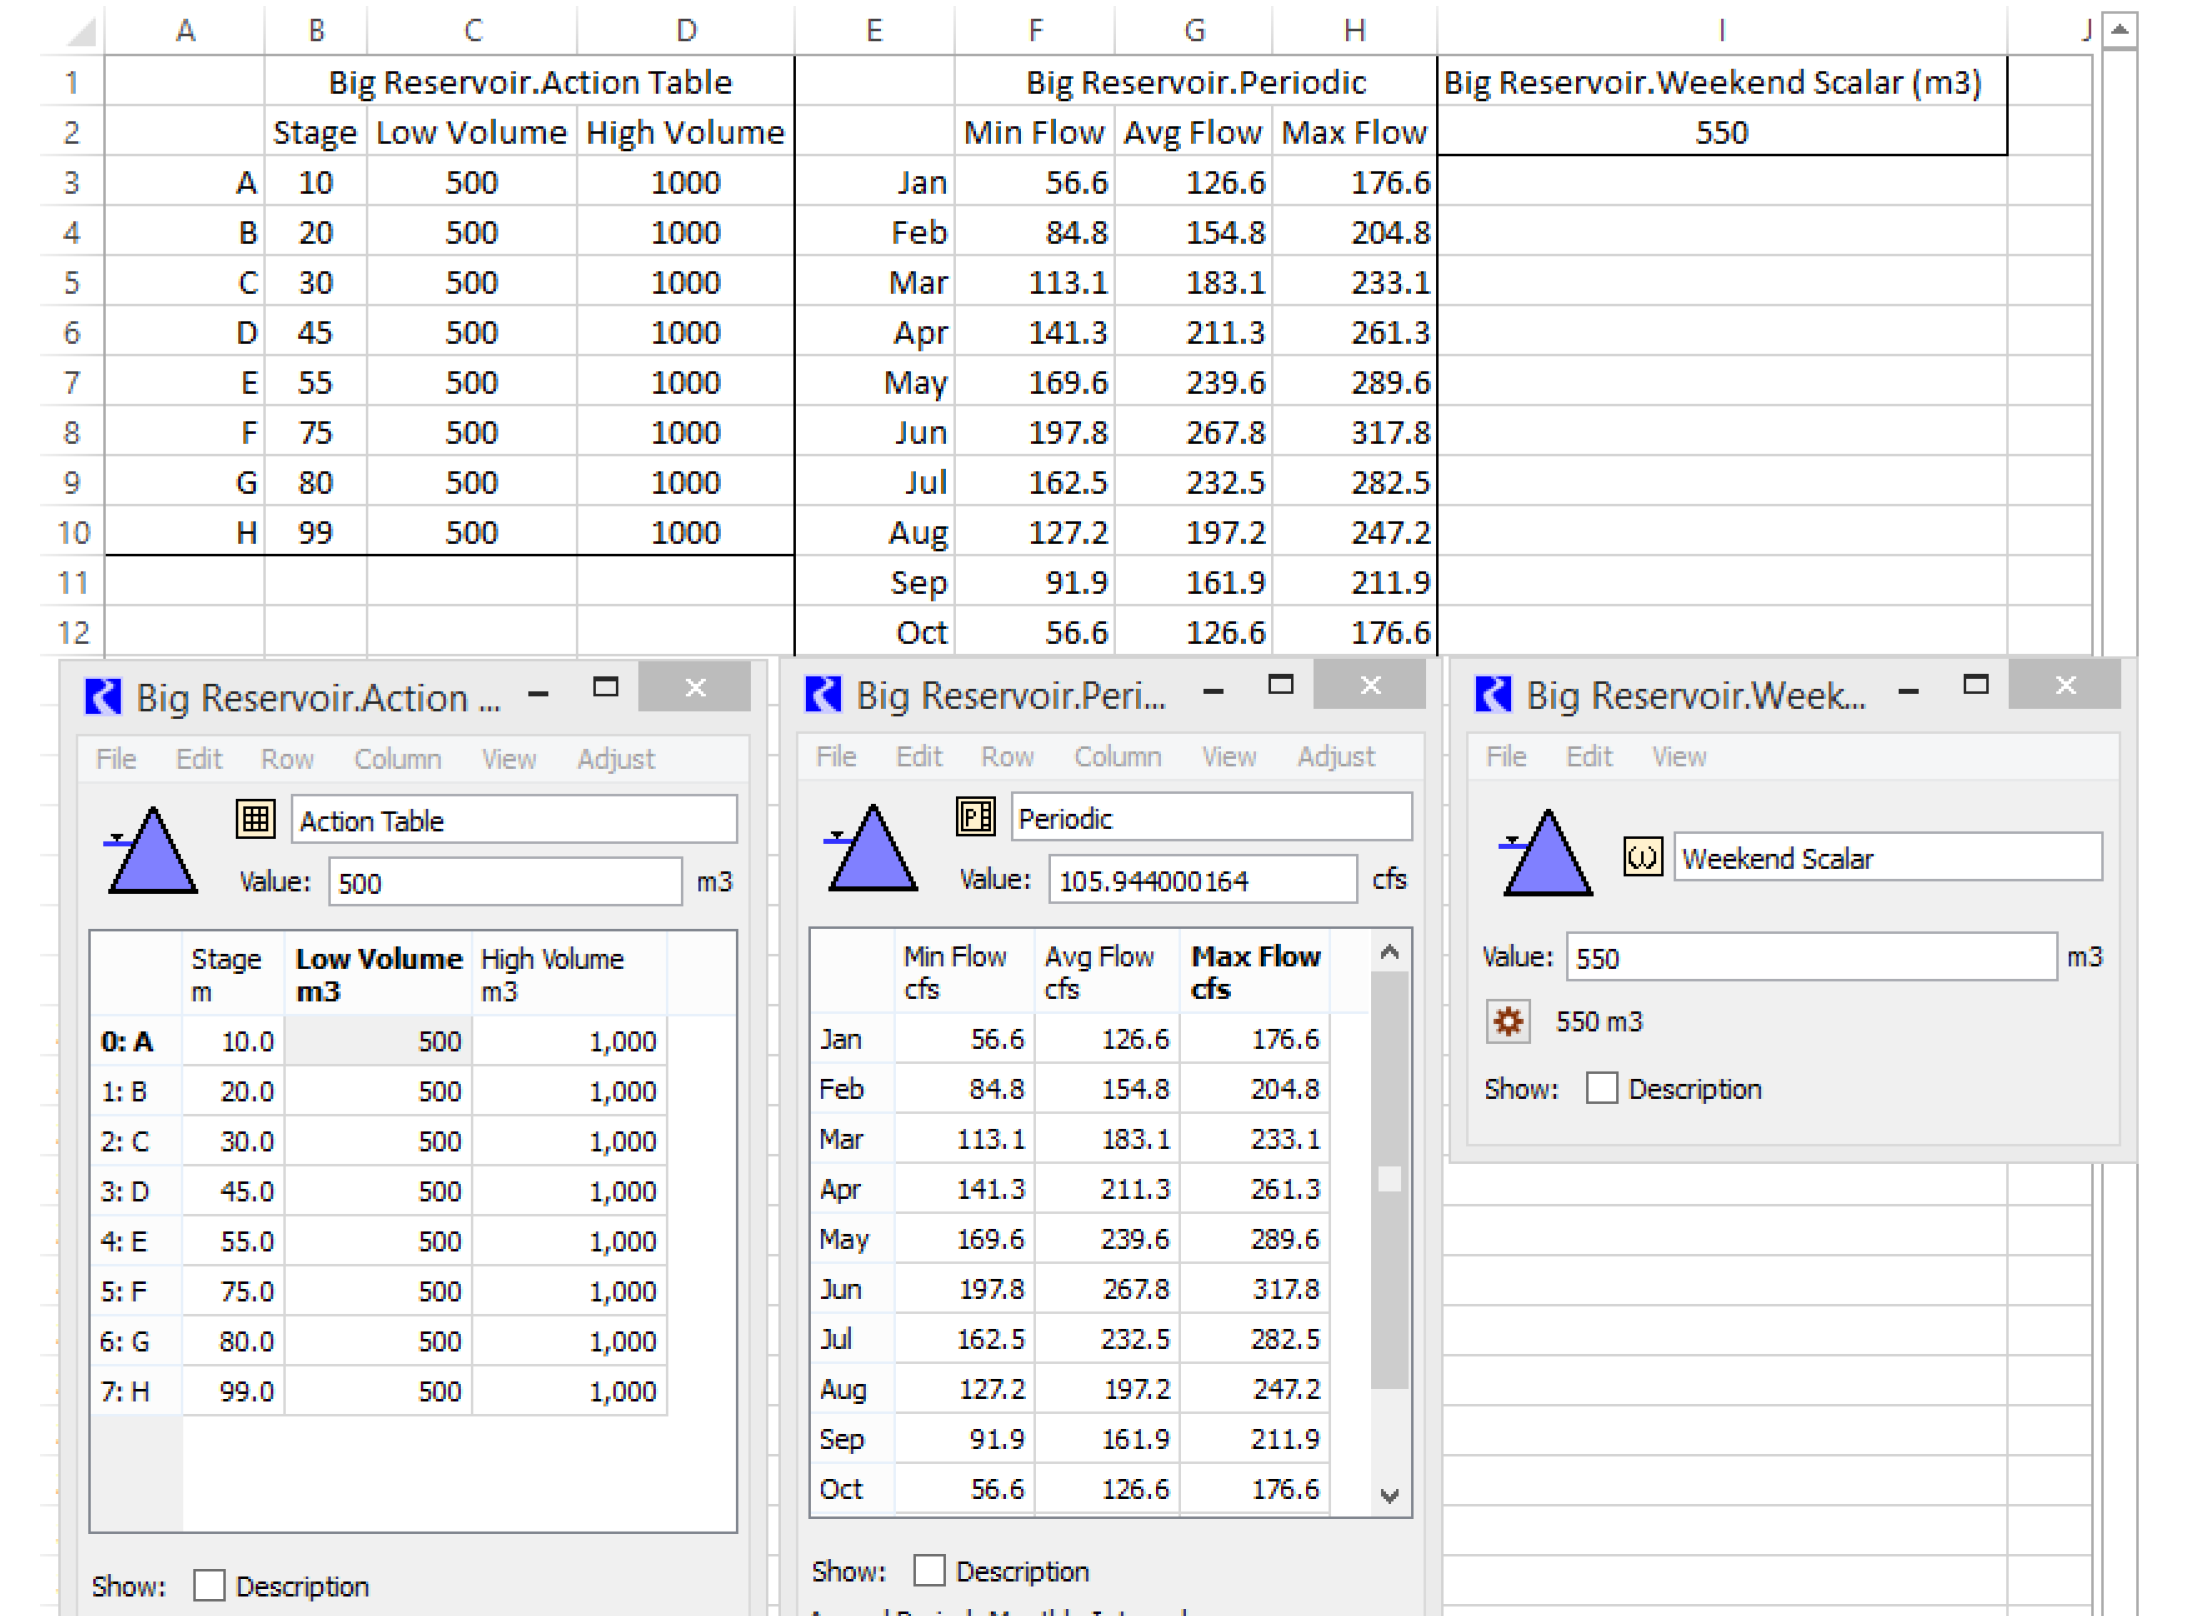
Table / Periodic / Scalar Slot DMI Limitations
Functionality to import/export Table, Periodic, and Scalar slots from/to Excel has the following limitations:
• Multiple runs are supported by having sheets with either the RunN or TraceN format.
• Using an offset from the first row/column is not possible.
• The Use Unit Name with Slot Name is only supported for Scalar slots. Units in Table or Periodic columns are not supported.
• Column and row labels must be specified in Excel as strings, even when the labels are the string representation of numbers (which is common for row labels). Unfortunately, Excel tries to convert string numbers into Numbers. To prevent this, quote numeric column and row labels with a leading apostrophe, for example '10.
• Table or Periodic slots with the DATETIME unit type are not supported.
• Importing a Table slot from Excel can only resize the number of rows in RiverWare. The number of columns cannot be changed.
• Importing a Periodic slot from Excel must match exactly the number of rows and columns. Changing the number of column or rows is not allowed.
• Periodic slots export includes row labels (i.e. dates) in the Excel sheet. But on import, the dates must match the row labels or an error will occur. It is not possible to change the periodic dates, interval or period based on data in Excel. These must all be configured in the slot before importing values from Excel.
Run Name Type
The Run Name Type options indicate how runs in the Excel workbook will be labeled.
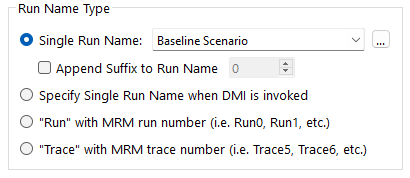
Use one of the following options:
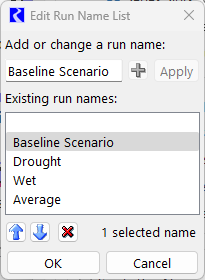
• Single Run Name. For a single run, the Single Run Name must be entered, which will be used to map to the appropriate dimension in Excel depending on the orientation selected (either row, column, or sheet). Either type the text directly into the field or use the chooser to select from a list of possible values. Use the button to edit the list of possible values. In the Edit Run Name List dialog, add, change, or delete possible Run Names using the buttons. A Run Name List can be copied from one Excel Dataset to another using copy/paste operations in the right-click context menu.
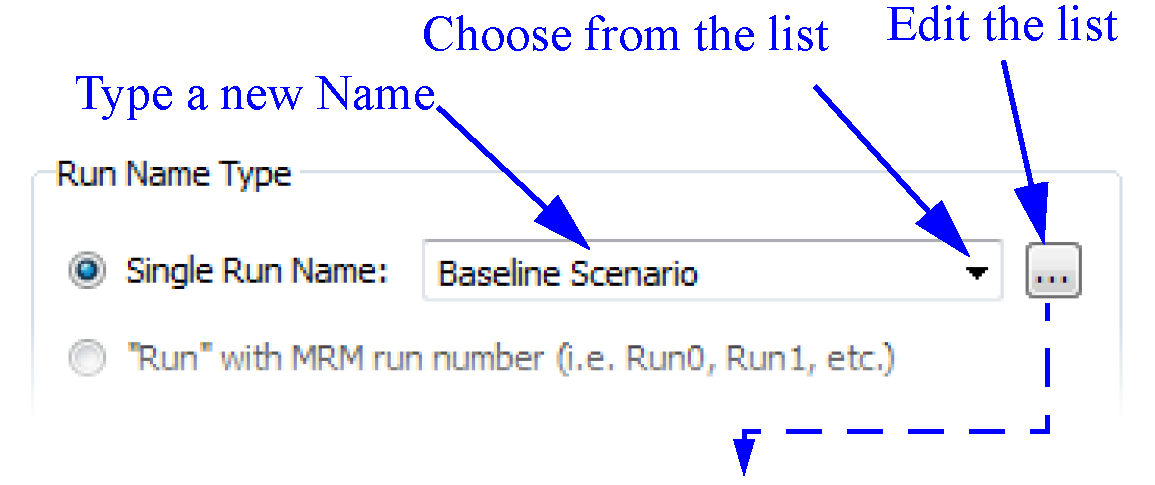
Also, below the Single Run Name, you can optionally specify a suffix to append for the run in the Append Suffix to Run Name field. Select the desired integer using the controls.

This value is appended to the single run name as a static value; it is not incremented within MRM. However, the Data Extractor Tool can increment this value during a data extraction. See Extract Data From Selected Model Files in Solution Approaches. Note, this value can be set by a script using the Configure Excel Dataset action as described in Configure Excel Dataset in Automation Tools.
• Specify Single Run Name when DMI is Invoked. For a single run, the Single Run Name must be entered when the DMI is invoked. The name is then used to map to the appropriate dimension in Excel depending on the orientation selected (either row, column, or sheet). When this option is selected, the name must be entered when the DMI is invoked, in the following window:
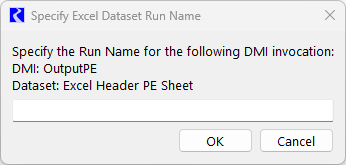
If a blank single run name is specified, or canceled, an error is raised and the DMI invocation stops.
Note: This option produces an error if the DMI is executed in MRM or Batch mode.
• “Run” with MRM run number. For multiple runs, a single run name is not adequate to label each run individually. Two options are provided for labeling multiple runs. If “Run” with MRM run number (i.e. Run0, Run1, etc.) is selected, then the run name used for mapping to Excel will be the word Run followed by the index number of the run within the multiple run.
Note: The index number used is zero-based to be compatible with how multiple run data has historically been written out of the ExcelWriter tool. The Run option cannot be used in the case of a distributed MRM run because run numbers start at zero in each distributed piece. A DMI error message is issued in this situation.
• “Trace” with MRM trace number. If “Trace” with MRM trace number (i.e. Trace5, Trace6, etc.) is selected, then the run name used for mapping to Excel will be the word Trace followed by the trace number of the run within the multiple run. Trace numbers are a one-based index into the runs, but the initial trace number for starting the multiple run can be specified by the user. Trace numbers can be used successfully with distributed MRM runs. See Input DMIs in Solution Approaches for details on setting up trace numbers in MRM.
Note: Excel worksheet names (i.e. the worksheet tab label) must be less than or equal to 31 characters; this limit is imposed by Excel. If you choose to have Runs on sheets and you type in text in the Single Run Name field, it is limited to 31 characters. If you choose to have Slots as sheets and your slot name is more than 31 characters, when the DMI is run the slot is not written/read and a message is posted. In this case, use Name Maps to map the slot names to shorter names that will be accepted by Excel.
Begin or End of Timestep Reference
For Series Slots, an option is provided to Use Begin Timestep Time Instead of End of Timestep.

Timesteps in RiverWare are dated with the end of timestep time, that is, a 1 Day timestep for the last day of the year 2000 is dated 12/31/2000 24:00. If the begin timestep option is not checked, this date is written to (and is expected to be read from) Excel as 12/31/2000 23:59. A minute is subtracted compared to the RiverWare end of time so that the date appears in the correct month and year in Excel. (Excel has no concept of a 24:00 display, so 12/31/2000 24:00 is interpreted by Excel as 1/1/2001 00:00, which would appear to be the wrong month and year.)
If Use Begin Timestep Time Instead of End of Timestep is checked, then the timestep is written to (and is expected to be read from) Excel as the beginning of timestep in RiverWare. For the 12/31/2000 24:00 timestep in RiverWare at a 1 Day timestep size, the time in Excel would be 12/31/2000 00:00. This option may be particularly useful if the user is entering data into Excel and is typing in 1 Day timesteps as 12/30/2000, 12/31/2000, 1/1/2001, and so on, which end up by default with 00:00 hours and minutes in the Excel date format. With the begin timestep option checked, the data associated with these times will be moved into RiverWare for their correct timesteps. When the model timestep is 1 Hour, the 12/31/2000 24:00 timestep in RiverWare would have a time in Excel of 12/31/2000 23:00 if the Use Begin Timestep Time option is checked and an Excel time of 12/31/2000 23:59 if the option is not checked.
Clear Dates and Values for Output
Select the Clear Dates and Values for Output options to remove the dates and values before writing outputs.

This is valid and enabled only under the following conditions:
• The DMI is an Output DMI
• The dataset maps by headers, not ranges
• The dataset is for series data not table/periodic/scalar data
• The dataset must use the Timesteps Slots Run(s) Header option as shown below:

• The Read/Write the workbook directly option in the Connection Process is selected
When this option is selected, both the dates and values will be deleted first and then the DMI will write new dates and values. For example, in the following figure, it will first clear out the dates and value for rows for 2 through 8, for 11/21 through 11/27, and then write values for 12/1 to 12/7 to get the screenshot on the right.

Warning: Blank lines should be used to separate dates and values from other content. Otherwise, values could be inadvertently cleared. For example, if there were values in row 9 above, they could be cleared, depending on the type of data present.
Include Unit Name
An option is also provided with the header approach to Use Unit Name with Slot Name. In an output DMI, this option will attach the unit name to the slot name when the slot name is written out to its appropriate row, column, or sheet, depending on the orientation selected. The format is the slot name, a space, and the unit name in parentheses, such as Storage Reservoir.Inflow (cfs). In an input DMI, this option means that the DMI will expect the unit name to be attached to the slot name as indicated above when it is looking for the slot in the Excel headers or sheets.
Open and Save Workbook
The final part of the Excel DMI tab is the choice of whether to have the DMI open and save the workbook as part of the process. The control is shown in Figure 4.27.
Figure 4.27 Screenshot of the Open and Save Workbook selection

Whether checked or not, the DMI will read or write the workbook data directly. But, you can select whether to open and save the workbook.The choices are:
• Leave the Open and Save Workbook box unchecked to read or write the data directly, without opening Excel. The Excel file is read/written directly, and no formulas are evaluated. This is the default.
• Check the Open and Save Workbook option to open the workbook in Excel in the background. This may be necessary to evaluate formulas to recompute data or link to other workbooks. The behavior is as follows:
– For an input DMI, the DMI will open and then save the workbook before importing data to RiverWare.
– For an output DMI, the DMI will write the data to the Excel file and then open and save the workbook.
In both the input and output cases, formulas can be evaluated when the Excel file is opened, as configured in the Excel workbook.
Select the More Information button get a quick description of the two options.
Revised: 12/06/2024