Snapshots
The following changes were made to Snapshots.
Snapshot Manager
The following changes were made to the Snapshot Manager. See Snapshot Manager in Output Utilities and Data Visualization for more information.
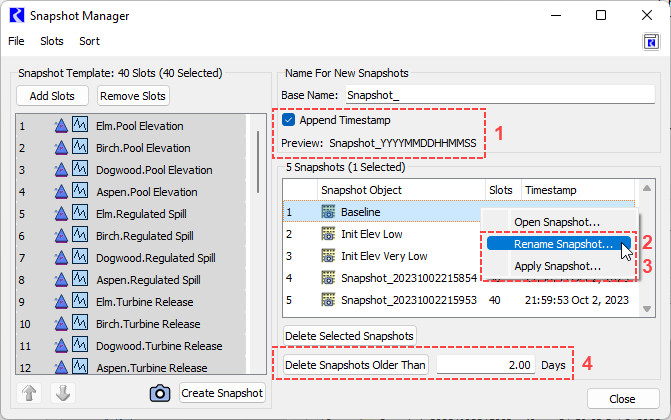
1. A new Append Timestamp option appends the time of snapshot creation, based on system time, to the Base Name when generating the name of a new snapshot object. The timestamp will have the format YYYYMMDDHHMMSS. This option is not selected by default to maintain existing behavior.
2. A new Rename Snapshot option is available from the right-click shortcut menu for a selected snapshot to allow the snapshot object name to be edited from the Snapshot Manager. Previously the snapshot object name could only be edited by opening the snapshot object from the workspace.
3. A new Apply Snapshot option is available from the right-click shortcut menu for a selected snapshot. This option pastes snapshot slot values back into their source slots. See Apply Snapshot for more information.
4. A new option was added to Delete Snapshots Older Than N Days. This can help manage snapshots by deleting old snapshots that may have accumulated in the model. See the related script action, Delete Snapshots.
Figure 2.26 Snapshot Manager with new options highlighted

Apply Snapshot
A new Apply Snapshot operation copies all slot values from a selected snapshot and pastes them back into the corresponding source slots, with the original flags and series slot notes. The Apply Snapshot operation can be accessed from three locations.
• In the Snapshot Manager, right-click on a snapshot, and select Apply Snapshot from the shortcut menu (see Snapshot Manager).
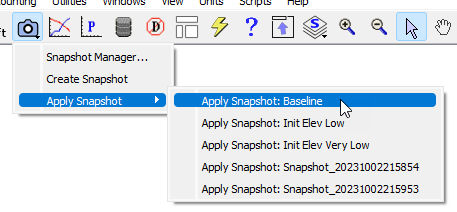
• From the Snapshot button menu on the main workspace, select Apply Snapshot, and then select the desired snapshot.
• From the Snapshot button menu on a SCT, select Apply Snapshot, and then select the desired snapshot.
Figure 2.27 Workspace Apply Snapshots options

Snapshot Button Menu
Previously, selecting the Snapshot button on the main workspace opened the Snapshot Manager. Now, selecting the button presents a menu with three options.
• Create Snapshot - creates a snapshot using the settings currently configured in the Snapshot Manager (see Creating and Viewing Snapshots in Output Utilities and Data Visualization).
• Apply Snapshot - pastes all values from the slots on the selected snapshot back into the source slots (see Apply Snapshot).
A Snapshot button has also been added in two locations.
• SCTs - see Snapshots in the SCT
• Plot pages - see Plotting Snapshot Slots
Series Slot Notes in Snapshots
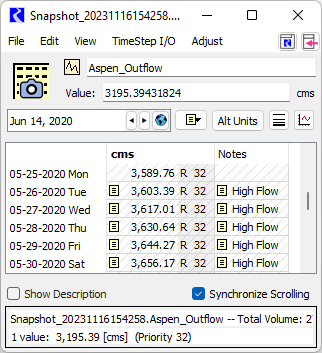
Now, when a snapshot is created, any series slot notes on the source slots get added to the snapshot slots as well, and they get automatically added as new note instances in the Note Manager. Previously it was possible to add series slot notes manually to snapshot slots, but notes on the source slots did not automatically get included with the snapshot slots. See Notes on Series Slots in User Interface for more information on series slot notes.
Figure 2.28 Snapshot showing series slot annotations from the source slot

Revised: 12/06/2024