Window Layouts
Window Layouts allow you to save the size, position, content, and status of many windows. The layout can be applied on demand to open the windows in their saved locations and sizes. In this section, we refer to windows and content; for example the Object Viewer is a window while the specific objects that are shown in the viewer, is the content. Some windows have content that can change and some do not.
Note: Supported windows are listed in Supported Window Types.
Window Layouts are managed through the Window Manager. For more information on accessing the Window Manager, see Window Manager.
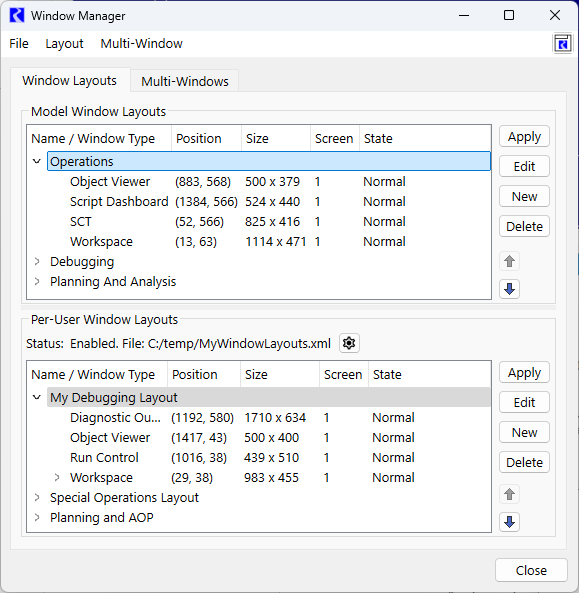
Figure 2.7 Window Layouts panel shown with three model layouts and three per-user layouts
Layout Save location
A layout is preserved as either a model layout or a per-user layout. When creating layouts, you must decide which type to create and therefore how it is preserved. Layouts can be saved as either:
• Model Window Layouts: Save the layouts in the model file. They are only available when that model is opened. In Figure 2.7, these are shown in the top panel. These layouts can be exported to and imported from an external file to share between models.
• Per-User Window Layouts: Save the layout to a separate file for use in any model or RiverWare session. In Figure 2.7, these are shown in the bottom panel. Per-User layouts can be exported and imported as model layouts.
As shown in Figure 2.7, the two types of layouts are listed separately and you operate on them separately.
Per-User Window Layouts
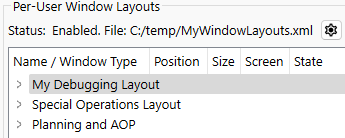
Per-User Window Layouts are saved in a separate file that is read by RiverWare. This makes the layouts available for any model or RiverWare session. By default, these are disabled and the window manager looks like this:

To enable this feature, select the gear icon to open the Settings Manager and the Windows, Window Layouts page:

Check the box to Enable Per-User Window Layouts. Then specify the save location, either the default or a custom specified location. See Windows for more info on these settings.
Note: Note, these settings are saved in the Settings File. For more information see the Settings File.
Once the Per-User layouts are enabled in the settings manger, then the Window Manager shows the layouts as shown below with the indication it is enabled and the File path:
Using Window Layouts in the Window Manager
Most operations involving layouts are performed from the Window Manager including creating and applying layouts. This section describes these operations in detail. These operations are the same for both Model and Per-User Layouts. For Per-User layouts, you must enable them first and specify the file. See Per-User Window Layouts above for more information.
Creating Layouts
Layouts are based on the size and position of windows. Thus, the first step is to open the desired windows, move them to the desired location, and resize as necessary. For those windows with specific content, like the object or slot viewer, open the desired items.
Then, in the Window Manager, select the New button to open the Window Layout Editor utility. The following information is tracked for each window as shown in Figure 2.7 and Figure 2.8:
• Name: The title of the window. Mouse over the name to see the full name and any specific information, such as the name of the SCT or Plot Page.
• Position: The pixel coordinates from the top-left corner of the screen to the top-left corner of the window.
• Size: The size, in pixels, of the window.
• Screen: The number of the screen on which the window resides. These numbers correspond to the main display, not necessarily the screen numbers used when identify the displays in the system settings.
• State: Normal, Minimized, or Maximized. For workspace items, the State column will list if the item is docked, where its docked, floating, or if its not shown.
Specify the desired name for the new layout.
De-select any windows you do not wish to include. They will turn red as changes are made.
Specify whether to Close all windows before applying layout. When checked, when the layout is applied, first all windows will be closed and then the layout is applied. The close behavior is identical to shift-clicking the Close Windows button (i.e. the lightning bolt). This feature allows you to switch between layouts, closing all other windows before applying the new layouts. The default is that the toggle is checked. Note, the workspace and its associated windows (Object List, Run Controls, etc.) are never closed by this action.
When satisfied, select OK and a new layout with the given name will be created.
Within the Window Manager, layouts can be renamed or deleted using the Rename Model|Per-User Layout or Delete Model|Per-User Layout options, respectively, in the Layout menu or the right-click context menu. (Here we use the “|” character to indicate “or” based on the context)
Layouts can be rearranged in the Window Manager by using the Up and Down arrows next to the list. This order will be maintained on subsequent model load.
Editing Layouts
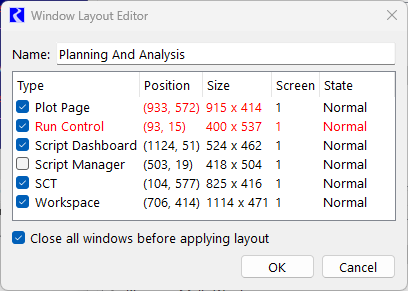
To change an existing layout, select the layout and use the Edit button. For example, we clicked Edit for the “Planning and Analysis” layout in Figure 2.7 to get the screenshot shown below in Figure 2.8
Figure 2.8 Window Layout Editor Dialog
The editor shows
• The layout Name text field. Modify the text to rename the layout.
• A list of all windows that are open (and supported by the window manager): (Example using Figure 2.8 are listed below)
– The checked items already belong to this layout.
– Unchecked items are open but do not belong to this layout. For example, the Script Manger is open, but is not included in the layout.
– Red items have changes compared to the saved layout.
• Individual items like position or size will be red if different. For example, the Plot Page size has changed.
• The entire row will be highlighted if a window is added to or removed from the layout. For example, the Run Control was not included previously, but now that it is checked, it will be included.
• The controls to Close all windows before applying layout. When checked, when the layout is applied, first all windows will be closed and then the layout is applied. The close behavior is identical to shift-clicking the Close Windows button (i.e. the lightning bolt). This feature allows you to switch between layouts, closing all other windows before applying the new layout. Note, the workspace associated windows (object list, run controls, etc) are never closed.
Select the windows to add or remove from the layout. They will change to red as they are changed.
Select OK and the confirmation to accept the changes.
Applying Layouts
There are four ways to apply a layout, that is, restore the specified windows to the state in which they were saved.
• Apply button: In the Window Manager, apply the selected layout by selecting the Apply button. The Window Manager remains open.
• Right-click context menu: In the Window Manager, right click a layout to get the context menu.
– Apply Model|Per-User Layout as configured
– Apply Layout With|Without First Closing All Windows: apply the layout but use the opposite policy for closing all windows. That is, if the layout is configured to close all windows, then the context menu gives an option to apply without closing all windows.
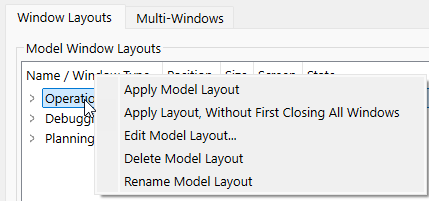
In both cases, the Window Manager remains open.
• Run a script that calls the Apply Window Layout script action. See Apply Window Layout in Automation Tools for more information.
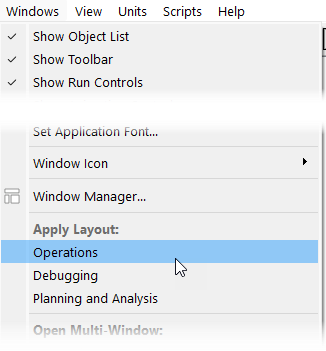
• On the workspace, use the Workspace menu and then select the layout from the Apply Layouts section of the menu. The following figure shows an example from the test model.
Figure 2.9 Screenshot of Windows menu showing Apply Layout operation
The following lists the limitations on applying layouts:
• Applying a layout closes windows that are not part of a layout according to the Close all windows before applying layout option described above. If not checked, applying layouts only modifies or shows those windows that are part of the layout. See note above on the context to apply a layout with the opposite operation.
• Due to the wide range of possible monitor configurations (number of monitors, arrangement, orientation, resolution, etc.), windows may not be restored exactly as saved. Such problems may arise if a layout was created on a setup using multiple monitors with very high resolution and restored on a setup with fewer monitors or lower resolution. If the Window Manager determines that a window would be positioned completely off-screen and not accessible, then it will instead open the window in a default state. A warning will then be displayed.
• The Window Manager will attempt to populate windows with the specified contents, such as objects or slots. If the contents cannot be located in the current model, then warnings will be displayed.
Exporting and Importing Window Layouts
Layouts in the Window Manager may be exported to and imported from an external XML file.
• Export: Use the File and then Export Model|Per-User Layouts menu. Specify a file name and select Save. Currently, all layouts of a given type are exported. This may be enhanced in the future.
• Import: Use the File and then Import Model Layouts menu. Locate the file containing the exported layouts and select Open. If there are any naming conflicts during import, imported layouts will be automatically renamed by appending a number on the end of the name.
Note: Per-User Layouts may not be imported as per-user layouts, but only as model layouts. Per-User layouts should already be available and should not need to be imported.
Revised: 01/10/2025