View and Configure Individual Accounts
To view or configure an individual account, use the Open Account Viewer.
Open Account Viewer and Open Account Window
This section describes the user interface for the Open Account Viewer and Open Account windows.
Accessing the Open Account Viewer
To access the Open Account Viewer, use one of the following methods:
• From the object window, switch to the Accounts tab. Select the account and then select Account, then Open Account from the menu bar or right-click the account and select Open Account from the context menu.
• From the Account Series Slot Viewer, select View, then Open Account.
• From the Accounting View of the workspace, right-click the account and select Open Account from the context menu
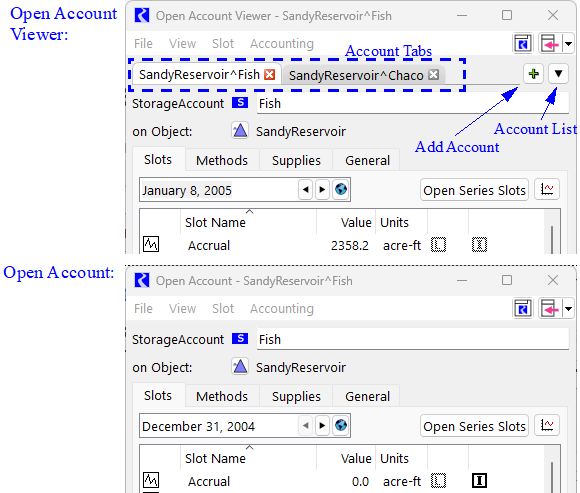
Figure 3.9 shows both an Open Account Viewer and an Open Account window.
Figure 3.9 Screenshot of the Open Account Viewer and Open Account Window
Open Account Viewer Operations
The Open Account Viewer is the default window used to look at an account. It is convenient, as all account open in one window as a separate tab. Select the tab to switch between accounts. Or use the Account List menu on the right of the tabs. This is particularly useful if you have many accounts in the viewer.
Figure 3.10 Open Account Viewer with Account List Highlighted
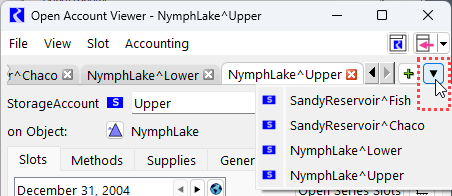
Also, use the green plus button to use the account selector and add one or more accounts to the viewer.
Undocking Accounts
To look at two objects at once, drag the tab off the viewer to create an Open Account window for that object. Or use the File, then Undock Account menu or File Undock all Accounts.
Redocking Accounts
To move an Open Account window back onto the viewer, grab the Account icon (S, D, I, or P icon) and drag it anywhere onto the Viewer. A new tab will be created. Or use the File, then Dock In Open Account Viewer menu.
Figure 3.11 Screenshot of Open Account Dragging to Open Account Viewer

Closing windows
On the viewer, use the red X on the tab to close an account tab.
Select the red X on the viewer to close the window. This will close the window and remove all accounts. Minimize the viewer to keep all accounts in the viewer. Reopen the viewer and show the previously opened accounts by selecting the Account Viewers button as describe below.
Account Viewer Buttons on the Workspace.
On the bottom of the workspace, use the Account Viewers menu button to open either the Account Series Slot Viewer or Open Account Viewer as shown in the screenshot below.
Figure 3.12 Screenshot of Account Viewers

Note: The Account Viewers button is only shown when Accounting is enabled.
Note: The Open Account Viewer can always be opened from the button menu, even if the viewer is empty. The Account Series Slot Viewer option is only shown when it contains slots.
Using the Open Account Viewer or Window
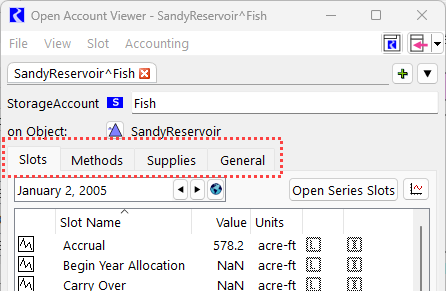
Whether you use the Open Account Viewer or Open Account for an individual account, there are four tabs as described in the following sections: Slots, Methods, Supplies, and General.
Figure 3.13 Screenshot of the Open Account Viewer
Slots
The Slots tab shows all of the slots on the account. Double-click on a slot to bring up a view of that slots data. If the slot is a multi-slot, both the total and the components will be shown. This is another location where accounting data can be entered or edited. In the Slots tab, there is also a date time spinner to scroll to a specific date and a plot button to plot the selected slot(s).
Figure 3.14 Open Account Slots Tab
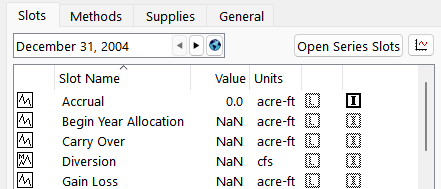
From the Slots tab, you can double-click any slot to see the values in a standard slot window. From the slot window, you can view variables listed in Table 3.1. You can make changes to units, scale, precision and format which actually result in a Slot Exception in the Unit Scheme; see Unit Schemes in User Interface for details. Use the View and then Configure menu.
Also, you can change the slot’s convergence in the configuration window. You can change the convergence of many accounting slots in the Configure Existing Slots utility described in: Global Slot Configuration in User Interface. This utility can also be used to change the convergence of Supplies.
Editable Variable | Description |
|---|---|
Units | The unit displayed in the user interface |
Scale | A multiplier of the unit (e.g., 1 cms or 10 cms), so its effect is to be a divisor of the value displayed. |
Precision | The number of digits after the decimal point that are displayed |
Format | A choice amongst float and scientific. • Float means floating point, displayed with the precision number of digits after the decimal point, e.g., 55.99, if precision is 2. • Scientific means in standard scientific notation, e.g., 5.599e+01. |
Convergence | Determines when an assignment to a slot is considered to have changed the value in the slot. When a slot value V is given a new value V’ and | V - V’ | < V * convergence, V and V’ are considered to be equal and the assignment is not made. This is necessary to allow the solution of the model to converge. When the value V is 0, the convergence criterion is: | V’ | < 1.1 x 10⁻¹². Keep in mind that convergence check (as all computation) is done in internal RiverWare units, not in the user (display) units. |
Methods
The Methods tab is used to select methods associated with a given account. For example, there are categories that have to deal with the calculation of Initial Request for water rights appropriation, Storage Account Carryover, and whether this account has a water right. Methods in the Storage Account Carryover category determine the storage carryover on the Begin Accrual Date.
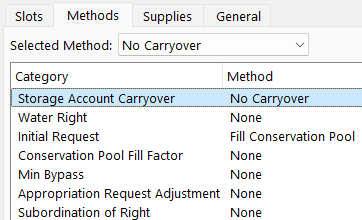
Highlight the desired category row, then use the Selected Method pull down menu to choose an alternative method.
Note: You can select methods on many accounts in one action using the multi-account method selector which is accessed from the Accounts Manager. See Multiple Account Method Selector for additional information.
Supplies
The Supplies tab is used to configure supplies into the account. Supplies are the mechanism to link two accounts on the same or linked objects. All supply configurations are done on the downstream account. Supplies are explained further later.
Figure 3.15

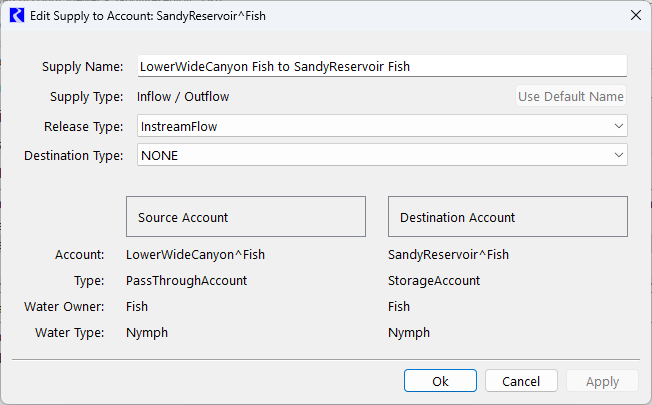
Double-clicking an existing supply will open the Edit Supply window for that supply. This window, shown in the Figure 3.16, can be used to change an individual supply’s name, release type or destination.
Figure 3.16
The demands area is used to view the supplies leaving the account. The demands are read-only; nothing can be changed. To edit a demand, the user must open the downstream object and edit the supplies entering the downstream object.
General
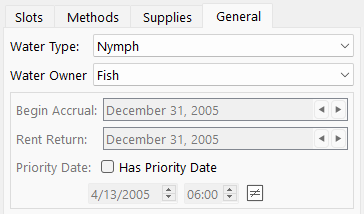
The General tab is used to configure general properties of the account. The user can select the Water Type and Water Owner, although the types must already be defined in the Account System Configuration. The user can also specify a Priority Date for the account, where applicable. The Has Priority Date toggle box must be selected to enter a priority date. The equal/unequal icon indicates if the date shown is unique or not with respect to the priority dates of other accounts. Selecting this icon will open the Account Manager to show accounts with the equal priority date (see Water Accounts Manager for details). If equal priority dates are allowed in the Account System Configuration, a copy icon is also shown that when pressed will open an account selector to choose an account from which to copy a priority date. An assigned Priority Date is used by rule functions to allocate water.
Revised: 01/10/2025