Menus on the Slot Dialog
Following is a general description of the menus for the Slot dialog. See Types of Slots for descriptions of each slot type.
File Menu
The functionality available from the File menu depends on the slot type. In general, this menu is used to do the following activities.
Import (fixed or resize) and Export (display or model precision)
Large sets of data may be imported into, and exported from the Open Slot dialog. Exported data are written to a text file in tab-separated format. Imported data may be tab or space-separated. Exported values are written in the display units and either the precision currently specified in the Open Slot dialog (Display Precision) or the entire internal precision (Model Precision). Likewise, imported data are assumed to be in the same units as the Open Slot dialog. The entire precision of an imported value will be preserved, although only the selected display precision is shown. Import Fixed Size always maintains the existing number of rows in the slot and truncates incoming data if the data file contains more rows than the slot. Import Fixed Size leaves existing data after the imported data if the data file contains fewer rows than the slot. Import Resize automatically expands the slot, if necessary, to match incoming data. For a table slot, Import Resize shrinks the number of rows in the slot to match the incoming data. For a series slot, Import Resize leaves existing data after the imported data if the data file contains fewer rows than the slot.
Plot
Open a new plot with the given slot.
Print Expression
On expression slots, print the expression.
SCT
Add the series slot to an existing SCT or create a new SCT with the slot.
Show Workspace
Bring the workspace to the top of the screen.
Close Window
Close the window.
Edit Menu
The Edit menu is available on series, table, periodic and list slots and is used to change the number of rows or columns, and to change values in the slot.
Cut/Copy/Paste
There are options to cut/copy/paste data from the highlighted cells. These use an internal clipboard and cannot be copied or pasted from other applications. The Export Copy and Import Paste options allow you to use the system clipboard.
Paste as Input
Paste from the internal clipboard and set the Input flag.
Export Copy
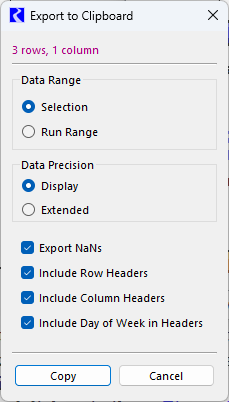
The Export Copy menu option is used to export the selected data to the operating system’s clipboard for use in other applications, like Excel. Select this option and an Export to Clipboard window opens. Then select from the following options:
• Data Range: For series data, do you want to export the selection or the Run Range:
– Selection: export only selected values
– Run Range: expand or contract the selection to the run range, Start Timestep to Finish Timestep. It does not include the initial timestep.
At the top, information is provided on the number of rows and columns that will be exported.
• Data Precision: Select from either:
– Display: Export the values exactly as shown in the slot window. That is, it will use the active Unit Scheme’s precision for the slot.
– Extended: Export up to 15 digits in the display units. Any trailing zeros are truncated.
• Export NaNs: when checked, NaNs will be export. If not checked, NaNs become blanks.
• Include Row Headers: Specify whether to export the row headers. For series in the Slot Viewer, these are the dates.
• Include Column Headers: Specify whether to export the row headers. For series in the Slot Viewer, these are the slot names.
• Include Day of Week in Headers: Specify whether to include the day of the week in time series headers. This option is only available when headers are shown and they represent daily or sub-daily timesteps. Uncheck this option to exclude the day of week. This may be useful when pasting to Excel as the values will paste as dates in Excel, when the day of the week is excluded..
Select Copy to add the selected data to the operating system’s clipboard.
Import Paste
The Import Paste menu is used to paste data from the operating system’s clipboard into the slot. For example, the user can copy a selection of cells from Excel or a column of data from a text file and Import Paste it directly into the slot. After copying the data, the user selects one or more cells of the slot and then selects Import Paste. An Import from Clipboard dialog similar to Figure 4.5 is shown. This dialog displays the contents of the system clipboard and provides options and information on the paste operation.
Figure 4.5 Screenshot of the Import Paste, Import from Clipboard dialog box
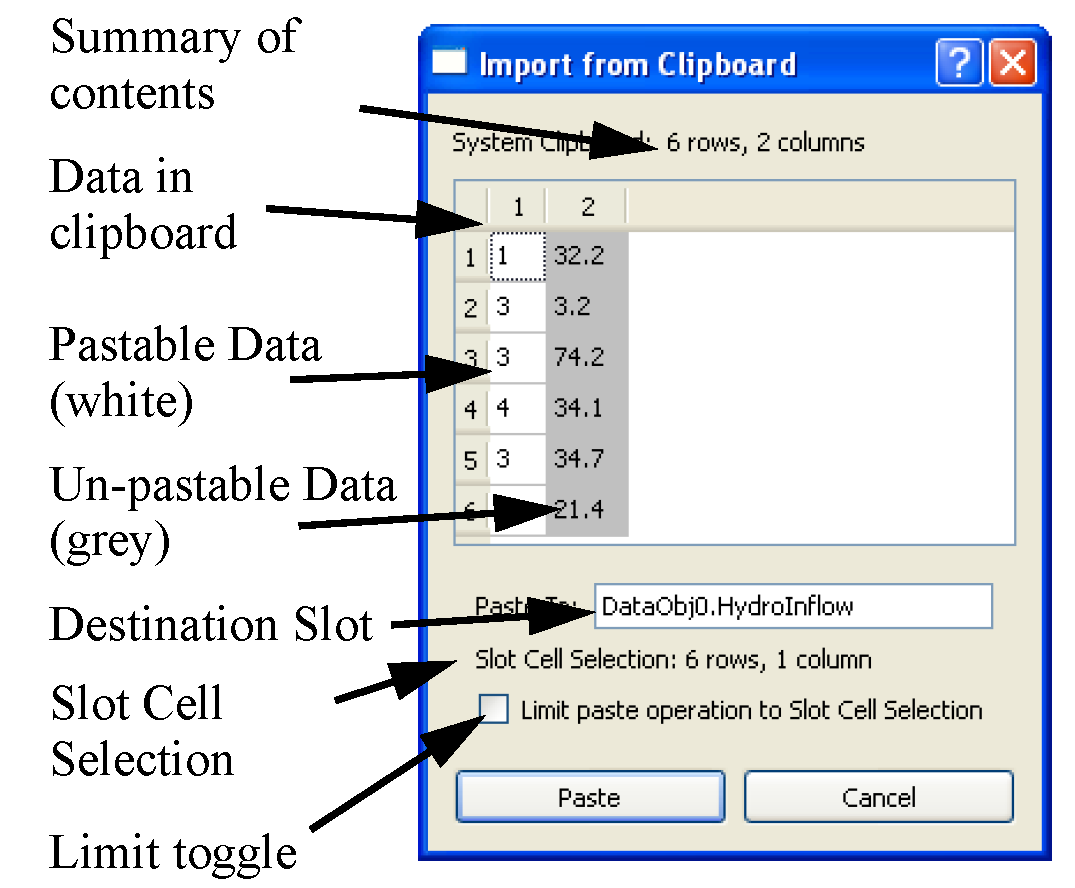
The contents of the clipboard will show data that can be copied (white) and data that cannot be copied (grey). Data cannot be copied if it does not fit in the content of the cell selection. For example, if the data in the clipboard has multiple columns and the cell is a single series slot, the second column of data cannot be copied, as shown in the Figure 4.5.
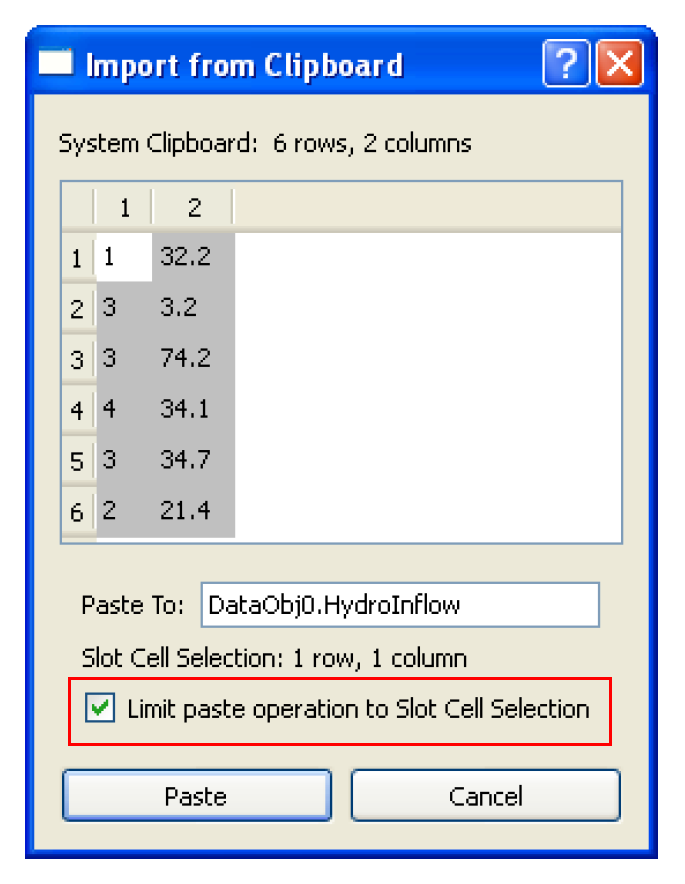
Also, the user can choose to Limit paste operation to Slot Cell Selection by selecting the checkbox. This limits the paste to only affect those cells in the slot that were selected. This selection is shown in the Slot Cell Selection line. For example, if only one cell in the slot is selected, but the clipboard contains two rows of data as above, all but the first cell are dimmed. In the example in Figure 4.5, only the value of “1” will be pasted. If the number of values in the clipboard is larger than slot selection, but the limiting operation is not checked, the paste will import all data and will add the necessary rows to the slot.
Note: An import will not add columns to the slot.
Figure 4.6 Screenshot of the Import from Clipboard dialog box with Limit paste operation
Insert/Append/Delete
The Edit menu contains options to Insert, Append, and/or Delete rows or columns from the slot, depending on the type and use of the slot.
Clear All Outputs
On series slots, this option can be used to clear all the Outputs.
Note: All outputs are cleared at the beginning of a run.
Fill Values Below
The Fill Values Below option is used to copy and paste the selected cell to all rows below. This will overwrite any existing data after the confirmation menu is selected.
Replace NaNs Below
The Replace NaNs Below option is used to replace only NaN with the selected values. Any existing data will not be overwritten.
Interpolate
The Interpolate option is used to interpolate between two known values within a column. It only works on a selection when the first and last value in the selection have values. The option will interpolate between the two values and change all the values to have the Input flag.
Adjust Values
One or more values selected in a slot can be adjusted using the Adjust Values item available from the Edit menu of slot dialogs. When the user selects Adjust Values RiverWare opens a modal Adjust Slot Values dialog which allows the user to provide the amount by which the selected slot values should be adjusted. Values may be adjusted by a percentage, or if all of the values have the same units, by a fixed increment in user units. After entering the adjustment value the user then applies that value to the selected values by selecting the Ok button or cancels the operation by selecting the Cancel button.

The adjustment is equal to adding a certain amount to the existing value(s) or multiplying by a percentage. The user may specify a positive or negative quantity.
Note: The percentage option increases the existing amount by adding a specified percentage of that amount.
For example if the values 10.0 and 100.0 acre-ft/month are selected and the user enters 10 acre-ft/month into the Adjust Slot Values Dialog and selects Ok, then the values will be changed to 20.0 and 110.0. If the user enters 10%, the values will be changed to 11.0 and 110.0.
Tip: It is easy to select all cells in a column by selecting the header for that column.
Undo and Redo
Undo and Redo operation allows you to freely move between the current and past states that result from any tracked edits. Undo returns all affected slot data (values and flags) to the values before the most recent tracked edit; Redo returns all affected slot data (values and flags) to the values after the latest tracked edit.
In RiverWare 8.1, all data editing operations that change values without changing the structure of the data are tracked by Undo and Redo including typing in values, pasting values, clearing values, filling values, interpolating values, adjusting values by factor or offset, changing flags, and importing values.
Note: Structural changes, such as those operations that change a slot’s rows (for example, removing a row from a table slot), columns, and configuration are not tracked and cannot be undone.
In addition, external changes, those changes to the slots that are initiated outside of the dialog (for example from an SCT or a script action), are not tracked. If you execute an Undo or Redo operation and there has been an intervening untracked change to any of the values affected by the edit, you are presented with a confirmation dialog and given the opportunity to cancel the operation. If you proceed, it will undo the value that was last tracked by the dialog, not the external change.
Row Menu
On table and periodic slots, the Row menu is used to configure the rows.
Edit Row Labels
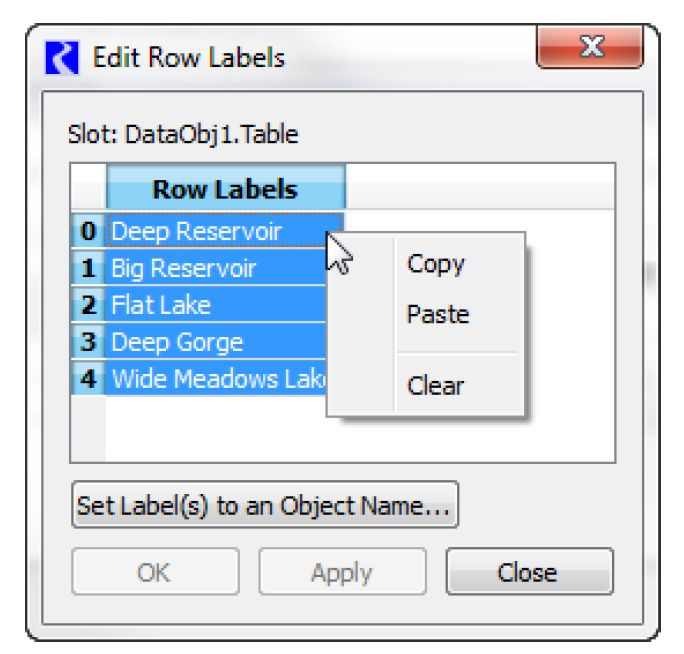
Change the Row Label. All row labels can be configured at once in the dialog. The labels can also be set to object names using the Set Label(s) to an Object Name button. Use right-click context menus to copy and paste from the system clipboard.
Insert Copied Rows
Insert Copied Rows from the internal clipboard
Insert New Row
Insert a new row above the selected row
Append New Row
Append a new row at the bottom.
Move Rows
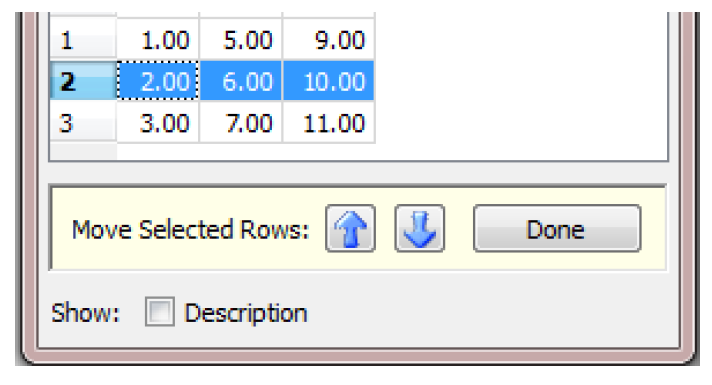
The Move Rows menu opens a panel at the bottom of the dialog which allows you to move the selected row (or multiple selected rows) up or down. When finished, select the Done button. This option is only available on custom table slots.
Delete Rows
Delete the selected rows
Delete Rows Below
Delete all rows below the selected row
Column Menu
On some table and periodic slots (such as on custom slots), the user can add or delete columns to the table. The Column menu is used to do this and change column labels.
Edit Column Labels
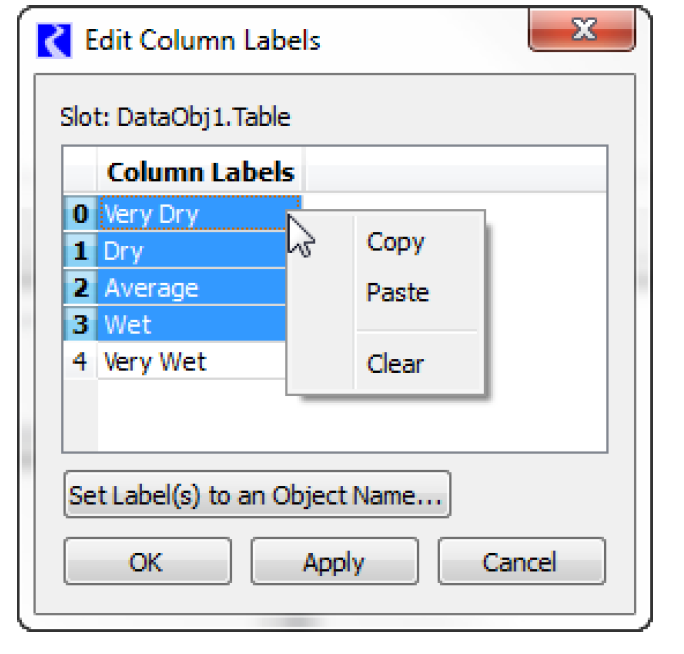
Change the Column Label. All column labels can be configured at once in the dialog. The labels can also be set to object names using the Set Label(s) to an Object Name button. Use right-click context menus to copy and paste from the system clipboard.
Set Number of Columns
Set the number of columns.
Append Column
Add a column to the end.
Move Column
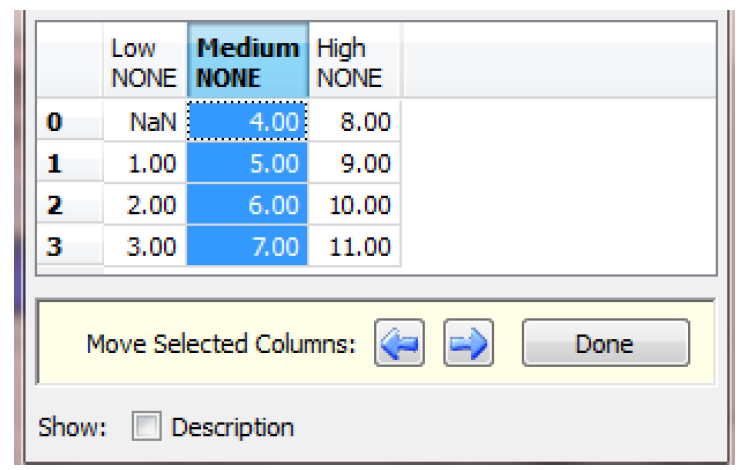
The Move Column menu opens a panel at the bottom of the dialog which allows you to move the selected column (or multiple selected columns) to the right or left. When finished, select the Done button. This option is only available on custom table and periodic slots.
Delete Column and Delete Last Column
Delete the selected column or last column, respectively.
Set Dimensions
Set the number of rows and column on the slot
View Menu
The View menu provides the following options.
Configure
The Configure Slot dialog is opened by selecting View, then Configure in the Open Slot dialog. Depending on the type of slot opened, the dialog could appear a slightly different. For example, the portion of the dialog showing the Upper Bounds and Lower Bound is only displayed for Series Slots.
Note: To configure Bounds or Convergence on multiple slots at one time, use the Configure Existing Slots dialog; see Global Slot Configuration.
Slot Display Settings
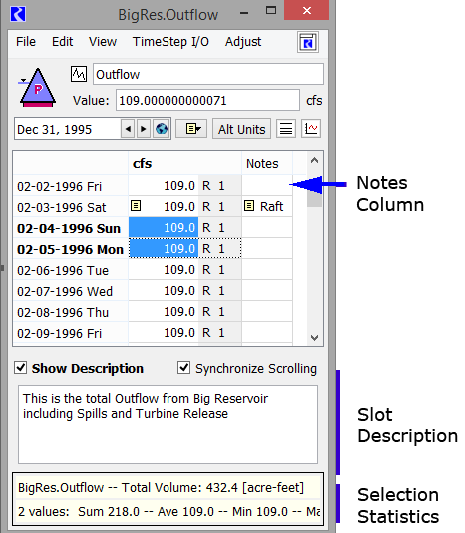
Slot windows have settings that allow you to configure which features are visible when the slot is opened. This allows you to specify if you want to see Selection Statistics, Description, and the Notes column. This section describes the setting, saved with the model, which are applied each time a slot is opened. Note that these are strictly initial settings, you can still show or hide each feature using the controls or menus.
The Slot Display settings are accessible from two places:
• From the main RiverWare workspace, use the Workspace, then Slots, then Slot Display Preferences menu.
• From the Slot Viewer, use the View, then Slot Dialog Display Preferences menu.
The Slot Display page in the settings manager consists of the following items:
• Selection Statistics. Show or Hide. Currently, Selection Statistics are supported only on series slots.
• Series Slot Notes Column. Show, Hide or Show if slot has notes.
• Slot Description. Show, Hide, or Show if slot has description provided by the user.

Note: When a series slot opens in the Slot Viewer, the preferences are applied to the first slot. If that slot has a description and the preferences say to “Show if slot has description”, the Description panel will be shown. But if the next slot shown doesn’t have a description, then the Description panel will remain open.
Go To Next NaN
The View, then Go To Next NaN menu navigates to the next NaN (Not A Number) in the slot. The search always goes first down the column (timesteps), then through the subsequent columns.
The Ctrl‑Shit‑N keyboard shortcut also executes the search.
Adjust Menu
The Adjust menu, available on series and table slots, is used to change the display size of the columns in the slot. Users can manually resize columns by dragging the dividers between the column headers. The following five operations are also available in the Adjust menu:
Set Column Widths
Set all data columns to the width of the single selected column.
Grow Columns to Fit Data
Expand, but do not shrink, the columns to fit the widest numeric value displayed in the corresponding columns.
Fit Columns to Data
Resize all data columns to fit the widest numeric value displayed in the corresponding columns.
Fit Columns to Headers and Data
Resize all data columns to fit the larger of the text in the corresponding column headers or the widest numeric value displayed in the corresponding columns.
Fit Columns to Headers
Resize all data columns to fit the text in the corresponding column headers.
Revised: 01/10/2025