
Editing RPL Sets
Following is a description of how to manage and edit RPL sets once they are open. This includes creating, naming, and editing blocks/groups, adding statements, and validating blocks or the entire set. See Editing a RPL Expression for details on editing individual expressions.
When a RPL set dialog opens, the Policy & Utility Groups tab is initially selected, presenting a comprehensive high-level view of the policy. Switching to the Report Groups tab provides a more selective, user-defined view.
Note: Many actions described below are appropriate only for one or the other main tabs (e.g., adding a new Report Group), and these actions are disabled when they do not apply.
Blocks and Groups
Naming Groups
To name a block or group, right-click or double-click the Name field of the block or group. Right-clicking will bring up a menu from which the editor dialog can be opened. Double-clicking will bring up an editor dialog directly. Type the name in the name field.
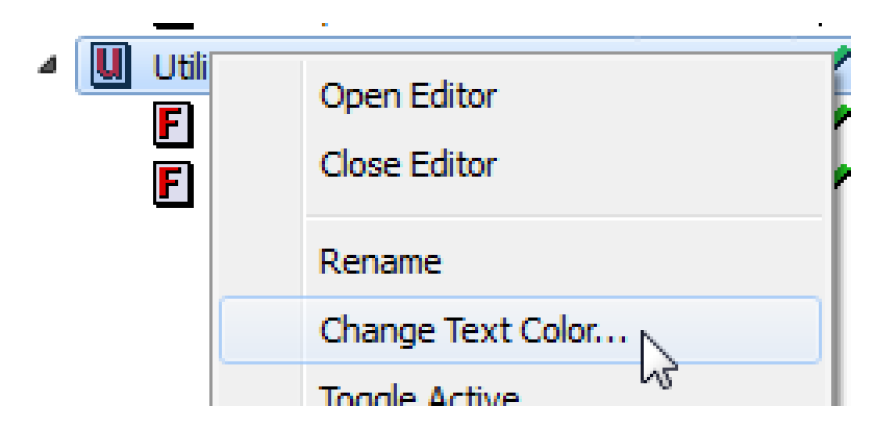
Name Color
The color of each name in the set can be specified by right-clicking an item and choosing Change Text Color. The selected color is then used by the RPL set editor, the RPL set analysis tool, and the RPL object selector dialogs for the name of the selected object. For groups, the color is changed for the group name and all members of the group that have the default black color.
Adding Groups
Groups (of type Policy, Utility, Global Utility, or Report) are added to a RPL set by selecting the appropriate item from the RPL set Set menu (e.g., Set, then Add Policy Group, Set, then Add Utility Group, Set, then Add Report Group, or Set, then Add Global Utility Group, for global function sets). New policy and utility groups are added to a set directly below the currently highlighted group of that type.
Add Blocks and Functions
Blocks and functions are added to a RPL set by highlighting the group they are to be placed in and selecting Set, then Add Block, Set, then Add User-Defined Function, or Set, then Add Global User-Defined Function (for global function sets) from the RPL set menu bar. New blocks and functions are added to a RPL set directly below the currently highlighted element of that type or at the bottom of a highlighted policy or utility group.
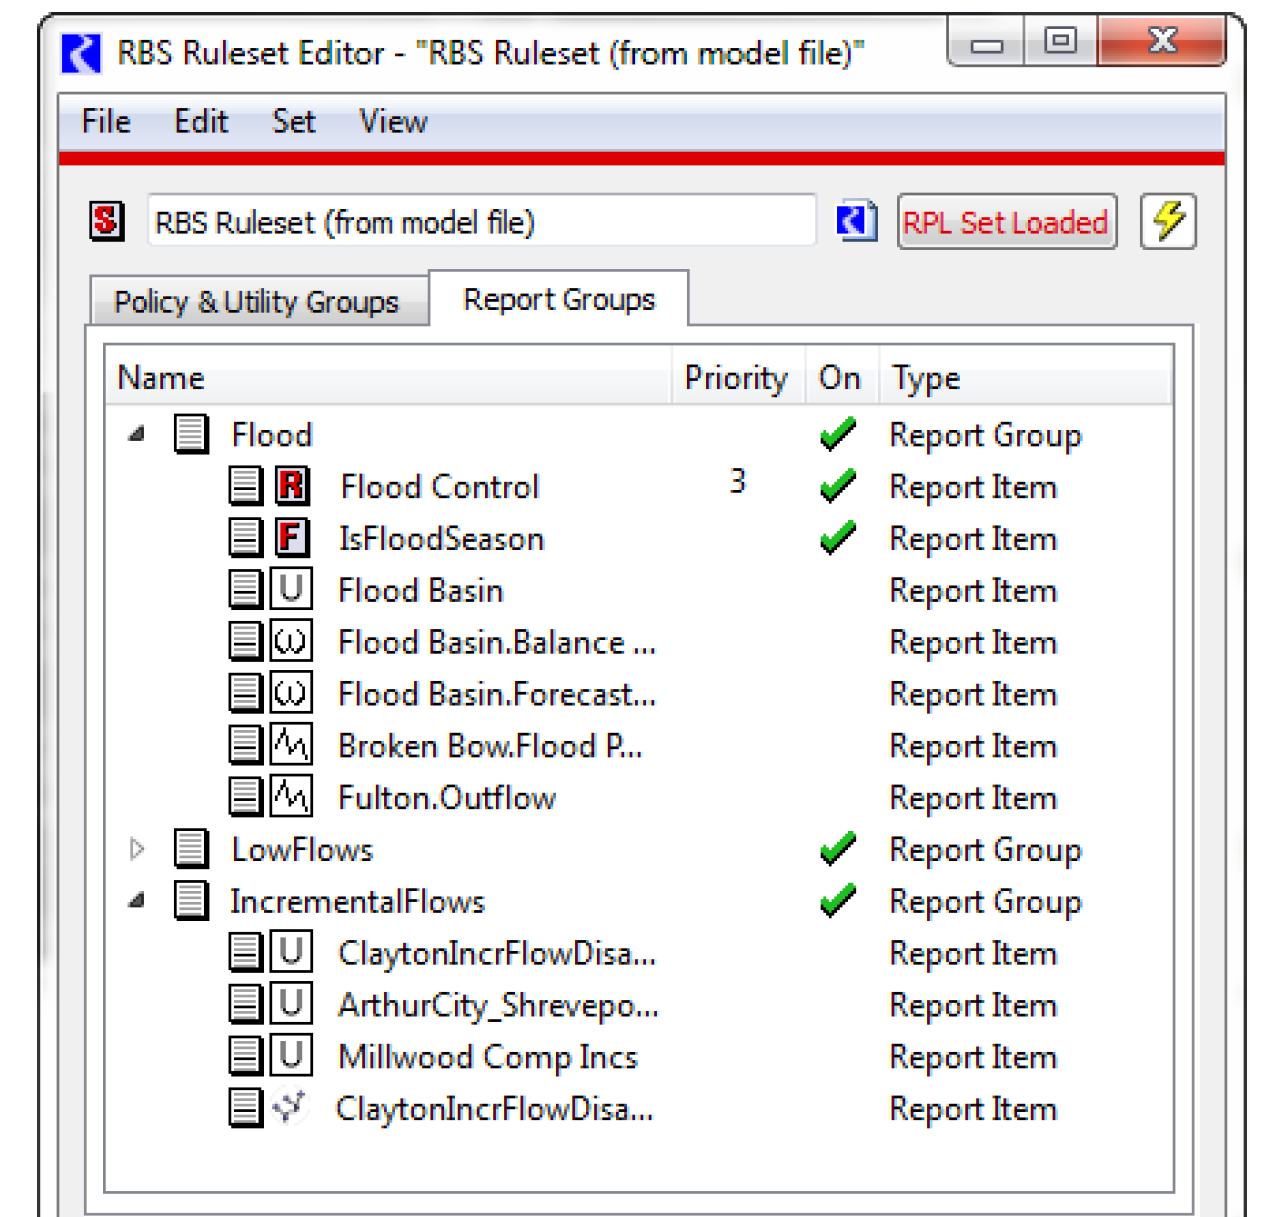
Add Report Items
The Report Groups tab, shown in Figure 2.7, provides a more selective, user-defined view of the policy/slots and object. Items are added to a RPL report group (visible in the Report Groups tab) by highlighting the group they are to be placed in and selecting the desired action from the Set, then Add Report Items menu, which contains an option to open a selector for each of the following types of objects.
• RPL Object Items Blocks and functions in the current set. See RPL Printing and Formatting for details on using the RPL Object selector.
• Object Items objects on the workspace.
• Slot Items slots on objects or accounts.
• Subbasin Item a single subbasin (automatic or user-defined).
Selecting the Ok button in the selection dialog will append the items for the selected objects to the end of the selected report group, but can be moved to any position by using the drag/drop technique.
Figure 2.7
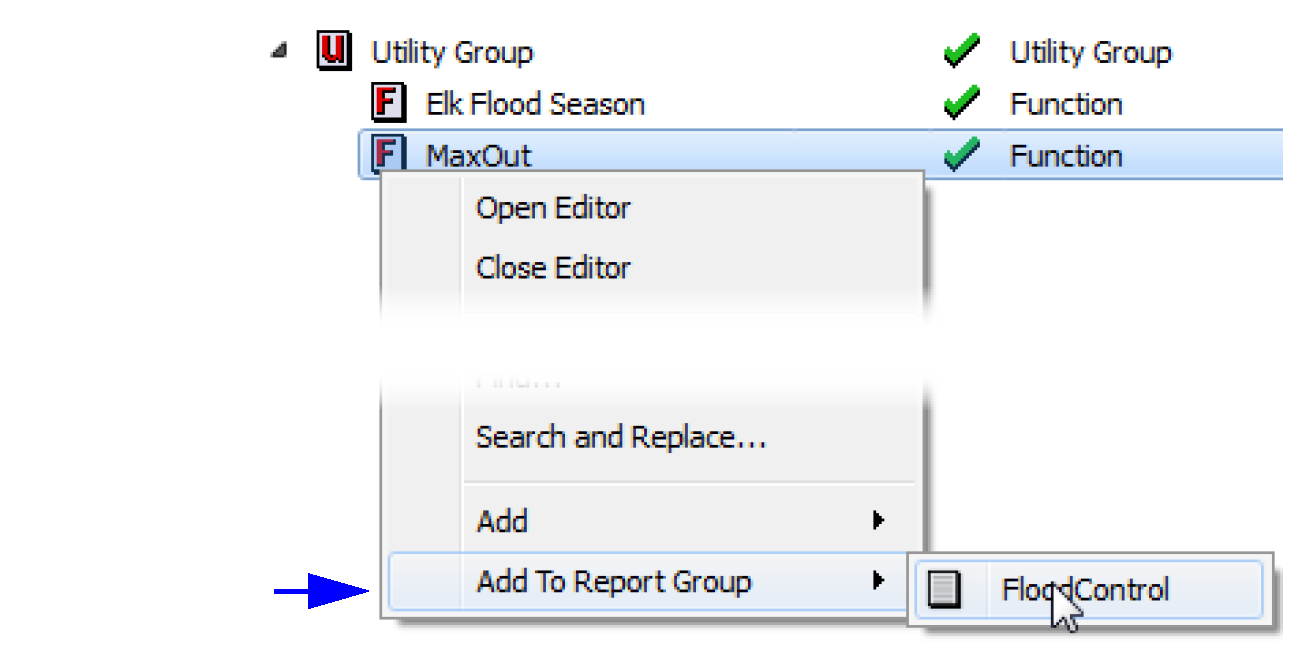
You can also right-click any RPL item (rule, function, etc), and choose Add to Report Group and select an existing Report Group. This will append the selected RPL item to the Report Group, as shown in Figure 2.8.
See Report Layout Area in Output Utilities and Data Visualization for details on including a Report Group in a model report.
Figure 2.8
Change Priorities
Blocks and functions may be rearranged in a set. By changing the relative priority of blocks, the order of firing, success of slot assignments, and order of dispatching is altered. Changing of priorities is often used to evaluate the effectiveness of different operational policies. Rearranging blocks and functions in a set is simple. To move a block in the list, select its icon and drag the block to the new desired location within the set. If you place it on another block, it will append after that block. Then, simply release the mouse button to drop the block in its new location. A dialog will ask you to confirm that you wish to complete the move. Select OK to confirm the move. All other blocks will be shifted to comply with the new priority structure. There is no need to reload a loaded set when rearranging blocks. Moving a block or a function is done in an identical manner. Predefined functions cannot be moved.
Delete Groups, Blocks and Functions
Groups, blocks and functions are deleted from a RPL set by highlighting them and selecting Edit, then Delete. Deleting a policy or utility group deletes the contents of the group as well. A confirmation dialog is shown.
Open and Close Policy, Utility, and Report Groups
Policy and utility groups which contain at least one block or function can be opened in a separate window by double-clicking their  ,
,  , or
, or  icon or highlighting them and selecting Set, then Open Editor They may also be expanded within the RPL Set Editor window by selecting the white tree-view triangle to the left of their icon or selecting View, then Expand. An expanded policy or utility group can be collapsed by selecting the white tree-view triangle again or selecting View, then Collapse.
, , or icon or highlighting them and selecting Set, then Open Editor They may also be expanded within the RPL Set Editor window by selecting the white tree-view triangle to the left of their icon or selecting View, then Expand. An expanded policy or utility group can be collapsed by selecting the white tree-view triangle again or selecting View, then Collapse.Open and Close Rules, Functions, Methods, Goals, and Report Items
Blocks and functions are opened in a RPL Viewer by double-clicking the icon or highlighting the item and selecting Set, then Open Editor. An opened block or function in the RPL Viewer may be closed by selecting red X on the tab or by selecting File, then Close Window from an individual RPL Editor.
Copy and Paste Groups, Blocks, and Functions
Groups, blocks and functions may be copied and pasted within a set or between open sets. An item is copied into memory by highlighting it and selecting Edit, then Copy. An item in memory is pasted just below any highlighted item in a RPL set by selecting Edit, then Append. An item may also be copied and pasted just below the item by selecting Edit, then Duplicate. Copy/Paste/Duplicate is only available within a single model; you cannot copy/paste items from RPL sets that are opened in separate instances of RiverWare. See Exporting and Importing RPL Sets for details on Import and Export to perform this task.
Note: A copied group/block/function can be pasted (or dragged and dropped) as a text representation into any text editor such as a word processor (Word), text editor (notepad), or email program (thunderbird). This includes all information about that group, block, function including the logic, description, active state, etc.
Exporting and Importing Groups and Blocks
In addition to copy and paste operations, it is also possible to export and import all or part of a RPL set. This is useful to share user-defined functions between two RPL sets. Using the export and import utility, you can share groups, blocks, and functions amongst these sets. See Exporting and Importing RPL Sets for details on the dialogs.
Validity
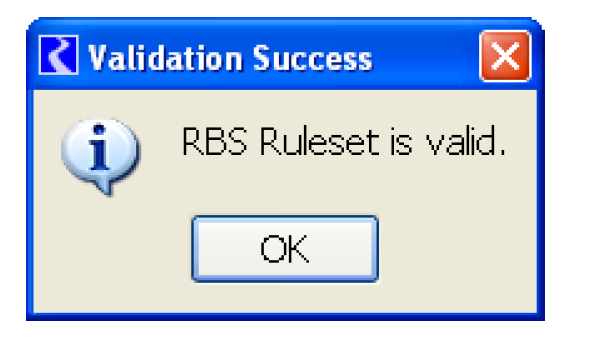
Before loading a newly built set into a model (or running with one of the other types of sets), the validity of the set must be checked. This can be done manually or is automatically done at run start. Manually validating a RPL set, however, allows you to perform these checks without having to bring up the Run Control dialog, start the run, and stop the run or wait for it to finish. Validating a RPL set checks for unspecified expressions, illegal object and slot names, conflicting expression types, and syntax errors. It does not check the consistency of unit types in mathematical expressions. Unit consistency is done while the block is evaluated during the run.
• To check the entire set, in the RPL Set Editor, select Set, then Check Validity.
• To check a single block or user defined function, select Block, then Check Validity.
If the block or set is valid, a confirmation window appears. Select OK and continue. Otherwise, a validation error dialog appears and the diagnostic window posts the location of the invalid expression. You then must fix the block.
Revised: 08/04/2020